Conquer Your Clogged Washing Machine Drain: A DIY Guide to Easy Drainage
Stuck with a flooded laundry room? Learn safe, step-by-step DIY methods to clear your washing machine drain hose or standpipe clog. Save money and avoid plumber calls with these pro tips!
Your washing machine relies on a clear path for water to escape. Over time, lint, hair, soap scum, fabric softener residue, or even small items forgotten in pockets build up inside the drain hose or the standpipe it empties into. This creates a blockage, leaving water trapped in the tub after a cycle. It's messy, inconvenient, and can lead to odors or machine damage if ignored. We get it – it feels like a major setback, but it's often a straightforward fix!
That dreaded moment when your washing machine finishes its cycle, but the tub is still full of murky water. You feel the frustration bubbling up – another chore derailed! Before panic sets in, take a breath. A clogged washing machine drain is one of the most common (and usually fixable) home headaches. This guide will walk you through clearing it safely, restoring your laundry flow, and giving you the confidence to tackle it yourself.
Tools Needed
- Adjustable Wrench or Pliers: For loosening hose clamps.
- Old Towels & Bucket: For catching spilled water (expect some!).
- Flashlight: To see clearly behind the washer and into pipes.
- Plunger (Cup Plunger, NOT toilet flange): For initial suction attempts on the standpipe.
- Drain Snake/Zipper (Handheld, 1/4 inch): For physically breaking up deep clogs.
- Long Bottle Brush or Zip Tie: Alternative for hose cleaning.
- Screwdriver (Phillips/Flathead): If needed for access panels.
Materials Needed
- White Vinegar (1-2 cups): For natural cleaning/flushing.
- Hot Water (Kettle or very hot tap): Helps dissolve grease/soap scum.
- Rubber Gloves (Heavy-duty): Protect hands from dirty water and debris.
- Safety Glasses: Protect eyes from splashes during cleaning.
Solution (Beginner - 30-60 minutes (depending on clog severity))
Step 1: Safety First & Prepare Your Space
Unplug the washing machine! Water and electricity are dangerous. Pull the machine away from the wall carefully. Lay down old towels. Grab your bucket, gloves, and glasses. Check if your machine has a drain hose filter (often behind a small access panel near the bottom front) – consult your manual. If found, place the bucket underneath before opening it.
⚠️ Warning: NEVER attempt any work with the machine plugged in. Water spills are likely; protect floors and yourself.
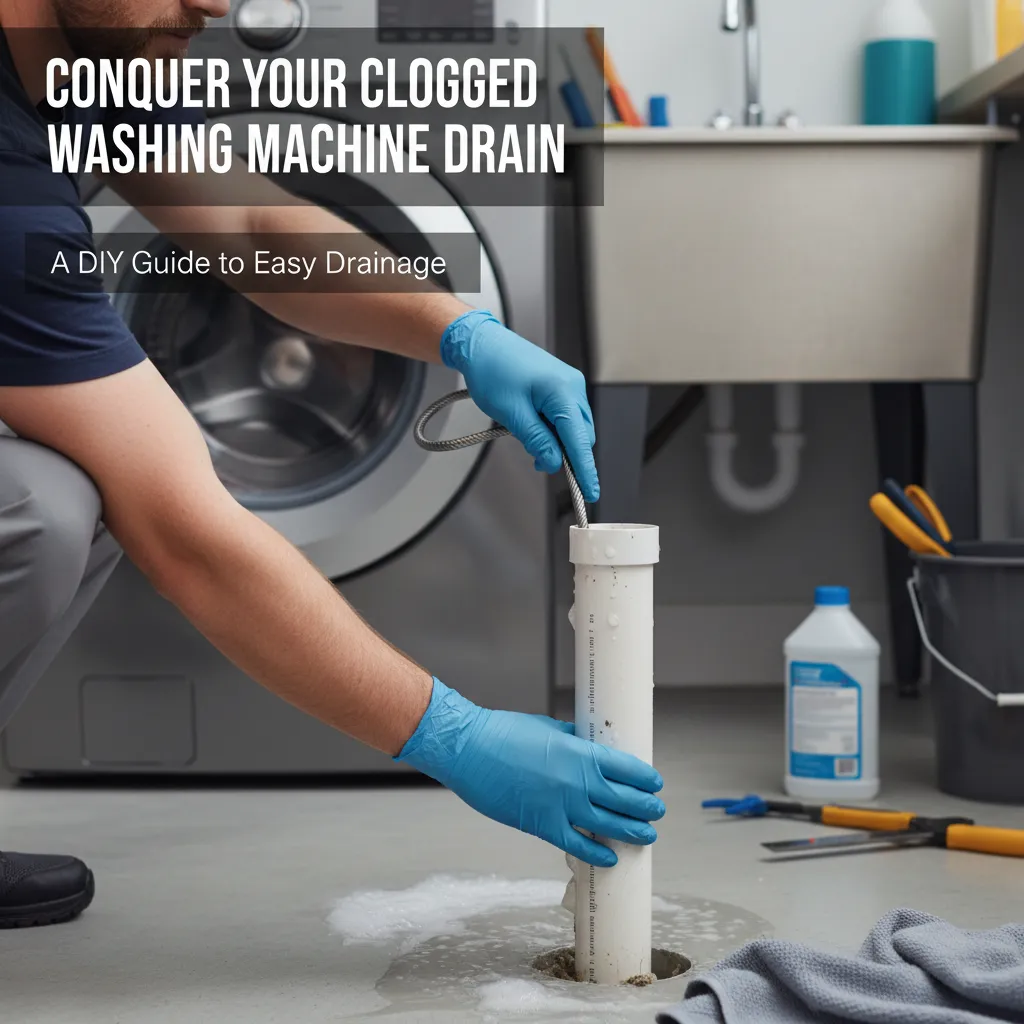
Step 2: Check & Clear the Drain Hose
Locate the flexible drain hose at the back of the washer. Loosen the clamp securing it to the standpipe or drain box using your wrench/pliers. Carefully pull the hose down into your bucket to drain excess water. Inspect the hose end for obvious gunk. Straighten it out. Use your bottle brush, zip tie, or gently feed the drain snake into the hose. Flush thoroughly with hot water. Feel for kinks or bends restricting flow – ensure a smooth path.
⚠️ Warning: Avoid forcing the snake aggressively; you could puncture the hose. Don't use chemical drain cleaners – they can damage rubber hoses.
Step 3: Tackle the Standpipe/Drain Box
Shine your flashlight into the open standpipe (the pipe sticking out of the wall/floor). Remove any visible debris near the top. Pour 1-2 cups of white vinegar down the pipe. Let it sit for 5-10 minutes to break down scum. Carefully insert the drain snake down the standpipe, feeding it slowly until you feel resistance. Gently crank or push/pull to break up the clog. Follow with a kettle of very hot (not boiling) water to flush. Try plunging the standpipe opening firmly several times (ensure a good seal with the plunger cup).
⚠️ Warning: Don't pour boiling water down PVC pipes – it can warp them. Avoid excessive plunging force on older pipes.
Step 4: Reconnect & Test Run
Securely reattach the drain hose to the standpipe, ensuring the clamp is tight and the hose forms a high loop (secured with a clip or hook) before descending into the pipe – this prevents 'siphoning' dirty water back into the machine. Double-check for kinks. Plug the washer back in. Run a short 'Drain & Spin' cycle or a quick rinse cycle with just water. Watch carefully to see if it drains completely and listen for normal operation.
⚠️ Warning: Ensure the drain hose is inserted correctly into the standpipe (usually 6-18 inches deep, not forced too far down).
Pro Tips
- The 'High Loop': Always maintain the drain hose high point – it's crucial for preventing backflow and future clogs.
- Monthly Maintenance Flush: Pour 1 cup vinegar followed by a kettle of hot water down the standpipe monthly to prevent buildup.
- Lint Trap Hack: Place a mesh lint trap (like a hair catcher) over the standpipe opening under the hose for easy debris collection.
- Snake Smart: If the snake gets stuck, gently reverse direction; don't just pull hard.
- Check the Pump Filter: If Step 4 fails, your machine's internal pump filter is the likely culprit (consult your manual for location/access).
When to Call a Professional
Call a plumber if: Water backs up into other drains (sinks/tubs), indicating a main line clog. The clog is deep in the wall/floor and your snake can't reach it. You suspect a damaged pipe. The internal pump filter is clogged and inaccessible/too complex for you. You smell sewer gas persistently. You're uncomfortable with any step after reading this guide – safety first!
Understanding the Problem in Detail
Think of your drain system as arteries for your laundry wastewater. The drain hose carries water from the machine. It connects to a standpipe (usually 1.5-2 inches wide) that leads to your home's main drain. Over weeks/months, tiny fibers (lint), hair, soap residue (especially liquid detergents and fabric softeners), and minerals in hard water stick to the pipe walls, gradually narrowing the passage. Eventually, water flow slows or stops completely. Front-loaders can also develop mold/mildew scum contributing to clogs.
Tools and Materials Guide
Adjustable Wrench/Pliers: Essential for hose clamps. A small pair is usually sufficient. Bucket & Towels: Big enough for a few gallons. Thick towels work best. Flashlight: LED headlamps are ideal for hands-free work. Plunger: MUST be a cup plunger (flat bottom), not a flange plunger. Drain Snake: A simple handheld 1/4-inch auger is perfect (found at hardware stores for $10-$20). Bottle Brush/Zip Tie: A long, narrow brush or a sturdy zip tie with the end smoothed can work for hose cleaning. Vinegar: Cheap, effective, and safe on pipes. Hot Water: As hot as your tap gets is fine; avoid actual boiling near PVC. Gloves/Glasses: Nitrile or rubber gloves; basic safety glasses. Alternatives: A wet/dry vac can sometimes suck out shallow clogs (use the hose attachment sealed over the standpipe).
Safety Considerations
Electricity is the #1 Hazard: ALWAYS unplug before touching hoses or moving the machine. Wet Floors: Spills are inevitable. Work slowly, use lots of towels, and clean up spills immediately to prevent slips. Lifting: Washers are heavy. Push/pull carefully, don't jerk. Get help if needed. Biohazards: Drain water is dirty. Wear gloves, avoid contact with skin/eyes, wash hands thoroughly. Pipe Damage: Don't force tools aggressively. Avoid harsh chemicals that eat pipes/hoses. Hot Water: Handle kettles/pots with care.
Troubleshooting Common Issues
Still Not Draining After Steps: 1. Did you check/re-clean the internal pump filter? (Major culprit!). 2. Is the drain hose kinked? Trace its entire path. 3. Is the standpipe itself clogged deeper? Try snaking further or plunging again. 4. Is the drain hose inserted too far into the standpipe? It can create a seal against the pipe wall. Pull it out slightly. 5. Is the washer's drain pump faulty? (Less common, usually makes noise). Gurgling Sounds: Often means air trapped due to a partial clog – keep cleaning/flushing. Slow Drain: Partial clog or lint trap needing emptying. Sewer Smell: Could indicate a dry P-trap (pour water down nearby floor drains) or a vent stack issue (call a pro).
Maintenance and Prevention
Monthly Flush: 1 cup vinegar + hot water down standpipe. Lint Trap: Use a removable mesh trap over the standpipe; clean weekly. Clean Pump Filter: Follow your manual's schedule (often every 1-3 months). Mind Detergents: Use HE detergent as directed; avoid excessive fabric softener. Pre-Treat Stains: Reduces dirt load. Check Pockets: Remove tissues, coins, etc., before washing. High Loop: Religiously maintain the drain hose high point.
Cost Analysis: DIY vs Professional
DIY Cost: Basic tools (snake, plunger, wrench): $20-$40 (often one-time buys). Vinegar/Hot Water: Negligible. Total DIY: ~$0-$40. Plumber Cost: Service call fee + labor: $150-$300+ on average. Savings: $110-$260+ per clog avoided! Investing in basic tools pays off quickly. Prevention costs pennies.
Related Plumbing Problems
Clogged Internal Pump Filter: Causes identical symptoms; requires accessing a panel on your machine. Slow Draining Sinks/Tubs: Could indicate a shared branch drain or main sewer line clog. Washing Machine Leaks: Could be from loose hoses, damaged pump, or overflows due to clogs. Foul Odors: From stagnant water in clogs or dry P-traps. Error Codes: Machines often display codes (like F21, OE, UE) for drain issues.
Frequently Asked Questions
Can I use chemical drain cleaner in my washing machine drain?
Strongly NOT recommended. Chemical drain cleaners are highly corrosive and can: 1) Damage the rubber drain hose, causing leaks. 2) Harm plastic pipes (PVC/ABS) if left sitting. 3) Potentially splash back and damage the washing machine pump or seals. 4) Pose safety risks during use. Stick to mechanical methods (snake, plunger) or natural solutions (vinegar + hot water).
My washer is in a tight closet/basement. How do I access the drain?
This is common! 1) Safety First: Unplug. 2) Slide Carefully: Use furniture sliders or cardboard under the feet to gently slide the machine out just enough to access the back. You might only need 12-18 inches. 3) Work Methodically: Have your bucket/towels ready. Use a flashlight. Be extra cautious reconnecting the hose in tight spaces. If it's truly impossible to access safely, that's a valid reason to call a professional plumber.
The water drains but VERY slowly. Is this the same fix?
Absolutely! A slow drain is simply an early-stage clog. Follow the same steps to clear the hose and standpipe. It's often easier to fix before it becomes a complete blockage. Pay extra attention to lint traps and consider a vinegar flush more frequently.
I found standing water in the drain pan under my washer. Is this related?
Possibly. The pan catches leaks. If the drain clog caused the washer tub to overflow, it could leak into the pan. However, water in the pan could also indicate a leak from a hose, the pump, the tub seal (front-loader), or a faulty water inlet valve. Investigate the source once the immediate drain clog is cleared.
How deep should the drain hose go into the standpipe?
Typically 6 to 18 inches deep is sufficient. The key is that the hose end should not be pushed all the way down to the bottom of the standpipe or submerged in standing water below the P-trap, as this can cause siphoning. Ensure the hose is secured so it doesn't slip down too far.