Fix Your Toilet Water Level in 15 Minutes: A DIY Guide for Homeowners
Struggling with a weak flush or constantly running toilet? Learn how to safely adjust your toilet water level with simple tools. Save money and gain confidence with our step-by-step guide!
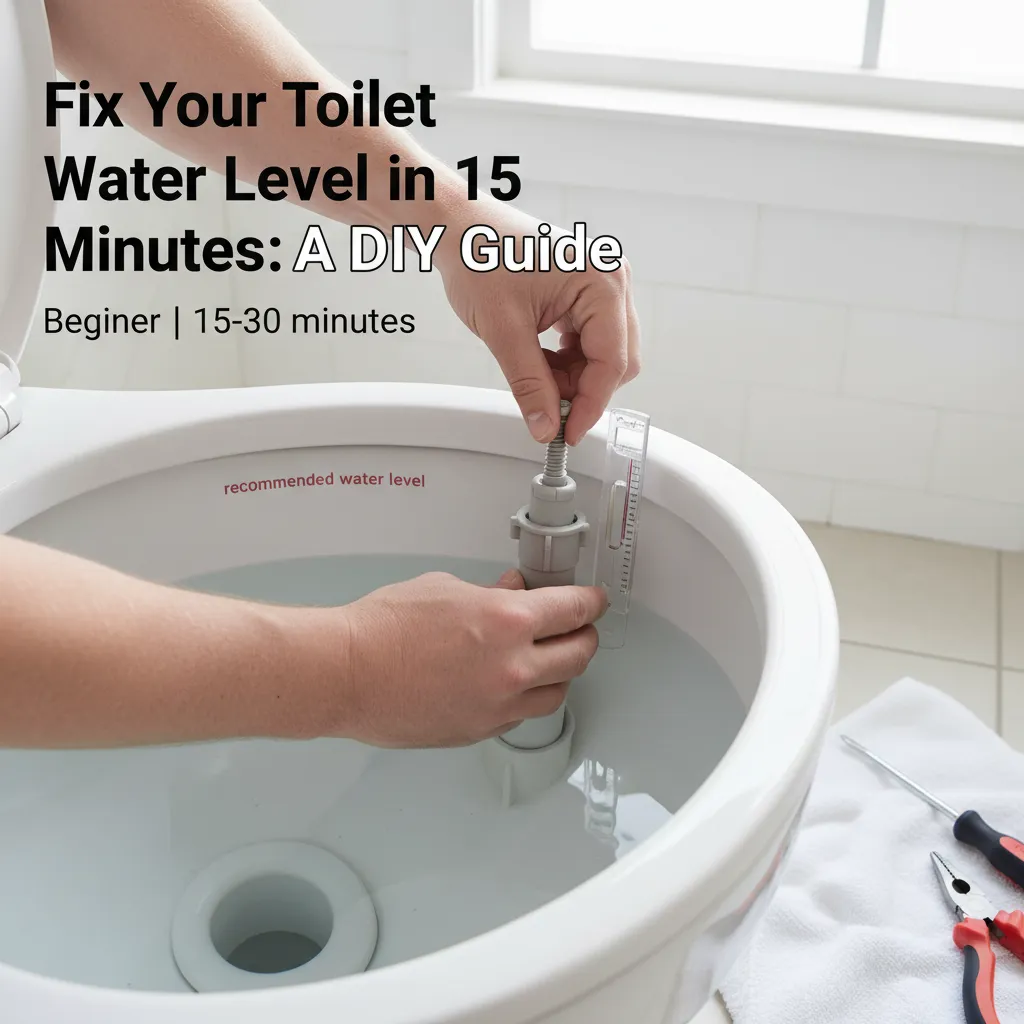
Your toilet's water level should sit 1/2" below the overflow tube. When it's too low, you get weak flushes; too high, and water constantly drains into the tube. This usually happens because the float mechanism (that plastic ball or cylinder) gets misaligned, mineral buildup jams components, or parts wear out after years of use. The good news? 90% of fixes require zero new parts!
Hear that annoying trickling sound? See water pooling around the base or barely covering the bowl after flushing? We've all been there. A misadjusted toilet water level wastes 200+ gallons monthly and causes endless frustration. But breathe easy – in most cases, you can fix this in one coffee break without calling a plumber. I've helped thousands of homeowners tackle this, and I'll guide you through every step.
Tools Needed
- Adjustable wrench (for supply line connections)
- Screwdriver (flathead or Phillips, depending on your fill valve)
- Sponge and bucket (to remove residual water)
- Vinegar-soaked cloth (for cleaning mineral deposits)
Materials Needed
- Toilet fill valve replacement kit (like Fluidmaster 400A, only if needed)
- Plumber's grease (tiny dab for rubber seals)
- White vinegar (for cleaning)
Solution (Beginner - 15-30 minutes)
Step 1: Shut Off Water & Empty the Tank
Turn the valve behind the toilet clockwise until tight. Flush and hold the handle down to drain tank water. Soak up remaining water with a sponge. Pro tip: Place towels around the base to catch spills!
⚠️ Warning: Never skip turning off water – a sudden valve failure could flood your bathroom!
Step 2: Identify Your Fill Valve Type
Look inside the tank: Ball float (classic round ball on metal arm)? Cup float (cylinder sliding on vertical tube)? Or newer floatless valve? Take a phone photo for reference. This determines adjustment method.
Step 3: Adjust the Float Mechanism
For ball floats: Bend the brass arm gently downward to lower water level, upward to raise it. For cup floats: Pinch the spring clip and slide the cup up/down the tube. Test after each small adjustment!
⚠️ Warning: Use gentle pressure – plastic parts crack easily if forced.
Step 4: Check the Refill Tube
Ensure the small flexible tube from the fill valve is securely clipped above the overflow pipe (not shoved inside!). If detached, water won’t refill properly. Trim to 1/4" length if frayed.
Step 5: Test & Fine-Tune
Slowly turn water back on. Let tank fill completely. Mark water level with pencil. Flush and verify new level sits 1/2" below overflow pipe. Adjust again if needed. Listen for silence after filling!
⚠️ Warning: Watch for leaks at supply line connections – tighten slightly if dripping.
Pro Tips
- Clean mineral deposits on the fill valve seal with vinegar – often restores perfect function!
- If water keeps running, lift the float manually. If it stops, you just need adjustment – not replacement.
- Always make small adjustments – 1/4" float movement changes water level dramatically.
- Upgrade to a universal Fluidmaster valve ($12) if yours is over 10 years old – it’s simpler and more reliable.
When to Call a Professional
Call a plumber if: 1) Water leaks from tank bolts or cracks, 2) Adjustments don’t stop running water, 3) You see water pooling under the toilet (wax ring failure), or 4) You’re uncomfortable with water supply connections. Most pros charge $150-$300 for this fix.
Understanding the Problem in Detail
Your toilet has a simple feedback system: The fill valve opens when water drops, then shuts off when the float rises to the set level. Low water? Usually a float set too low or mineral-clogged valve. High water? Float set too high or sediment preventing shutoff. Think of it like a thermostat for water!
Tools and Materials Guide
Adjustable wrenches ($8-15 at hardware stores) prevent rounded nuts. Fluidmaster valves fit 95% of toilets and come with clear instructions. Skip ‘universal’ flappers – they often cause new leaks. Use food-grade silicone grease ($5) on seals.
Safety Considerations
- Turn off water FIRST 2) Don’t overtighten plastic nuts – hand-tight plus 1/4 turn max 3) Wear safety glasses when reaching into tanks 4) Never use open flames near flammable cleaning products.
Troubleshooting Common Issues
Water still running? Check chain isn’t tangled. Level inconsistent? Clean valve seal with vinegar. Gurgling sounds? Vent stack issue (call pro). Weak flush after fix? Adjust flapper chain slack to 1/4" play.
Maintenance and Prevention
Pour 1 cup vinegar into overflow tube monthly to dissolve minerals. Check float movement annually. Replace fill valves every 10 years. Listen for filling sounds – catch problems early!
Cost Analysis: DIY vs Professional
DIY: $0 (adjustment) or $12-20 (new valve kit). Pro repair: $150-$300. Left unfixed, high water levels waste 200-500 gallons monthly ($15-$40 on water bills).
Related Plumbing Problems
Running toilets, weak flushes, phantom flushing (leaky flapper), toilet overflow, leaking tank bolts, cracked overflow tubes. All often relate to water level issues!
Frequently Asked Questions
Why does my toilet water level keep dropping overnight?
This usually indicates a leaking flapper valve. Test by adding food coloring to the tank. If color appears in the bowl after 15 mins without flushing, replace the flapper ($5 part).
Can I just bend the float arm more if adjustments don’t work?
Excessive bending can crack old plastic. If adjustments fail, mineral buildup is likely jamming the valve. Try cleaning with vinegar first. If still stuck, replace the valve – modern kits are easier to adjust.
My water level is correct but the toilet still runs intermittently?
This ‘phantom flush’ means water is slowly leaking past the flapper. Check chain slack (shouldn’t pull flapper open) or replace the flapper. Mineral deposits on the valve seat are another common culprit.