Stop That Drip! How to Replace Your Shower Valve Stem Like a Pro
Frustrated by a leaky shower or stiff handle? Learn exactly how to safely replace a shower valve stem yourself. Save money & water with this step-by-step DIY guide for homeowners.
That leak driving you crazy? The shower handle that's either stuck or spins too freely? You're not alone. Years of turning, mineral buildup, and worn rubber washers or O-rings inside the valve stem eventually lead to failure. Water sneaks past the seals (causing drips) or the mechanism binds (making the handle hard to turn). It feels like your shower is rebelling against you. The good news? The core fix – replacing that little stem inside – is manageable. We understand the worry about making it worse or causing a flood. This guide is designed to eliminate that fear and give you the know-how to succeed.
That constant drip... drip... drip from your shower isn't just annoying – it's wasting water and money! Or maybe turning the handle feels like wrestling a bear. Chances are, the culprit is a worn-out shower valve stem. Before you panic or call an expensive plumber, take a deep breath. Replacing a valve stem is a very achievable DIY project, and we've got you covered. This guide will walk you through the process safely and confidently, turning frustration into a satisfying repair. No magic required, just clear instructions!
Tools Needed
- Adjustable Wrench: For loosening/tightening nuts.
- Screwdrivers (Flathead & Phillips): For handle/trim screws and potentially the stem screw.
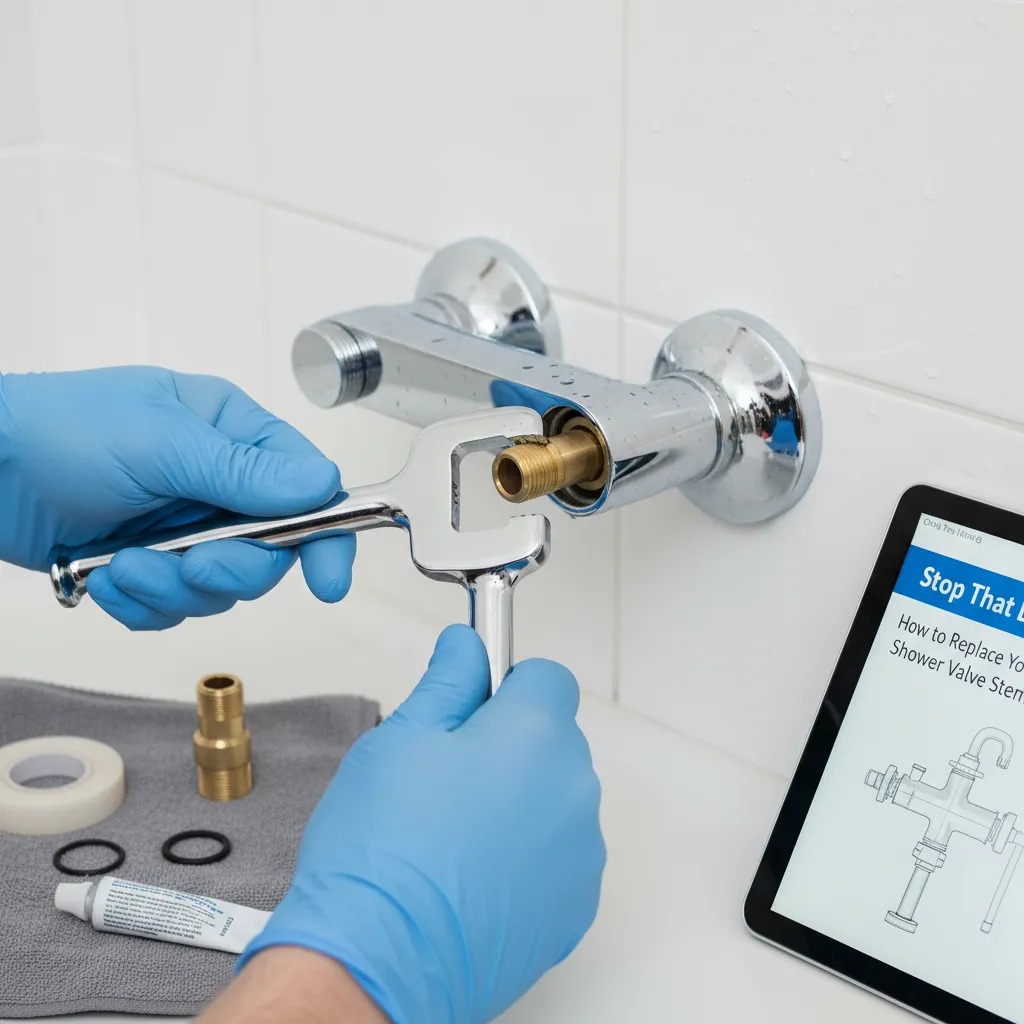
- Valve Stem Socket or Deep Socket Set: CRITICAL! A special deep socket designed to fit over the stem body and engage the flats. Standard sockets usually won't fit. Size depends on your valve (common: 3/8", 1/2").
- Allen Wrenches (Hex Keys): If your handle uses set screws.
- Needle-Nose Pliers: For removing small parts like retaining clips or screws.
- Channel Locks (Optional): Helpful for stubborn trim nuts, use gently with cloth to avoid scratches.
- Flashlight/Headlamp: Essential for seeing inside the dark valve cavity.
- Rag/Towel: For drying and protecting surfaces.
- Penetrating Oil (e.g., PB Blaster): For soaking stubborn stems before starting work.
Materials Needed
- Replacement Valve Stem: MUST match your brand and model (e.g., Moen 1225, Delta RP19804). Take the old one to the store!
- Seat Wrench & Replacement Seats (Highly Recommended): The worn seat often damages the new stem. Seats are cheap insurance.
- Replacement Springs (If Applicable): Often sold with seats/kits, or included with some stems.
- Plumber's Grease (Silicone or NSF-PG): For lubricating new stem threads/o-rings and the handle splines.
- Pipe Thread Sealant (Teflon Tape or Pipe Dope): Only needed if removing/replacing the shower arm or other threaded connections (not usually for the stem itself).
- Replacement Washers/O-rings (Optional but Wise): If your stem kit includes them or the old ones look damaged.
- Cloth or Painter's Tape: To protect the shower finish from tools.
Solution (Intermediate - 1 - 2 hours (depending on accessibility and stubbornness of old parts))
Step 1: Kill the Water & Prep Your Battlefield
Locate your home's main water shutoff valve and turn it OFF. Open the shower faucet and a sink faucet downstairs to drain the lines and relieve pressure. Remove the shower handle: Look for a small screw (often hidden under a decorative cap - pry it off gently) on the front, side, or back. Unscrew it and gently pull the handle straight off the stem. Remove the escutcheon plate/trim: Unscrew or unclip the decorative cover plate to expose the valve body and stem retaining nut. Lay down a towel in the tub/shower base to catch parts and protect the surface. Cover nearby fixtures with cloth/tape to prevent scratches.
⚠️ Warning: FAILURE TO TURN OFF THE MAIN WATER SUPPLY WILL RESULT IN SIGNIFICANT WATER DAMAGE. Double-check it's off before proceeding!
Step 2: Remove the Old Valve Stem
Locate the large hexagonal retaining nut holding the stem into the valve body. Carefully fit the valve stem socket or deep socket over the stem body and onto this nut. Turn the socket COUNTER-CLOCKWISE (lefty-loosey) with your wrench. It might be snug! If it's stuck, don't force it. Apply penetrating oil around the nut/stem threads and wait 10-15 mins, then try again with steady pressure. Once loose, unscrew the nut completely by hand. Firmly grasp the stem itself (not just the handle splines) and pull it straight out of the valve body. If it resists, gently rock it back and forth while pulling. Avoid twisting excessively.
⚠️ Warning: Excessive force can break the valve body inside the wall, leading to a major repair. If it won't budge after soaking and gentle rocking, STOP. This is when to call a pro.
Step 3: Inspect, Clean & Replace Seats/Springs
Shine your flashlight deep into the valve body hole where the stem came out. You'll see a small, flat, threaded opening – that's the seat. Insert your seat wrench firmly into the seat and turn it COUNTER-CLOCKWISE to remove it. Inspect both the seat and the matching hole in the valve body for cracks, deep gouges, or heavy corrosion. Replace the seat with a new identical one, applying a tiny dab of plumber's grease to its threads. Screw it in CLOCKWISE (righty-tighty) with the seat wrench until snug – DO NOT OVERTIGHTEN. Often, a small spring sits behind the seat; replace this too if it's damaged or you have a new one. Clean any debris from the valve cavity with a rag.
⚠️ Warning: Skipping the seat replacement is the #1 reason new stems fail quickly! A worn seat will chew up the new stem's washer.
Step 4: Lube & Install the New Valve Stem
Take your NEW stem out of the package. Apply a generous amount of plumber's grease to all the threads, the O-rings/washers on the stem body, and the splines where the handle attaches. DO NOT use regular grease or oil – it must be plumber's grease. Carefully insert the stem straight into the valve body, aligning the splines with the handle position (usually pointing straight out for 'off'). Push it firmly in until it seats fully. Hand-thread the large retaining nut back onto the stem body CLOCKWISE. Once hand-tight, use your socket and wrench to snug it down firmly. Avoid overtightening – just secure it enough to prevent leaks.
⚠️ Warning: Forcing the stem or cross-threading the nut can ruin the new stem or valve body. Ensure it's aligned correctly before tightening.
Step 5: Reassemble, Test & Celebrate!
Slide the escutcheon plate/trim back into place and secure it with its screws or clips. Apply a tiny dab of grease to the handle splines. Slide the handle back onto the stem splines, ensuring it's oriented correctly for Hot/Cold and Off positions. Secure it with its screw (don't overtighten!) and replace any decorative cap. Turn the main water supply back ON SLOWLY. Listen for leaks and check around the stem area and below. Turn the shower on and off several times, checking for smooth operation and ZERO drips from the spout or around the stem. If all is dry and smooth, you've succeeded!
⚠️ Warning: Turn the main water back on slowly to avoid water hammer. Check carefully for leaks before closing up walls (if applicable). A small drip means re-checking the nut tightness or stem seating.
Pro Tips
- Take photos with your phone at each disassembly step. It's your best reference for reassembly!
- Wrap the jaws of your Channel Locks or wrench with electrical tape to minimize scratches on chrome trim.
- Stuck retaining nut? Tap the side of the socket (not the stem!) gently with a hammer while applying counter-clockwise pressure to shock it loose.
- Can't find the exact stem? Take the OLD one (even if broken) to a specialized plumbing supply store – they are identification experts.
- Apply penetrating oil the night before on suspected tough nuts for maximum effect.
When to Call a Professional
Call a licensed plumber if: The stem is completely frozen and won't budge after soaking and gentle effort; You discover significant corrosion or cracks in the valve body itself; You have extremely limited access behind the shower (e.g., no access panel, tiled wall); You encounter unexpected leaks after reassembly that you can't resolve; You feel unsafe or unsure at any point. It's cheaper to call a pro than to fix major water damage or a broken valve inside the wall.
Understanding the Problem in Detail
Think of the valve stem as the 'tap handle' inside your wall. When you turn your shower handle, it rotates the stem. This pushes a rubber washer (compression) or moves ceramic discs (cartridge-style, though stems are often used in older compression valves) against a fixed 'seat'. Over time, the washer wears down or hardens, the seat gets grooved, or mineral buildup jams things up. This lets water sneak through (drip) or makes movement difficult. Replacing the stem and its seat resets this critical seal.
Tools and Materials Guide
Valve Stem Socket: Non-negotiable. Standard sockets are too shallow. Brands like Danco make universal kits. Measure your stem's flats or take the old nut to the store. Seat Wrench: A small, inexpensive L-shaped tool with specific tips. Kits cover common sizes. Plumber's Grease: MUST be silicone-based or NSF-PG rated for potable water. Never use WD-40 or motor oil! Finding Parts: Big box stores have common stems (Moen, Delta, Pfister). For obscure brands or exact matches, visit a plumbing supply house (Ferguson, Hajoca, local independents) – bring the old stem! Alternatives: In a pinch, a deep well socket might work if it perfectly fits the stem flats, but the special socket is best.
Safety Considerations
Water Off is Paramount: Verify NO water flows from any faucet after shutting off the main. Open the lowest faucet in the house to drain. Protect Fixtures: Cover tub/shower surfaces and nearby fixtures to prevent scratches from tools. Avoid Force: If something won't budge, stop. Apply penetrating oil and wait. Forcing brass or plastic parts breaks them. Eye Protection: Wear safety glasses when loosening stubborn nuts or using penetrating oil. Electrical: Be mindful of light fixtures near the shower. Ladder Safety: Use a stable step stool if needed. Know Your Limits: If accessing the valve requires cutting tile or drywall, reassess DIY feasibility.
Troubleshooting Common Issues
Stem Won't Come Out: Did you remove the retaining nut completely? Is it catching on corrosion? Soak longer in penetrating oil, gently rock (don't twist hard), ensure nut is fully off. New Stem Leaks Immediately: Did you replace the seat? Is the retaining nut tight enough? Did you grease the O-rings? Is the stem pushed fully in before tightening the nut? Handle Still Hard to Turn: Did you grease the stem splines? Is the new stem the correct model? Is there hidden debris in the valve body? Leak Behind the Wall: Major cause: Overtightening the retaining nut cracked the valve body. Requires professional repair. Drip Returns Quickly: Almost always a worn seat not replaced, or incorrect/damaged stem.
Maintenance and Prevention
Operate Gently: Don't crank the handle hard. Turn it just enough to stop the water. Occasional Exercise: Turn the valve on/off fully every few weeks if unused to prevent seizing. Water Softener: If you have hard water, a softener drastically reduces scale buildup that damages stems and seats. Annual Check: During other bathroom maintenance, quickly remove the handle and trim, check for minor leaks or grit, apply a tiny bit of fresh grease to the stem splines.
Cost Analysis: DIY vs Professional
DIY Cost: Replacement Stem: $10 - $30. Seat & Spring Kit: $5 - $10. Plumber's Grease: $5. Penetrating Oil: $7. Total Potential: $15 - $50. Professional Cost: Plumber service call + labor (1-2 hours) + parts: $150 - $400+ depending on location and difficulty. Savings: DIY saves $100 - $350+ on average. Smart Spending: Invest in the correct socket and quality plumber's grease. Buying the matching seat kit is cheaper than a callback.
Related Plumbing Problems
Leaky Shower Head: Often just needs new washers or cleaning. Diverter Valve Issues: Trouble switching between tub spout and showerhead? Needs diverter stem/service. Low Water Pressure: Could be clogged aerator (showerhead), supply line issues, or failing pressure balancing unit (different from stem). Temperature Fluctuations: Points to a failing pressure-balancing cartridge (often integrated with modern stems/cartridges) or anti-scald valve. Frozen Faucet Handles: Similar stem issues, but access might be easier. General Tub/Shower Faucet Repair: The principles are similar for tub faucets using stems.
Frequently Asked Questions
How do I know what brand/model my shower valve is to buy the right stem?
Look for a brand name (Moen, Delta, Kohler, Pfister, etc.) on the handle, trim plate, or showerhead. If not visible, carefully remove the handle and trim. The stem itself often has a number stamped on its backside (the part inside the wall). Take photos and the old stem to a plumbing supply store – they are experts at identification.
My stem is completely stuck and won't pull out! What now?
First, double-check the retaining nut is fully removed. Apply more penetrating oil liberally around the base where the stem enters the valve body. Let it soak for 30+ minutes, even hours. Try gently rocking the stem back-and-forth (not twisting) while pulling firmly. If it still won't budge, STOP. Forcing it risks breaking the valve body. This is the point to call a professional plumber who has specialized tools and experience extracting frozen stems.
Do I really need to replace the seat and spring too?
ABSOLUTELY YES, if you want your repair to last. Think of the seat and stem washer as a pair. A worn, grooved seat acts like sandpaper on the new washer in your stem. It will wear out incredibly fast, leading to another drip within weeks or months. The small springs help maintain proper pressure on the washer. Kits are cheap and it takes only an extra minute – it's the best insurance for a long-lasting fix.
Water is leaking from around the base of the stem after I put it back together. What did I do wrong?
This usually means the large retaining nut isn't tight enough, or the O-rings on the stem body weren't lubricated or are damaged. Turn off the water again. Carefully tighten the retaining nut a little more – snug, not super tight. If it still leaks, disassemble, inspect the O-rings for nicks or tears (replace if needed), apply fresh plumber's grease liberally to them, and reassemble, ensuring the stem is fully seated before tightening the nut.
Can I use Teflon tape on the valve stem threads?
NO! Teflon tape or pipe dope should NOT be used on the threads of the valve stem itself or the retaining nut. These threads are designed to seal via metal-to-metal contact and the compression of the O-rings/washers against the valve body. Adding tape can prevent the stem from seating properly, damage O-rings, or cause the nut to crack the valve body when overtightened. Use PLUMBER'S GREASE on the stem threads and O-rings only.