
Most faucet handle leaks come down to a worn rubber seal you can replace for the price of a coffee. One homeowner reported fixing theirs for $2 in parts and walking away feeling like a wizard — and that's the realistic outcome for most of these jobs 5. This guide walks you through finding where the drip is really coming from, the simple fix that solves it, and the few moments when handing it to a pro is the smarter call.
Identifying the Problem: Faucet Leaking from the Handle
You turn the faucet off, but drips keep sneaking out from under the handle. It’s frustrating, and you can almost hear your water bill ticking up. When water escapes around the handle instead of from the spout, it’s a sign that the seal around the stem is failing. Take a deep breath — with a little know-how and some basic tools, you’ll get it fixed.
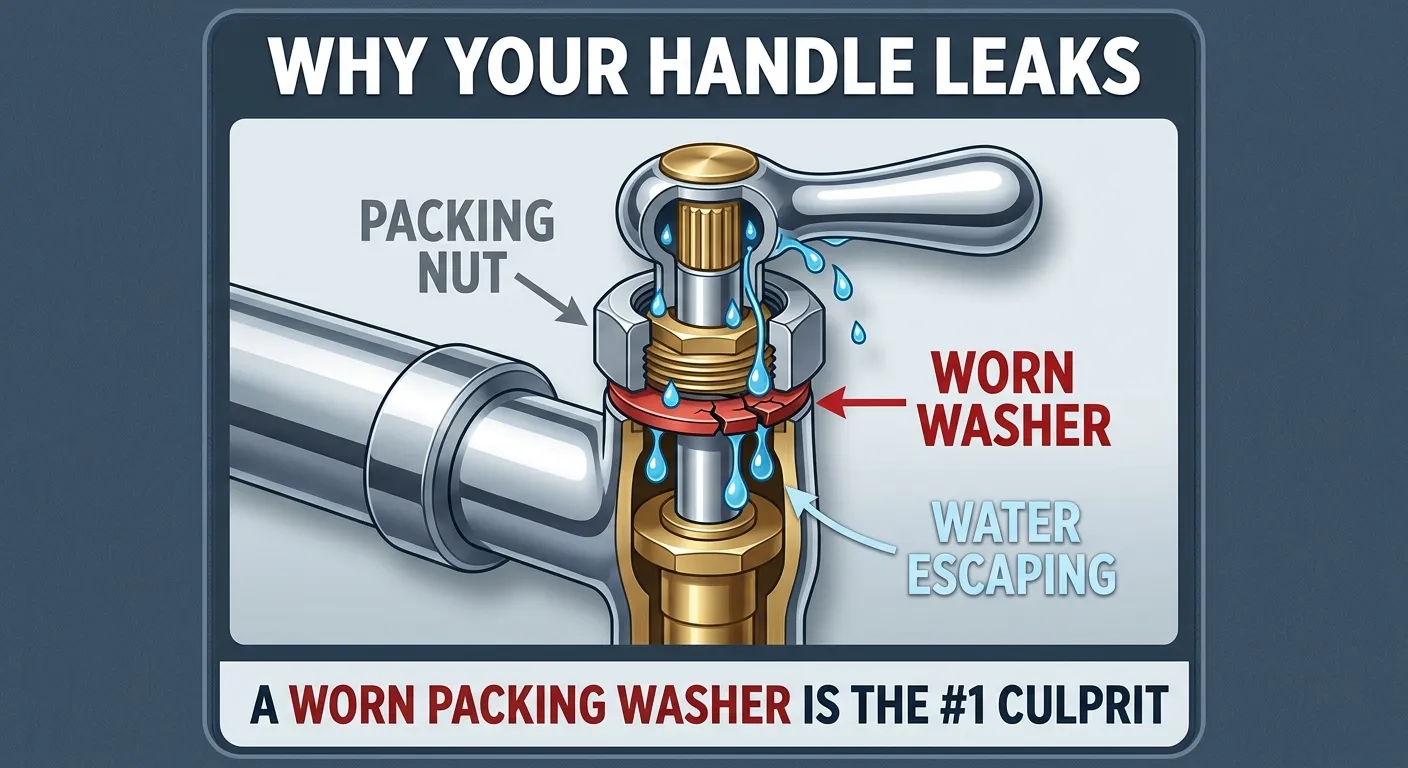
The most common culprit is worn stem packing or a dried-out O-ring, especially on older compression-style faucets. Working plumbers note that on classics like the Barnes 420, a handle leak when the faucet is off almost always points to a worn packing washer or O-ring on the stem 1. You might also feel the handle become stiff or hard to turn as the rubber compresses and loses its give — that’s another clue you’re dealing with packing that’s seen better days. Ignoring it can lead to deeper damage inside the fixture, but once you’ve identified the source, you’re already halfway to a simple fix.
Causes of Faucet Handle Leaks
You’ve shut the faucet off, but water keeps trickling out around the handle — it’s annoying, and it’s wasting water. The good news is that most handle leaks trace back to a handful of worn internal parts you can identify without tearing the whole fixture apart.
A. Worn-out or Damaged O-rings: Common Culprits for Leaks
O-rings are small rubber or silicone seals that sit around the valve stem. With regular use and mineral buildup, they harden, crack, or lose their spring. Once that happens, they can’t maintain a tight seal, and water seeps out right at the handle.
B. Loose or Deteriorated Packing Nut: A Potential Source of Leakage
The packing nut holds the valve stem in place and compresses the packing material or washer beneath it. Over time, it can work itself loose or the threads can corrode, letting water escape around the stem. A quick snug with a wrench is sometimes all it takes — but if the nut is pitted or the packing washer underneath is shot, you’ll need to replace it.
C. Corroded Valve Seat: Understanding Its Impact on Handle Leaks
The valve seat is where the faucet stem meets the body of the faucet, and it’s a magnet for mineral deposits. Corrosion here prevents the stem assembly from sealing fully, so water finds its way up and out the handle instead of staying contained.
D. Faulty Cartridge or Valve Stem: Identifying and Addressing the Issue
In cartridge-style or modern stem faucets, a cracked cartridge or a scored valve stem can be the root cause. These parts control water flow, and once they develop wear or hairline fractures, they’ll leak from the handle even when the faucet is fully off.
E. Outdoor Hose Bibs: A Different Animal
If you’re dealing with an outdoor hose faucet, don’t assume the handle leak is the same as an indoor sink. On hose bibs, a leak from the handle when the water is turned off often points to a failed vacuum breaker, not the handle seal itself. The vacuum breaker is designed to spray water when backpressure occurs — it’s a safety feature, not a defect. One homeowner replaced the vacuum breaker on an outdoor faucet but the handle still leaked; experienced plumbers clarified that if water is coming from the handle, you likely need to repack the stem or replace the washer inside the bib 2. So before you chase the wrong part, check whether the spray is from the vacuum breaker or truly from around the stem.
Step-by-Step Guide to Fixing a Faucet Leaking from the Handle
A. Gather the Essential Tools for the Repair
You don’t need a plumbing apprenticeship for this — you just need the right gear within arm’s reach before you start. Pull together an adjustable wrench, a flathead and a Phillips screwdriver, a pair of pliers, and a small kit of replacement parts (O-rings, packing washers, and a spare packing nut if you have one). Setting it all on the counter beforehand beats running to the hardware store mid-repair with the water shut off.
B. Shut Off the Water Supply: A Crucial Precautionary Step
Before you touch a single nut, kill the water. Reach under the sink, turn both shut-off valves clockwise until they stop, then open the faucet to bleed off the pressure that’s still trapped in the line. If the under-sink valves are stuck or missing, shut off the main supply to the house instead. Skip this step and the moment you crack the packing nut, you’ve got a small fountain on your hands.
C. Disassembling the Faucet Handle: Accessing the Problematic Components
With the water supply shut off, begin the disassembly process by removing any decorative caps or covers on the handle. To access the handle screw on many modern faucets, look for a small cap or button on top of the handle 3. Experienced plumbers often point out a "wee cap right beside the rod" that conceals the set screw—a common design across many faucet brands 3. You can gently pry this cap off with a flathead screwdriver. This will expose the handle screw, which you can then unscrew using the appropriate screwdriver. Carefully remove the handle, taking note of the arrangement of parts as you disassemble them.
D. Inspecting and Replacing Faulty O-rings, Packing Nut, Valve Seat, or Cartridge
With the handle off, you can finally see what’s been causing the trouble. Unscrew the packing nut and pull out the packing washer or O-ring sitting underneath 1. Working plumbers describe the process simply: pop the stem out, identify the worn washer or O-ring, take it to a hardware store to match against new ones, and reassemble — total parts cost is usually under a dollar 1. Look over the O-rings, packing nut, valve seat, and cartridge for wear, cracks, or corrosion while you’re in there. Replace anything that looks faulty with parts that match the original size and spec — bringing the old part to the store is the surest way to walk out with the right replacement on the first try.
E. Reassembling the Faucet Handle: Ensuring Proper Alignment and Tightness
Putting it all back together is just disassembly in reverse, but pay attention as you go. Drop each part into its slot in the right order, line everything up cleanly, and snug the hardware down by hand first. Finish with the wrench, but stop the moment things feel firm — over-tightening cracks washers, splits cartridges, and strips brass threads, and you’ll end up right back where you started.
F. Testing for Leaks: Ensuring a Successful Repair
With the handle back on, slowly open the shut-off valves under the sink and turn the faucet on. Watch the base of the handle as the water flows. No drip? You’re done — go enjoy the quiet. Still seeing moisture sneak out? Cut the water again, pull the handle, and double-check that the new O-ring is seated flat in its groove and the packing nut is snug but not cranked.
When to Call a Professional
You’ve shut off the water, pulled the handle, and swapped the packing washer, but water still seeps out around the stem when you turn the tap on. That’s the moment when a satisfying Saturday project starts feeling like a trap. Take a deep breath — most handle leaks are simple, but a few situations genuinely call for a licensed plumber’s hands and eyes.
If you notice water damage on the ceiling or wall below the faucet, stop right there. A leak that’s traveled beyond the sink basin means the valve body or supply connection may have cracked inside the wall, and opening things up without knowing what’s behind the tile can turn a $2 fix into a four-figure repair. Similarly, if the faucet is so corroded that the packing nut won’t budge even after applying penetrating oil and gentle heat, forcing it can snap the stem or crack the valve body — and then you’re replacing the whole fixture, possibly with drywall work involved.
Older homes with original galvanized plumbing add another layer of risk. If you see rust flakes in the water or the shutoff valve under the sink won’t fully close, you’re working on a system where one stuck fitting can cascade into a whole-house repipe. A pro can isolate the line and handle brittle pipes without causing a flood. And if you’ve already replaced the packing, O-ring, and cartridge and the handle still leaks, the valve seat itself may be scored — a repair that requires a seat wrench and the judgment to know when the faucet body is too far gone to save.
⚠️ Warning: If the leak is coming from inside the wall or ceiling cavity, do not ignore it. Hidden water can rot framing, feed mold, and damage electrical wiring long before you see a stain on the drywall.
Still leaking after you’ve tried everything? One homeowner reported that a persistent handle drip on a widespread bathroom faucet turned out to be a hairline crack in the valve body, invisible until the plumber pressure-tested the assembly on the bench. If you’ve ruled out the seals and the leak persists, you’re not failing — you’re up against a part that wasn’t designed to be field-repaired. In that case, calling a pro isn’t defeat; it’s the smart next step that protects your home.
Prevention and Maintenance Tips for Faucet Handle Leaks
A. Regular Inspection: Staying Ahead of Handle Leaks
You’ll catch most problems before they turn into a mess if you just look. Make it a habit to check every faucet in the house every few months—run it, shut it off, and watch the handle base for any seepage. Catching a tiny drip early means you’re swapping a fifty-cent O-ring instead of dealing with a rusted-out handle assembly later.
B. Proper Cleaning and Lubrication: Preventing Wear and Tear
Mineral buildup and grime act like sandpaper on your faucet’s internal seals. Wipe down the handles regularly with a soft cloth and a little vinegar if you have hard water. Once a year, pull the handle, clean the stem, and apply a thin coat of plumber’s grease to the O-rings and moving parts. That slick layer cuts friction and keeps the rubber from drying out and cracking, which is exactly what leads to those annoying handle-base leaks.
C. Prompt Repairs: Addressing Leaks in a Timely Manner
A small drip you ignore today is a corroded valve seat and a bigger bill tomorrow. Water that constantly seeps past a worn packing nut or O-ring accelerates wear on everything it touches. Fix it the week you notice it—you’ll save water, protect the faucet body, and keep a simple repair from snowballing into a full replacement.
D. Choosing Quality Fixtures and Knowing Your Warranty
The brand stamped on the box matters more than most people think. Experienced plumbers consistently point out that a reputable brand like Moen tends to hold up better and leak less often than entry-level store brands, though no manufacturer is perfect. If you’ve just installed a new Moen and the handle is already dripping, don’t assume you did something wrong—a faulty unit can slip through quality control, and it’s likely covered under warranty 4. Before you tear into a brand-new faucet, check the paperwork and give the manufacturer a call; you might get a free replacement cartridge instead of a weekend project.
E. Seeking Professional Assistance: Complex Repairs Handled with Expertise
Most handle leaks are a straightforward DIY fix, but if you’ve replaced the packing, the O-ring, and the cartridge and water still pushes out around the stem, the faucet body itself may be scored or cracked. That’s the point where a pro’s eye saves you hours of frustration. A skilled plumber can diagnose whether it’s a hidden defect, improper installation, or just a lemon, and get it sorted without you having to guess.
Conclusion:
You’ve just walked through the whole process, and now you know that a faucet leaking from the handle isn’t a mystery—it’s a fix you can handle. With basic tools and inexpensive parts, most homeowners can tackle this repair themselves, saving money and gaining confidence along the way 5. Take a deep breath: you’re not alone in this, and the satisfaction of a drip-free faucet is well within reach.
Understanding what causes the leak, following the step-by-step repair, and keeping up with simple preventive maintenance will keep your faucet working smoothly for years. Don’t let a small handle leak throw off your daily routine. You’ve got the know-how now, so grab your tools, apply what you’ve learned, and enjoy the quiet, reliable faucet you’ve earned. A little plumbing confidence goes a long way—happy repairing!
Tools Needed
You don't need a fully stocked plumbing truck to stop a handle leak. A handful of basics you probably already own, plus a couple of inexpensive parts, will get the job done. Grab these before you start so you're not making a mid-repair hardware store run with the water still shut off.
- Adjustable wrench — for loosening and tightening the packing nut without chewing up the brass.
- Flathead and Phillips screwdrivers — one to pop off the decorative handle cap, the other to remove the handle screw underneath.
- Needle-nose pliers — helpful for pulling out old O-rings or packing washers that have stuck in place.
- Replacement O-rings or packing washers — the actual fix; match the size to your faucet model or pick up an assorted kit.
- Plumber's grease — a thin smear on the new O-ring helps it seat smoothly and last longer.
- Penetrating oil — if the handle screw or packing nut is corroded, a quick spray saves you from stripping the head.
- Rag or small bucket — to catch the dribble of water that's still in the faucet body when you open it up.
⚠️ Warning: Before touching any nut or screw, shut off the water supply valves under the sink. Skipping this step turns a simple repair into an indoor fountain.
Materials Needed
You don't need a truck full of specialty tools for this job. Most of what you'll need is already sitting in your junk drawer or a basic toolbox, and the replacement parts are surprisingly cheap — we're talking pocket change. Take a deep breath; you've got this.
Here's what to gather before you shut off the water:
- Adjustable wrench — a 6-inch or 8-inch will handle most packing nuts without chewing up the brass.
- Flathead and Phillips screwdrivers — one of each, small to medium size, for prying off handle caps and removing the handle screw.
- Replacement packing washer or O-ring — this is the heart of the fix. Bring the old one to the hardware store to match the size exactly. Common sizes are 1/2" NPT brass packing washers or #6 to #10 O-rings, but faucets vary wildly.
- Plumber's grease — a small tub of silicone-based grease. Don't use petroleum jelly; it degrades rubber over time.
- Allen wrench set — some handles use a small hex screw instead of a Phillips, usually 1/8" or 3/32".
- Penetrating oil — if your faucet is older and the handle screw or packing nut is crusted with mineral deposits, a shot of WD-40 or PB Blaster ten minutes before you start saves knuckles.
- Clean rag or old towel — for wiping down parts and stuffing into the sink drain so nothing disappears down it.
- White vinegar and an old toothbrush — optional, but brilliant for dissolving hard-water crust on the stem threads before you reassemble.
If you're working on a widespread bathroom faucet or a kitchen model with a side sprayer, the handle assembly might also hide a small retaining clip or spring-loaded mechanism. Don't panic if yours looks different — the core principle is the same: get the handle off, pull the stem, and replace the worn seal.
Troubleshooting Common Issues
You’ve replaced the packing, put everything back together, and turned the water on — only to find a tiny bead of water still sneaking out around the handle stem. Take a deep breath. You’re not alone, and you almost certainly don’t need to call a plumber yet. Most “failed” repairs come down to one of a handful of small, fixable mistakes that experienced plumbers see all the time.
First, double-check the packing nut’s tightness. A nut that’s just a quarter-turn too loose will let water weep past the new washer. Gently snug it down with your wrench, but don’t crank on it — over-tightening can distort a fresh O-ring and make the leak worse. If the drip stops when you press down on the handle, the nut is almost certainly the culprit.
Still leaking? You might have the wrong size O-ring or packing washer. Even if the old part looked identical, a difference of a single millimeter in thickness or diameter will prevent a proper seal. Take the stem to a hardware store and match the replacement against the exact groove it sits in, not just the old part’s flattened dimensions.
Another common failure mode is a scored valve stem. If the metal stem has a groove worn into it where the packing rides, a new washer can’t compensate. Run your fingernail along the stem’s sealing surface — any roughness you can feel will channel water right past the seal. In that case, you’ll need to replace the entire stem or cartridge rather than just the soft parts.
Finally, on older compression faucets, a worn brass seat down inside the valve body can prevent the washer from sealing fully, and that back-pressure sometimes forces water up around the stem. A seat-dressing tool can resurface it in place, or you can unscrew and replace the seat entirely. If you’ve tried everything above and the handle still drips, that seat is the next place to look.
Cost Analysis: DIY vs Professional
When water’s seeping out around the handle every time you turn the tap, the first question that hits you is usually, “What’s this going to cost me?” You’re not alone — and the good news is that fixing a handle leak is one of the most affordable plumbing repairs you’ll ever tackle.
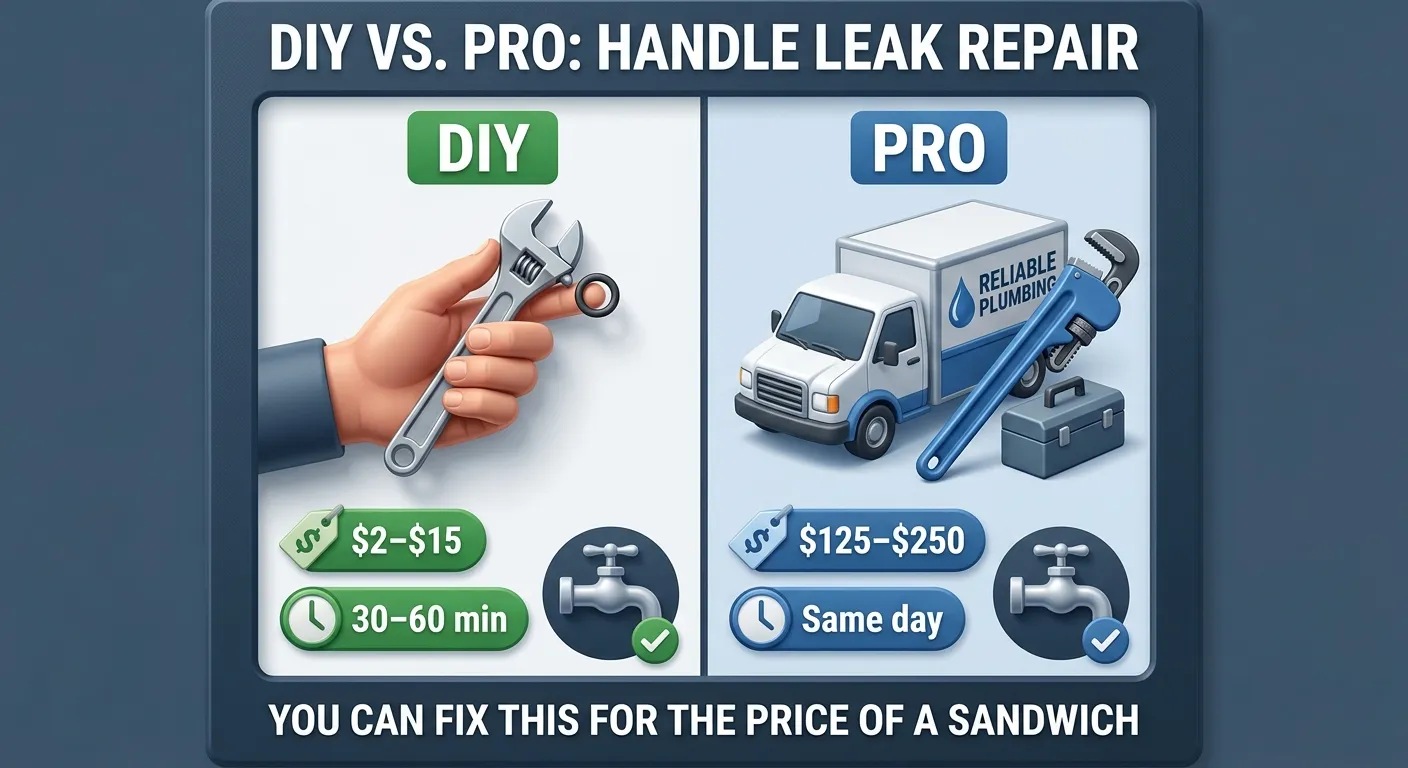
On the DIY side, you’re looking at roughly $2 to $15 in parts. The culprit is almost always a worn packing washer, an O-ring, or a cartridge seal, and most hardware stores sell these in inexpensive multi-packs. You’ll need a couple of basic tools you probably already own — an adjustable wrench, a screwdriver, and some plumber’s grease. Even if you have to buy a small tube of grease and a seat wrench, your total outlay rarely climbs past $25. The real investment is your time: expect to spend 30 minutes to an hour the first time you do it, and half that once you know the routine.
Calling a licensed plumber changes the math. A service call for a dripping handle typically runs between $125 and $250, depending on where you live and whether it’s an after-hours visit. The part itself is still a couple of bucks, but you’re paying for the drive time, the diagnostic know-how, and the guarantee that it’s done right. If the valve body is scored or the cartridge is proprietary and hard to find, a pro can source the correct replacement on the spot — something that can save you multiple trips to the store.
For most homeowners, the decision comes down to confidence. If you’re comfortable shutting off the water, popping off the handle cap, and swapping a rubber ring, you’ll pocket the savings and feel pretty good about it. If the faucet is old, corroded, or you’re just not in the mood to wrestle with stuck parts, the pro’s fee buys you speed and certainty. Either way, you’re not facing a four-figure bill — and that’s worth a deep breath.
Frequently Asked Questions
You’ve got the water shut off, the handle apart, and you’re staring at a stem wondering if you’re in over your head. Take a breath — most handle leaks come down to the same few questions, and the answers are simpler than you think.
“The leak is only a tiny drip. Can I just ignore it?” A slow drip from the handle might seem harmless, but it’s a sign that a seal has failed. Left alone, water can sneak down the stem and corrode internal parts, turning a $2 O-ring job into a full faucet replacement. You’ll also risk water damage inside the cabinet or wall. Fixing it early keeps the repair cheap and quick.
“I replaced the O-ring and it’s still leaking. What now?” If the handle still weeps after you’ve swapped the packing washer or O-ring, inspect the metal stem itself. Mineral buildup or a tiny scratch on the stem can tear a new seal within days. Polish the stem gently with fine steel wool or a scouring pad. If you feel a groove with your fingernail, the stem needs replacing — take the old one to the hardware store to match it.
“Do I really need to shut off the water under the sink?” Yes, every time. Even if the leak is only at the handle, the moment you loosen the packing nut, water pressure can spray out of the valve body. Close both shut-off valves under the sink, then open the faucet to drain the line. If the shut-offs are stuck or missing, shut off the main house valve instead. Skipping this step turns a five-minute fix into a flooded cabinet.
“My outdoor spigot is leaking from the handle — is this the same fix?” Not always. On outdoor hose bibs, a handle leak when the water is turned off often points to a failed vacuum breaker, not the handle packing. The vacuum breaker sits on top of the bib and can dribble water down the stem, mimicking a handle leak. Replace the vacuum breaker cap first — it’s a $5 part that unscrews by hand — before you dig into the handle assembly.
“How do I know which brand of cartridge or stem I have?” Shut the water off, pull the handle, and remove the retaining clip or nut holding the cartridge. The cartridge body usually has a brand name and part number stamped on the plastic or brass. Moen, Delta, and Kohler all have distinct shapes. Snap a photo with your phone and take the old part to a plumbing supply house — they’ll match it in seconds. If you can’t find a number, measure the length and count the splines on the stem.
“The handle screw is stripped or won’t budge — any tricks?” A stripped handle screw is frustrating but common. Try pressing a wide rubber band over the screw head and inserting your screwdriver through it for extra grip. If that fails, use a screw extractor bit in a drill. As a last resort, you can carefully drill out the screw head, remove the handle, and then back out the remaining shank with pliers. You’ll need a replacement screw, but those are standard at any hardware store.
Safety Considerations
You're standing at the sink with a wrench in one hand and a YouTube video in the other, and the last thing you want is to turn a $2 fix into a flooded kitchen. Take a deep breath — a little caution goes a long way here.
Before you touch a single screw, shut off the water supply to the faucet. You'll usually find the shutoff valves right underneath the sink. Turn them clockwise until they stop, then open the faucet to release any pressure trapped in the line. If the valves are stuck or missing, you'll need to shut off the main water supply to the house instead. Skipping this step means you're gambling with a geyser the moment you loosen the packing nut.
⚠️ Warning: Failing to shut off the water supply before disassembling the faucet can result in uncontrolled high-pressure spray, water damage, or scalding if the hot side is still live.
Cover the drain with a rag or a sink plug before you start. Small parts like screws, O-rings, and handle caps have a talent for disappearing down the drain the second they're free. You don't want to fish a cartridge clip out of the trap when you could be finishing the job.
Work slowly when prying off decorative caps or handle buttons. A flathead screwdriver can scratch chrome or chip porcelain if you're impatient. Wrap the tip in electrical tape or use a plastic trim tool to protect the finish. If the handle is stuck, apply penetrating oil and let it sit — brute force often snaps the stem before it frees the handle.
⚠️ Warning: Applying excessive force to a stuck faucet handle can crack the valve body or shear the stem, turning a simple seal replacement into a full faucet replacement.
Keep your workspace dry and your hands clean. Grease, soap residue, or water on the floor makes a slip more likely, and you're working with metal tools near porcelain and glass. A towel under your knees or a dry mat at your feet is cheap insurance.
Maintenance and Prevention
You’ve stopped the drip for now, but keeping it from coming back is mostly about a few small habits. You don’t need a maintenance schedule taped to the inside of the vanity door—just pay attention to how the handle feels when you use it. If it starts getting stiff or you have to crank it harder to shut the water off completely, the internal seals are wearing down. Catching that early means you’ll swap a fifty-cent O-ring instead of dealing with a corroded stem later.
When you do replace parts, take a minute to clean any mineral buildup off the stem and inside the packing nut with a little vinegar and a rag. A thin smear of silicone plumber’s grease on the new O-ring or packing washer helps it seat without twisting or pinching, and it’ll slide smoothly for years. Avoid petroleum jelly—it can swell some rubber compounds and make the leak worse.
If your water has a lot of sediment or you’re on a well, consider flushing the valve body briefly with the stem removed before reassembling. Just cup a rag over the opening and have someone turn the water on for a second. That blast clears grit that would otherwise chew up your fresh seals the first time you turn the handle.
Finally, don’t muscle the faucet closed. Once you feel the water stop, a light extra nudge is all it takes. Cranking down hard deforms the washer and shortens its life. A gentle touch keeps the repair holding longer, and your knuckles will thank you too.
Pro Tips
You’ve got the handle off and the old washer in your hand, but a few tricks can turn a frustrating afternoon into a 15-minute victory. Experienced plumbers lean on these habits to avoid callbacks, and you’ll want to steal every one of them.
Before you even reach for a wrench, snap a photo of the faucet’s internals with your phone. When the parts are spread across a towel and you’re staring at a stem that only goes back together one way, that picture is your cheat sheet. Next, wrap your wrench jaws with a layer of electrical tape or drape a soft rag over any finished trim. Chrome and brushed nickel scar easily, and a scratched handle collar will bug you every time you walk past the sink long after the drip is gone.
When you head to the hardware store, bring the old cartridge, O-ring, or packing washer with you. The bin labeled “universal” is lying to you, and matching the worn part side-by-side with the replacement avoids a second trip. While you’re there, grab a small container of plumber’s silicone grease—not petroleum jelly, which can degrade rubber over time. A thin smear on every new O-ring and seal lets the parts slide home without pinching or rolling, and it dramatically extends their life.
⚠️ Warning: Over-tightening the packing nut or handle screw is the fastest way to crack a plastic cartridge or strip brass threads. Snug it by hand, then give it just a quarter-turn more with the wrench. If it still weeps, the seal is likely misaligned, not loose.
Still getting a trickle after you’ve replaced the packing and reassembled everything? Don’t immediately crank down harder. Pull the stem back out and run your fingertip around the inside of the valve body. A tiny burr or a fleck of old rubber stuck on the seat will chew up a brand-new washer in days. Clean the seat with a cloth and, if you feel any roughness, use a seat-dressing tool to resurface it before reinstalling the stem.