How to Install a Backflow Preventer
Step 1: Know Your Code & Choose the Right Preventer
Call your local building department or water supplier and ask which type is required for your application — Hose Bibb Vacuum Breaker, Pressure Vacuum Breaker (PVB), or Double Check Valve Assembly (DCVA). The wrong device won't protect you and may fail inspection.
⚠️ Warning: Installing the wrong preventer or bypassing code can lead to fines, failed inspections, and most importantly, no actual protection. Skipping this step risks your family's health.
Step 2: Gather Everything & Shut Off the Water
Lay out all tools, materials, and the preventer, then turn off the water at the main shut-off or dedicated line valve. Open faucets at the highest and lowest points in the house to drain the lines and relieve pressure — keep them open while you work.
⚠️ Warning: Confirm water is off before cutting! A surprise blast of water under pressure is dangerous and damaging. Double-check with an open faucet downstream.
Step 3: Plan & Cut the Pipe (Measure Twice, Cut Once)
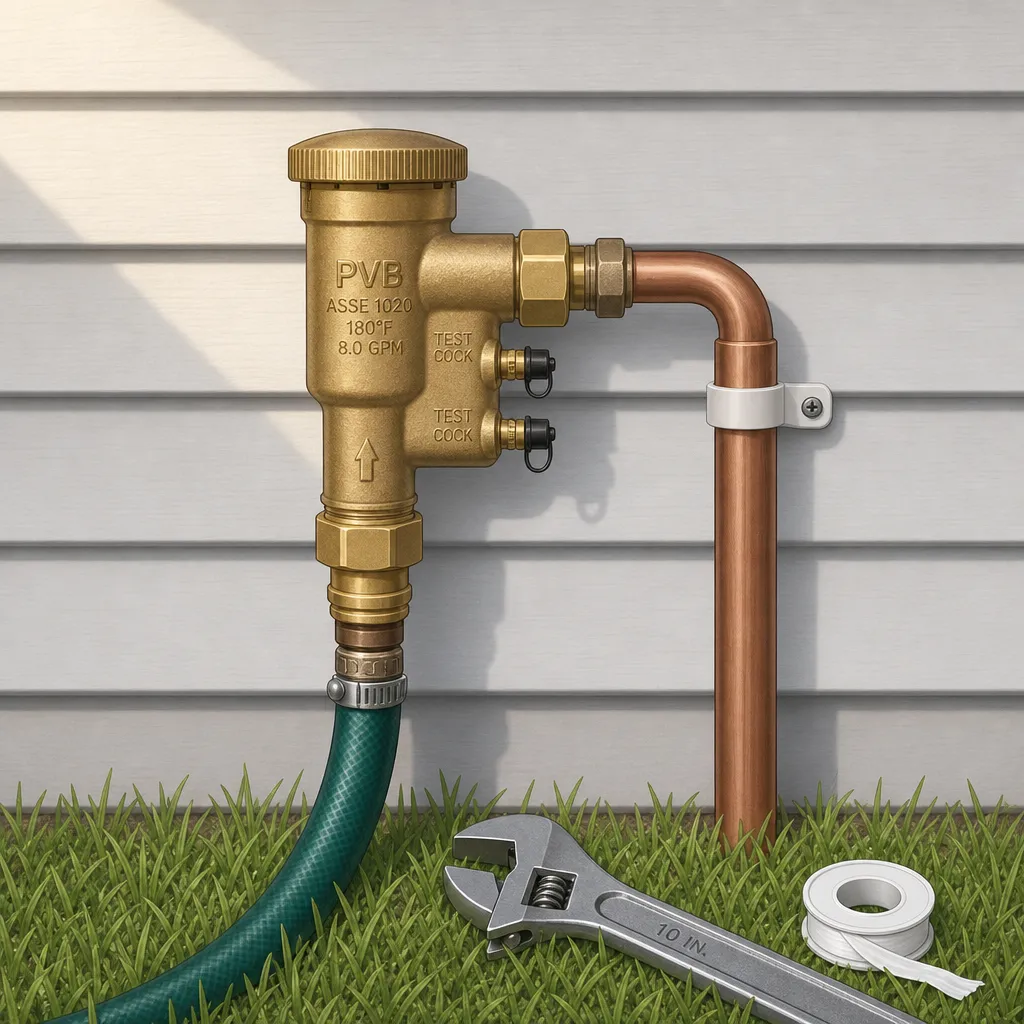
Hold the preventer in position with the flow arrow pointing away from the supply, measure the section to remove, and make clean square cuts with your pipe cutter or hacksaw. Deburr all cut ends inside and out before fitting anything.
If the installation point is on the main water line entering the house, call a licensed plumber — that job requires an RPZ device and main-line work.
Step 4: Dry Fit & Assemble with Care
Temporarily assemble everything without sealant to check alignment, then disassemble and apply Teflon tape clockwise 4–6 times to all male threads. Hand-tighten plus 1/4 to 1/2 turn — overtightening cracks fittings.
If your connection requires soldering copper, crimping PEX, or cementing CPVC and you haven't done it before, hire a licensed plumber for this step.
Step 5: Install the Preventer & Make Final Connections
Fit the preventer and fittings into the pipe gap and make your connections — threaded, soldered, crimped, or cemented. Make sure unions are accessible for future service.
If you need to solder and aren't comfortable with an open torch near walls or framing, call a licensed plumber for this step.
⚠️ Warning: If soldering, protect surrounding materials from flame! Have a fire extinguisher nearby. Never solder near flammable vapors.
Step 6: Slowly Turn Water On & Hunt for Leaks
Close the drain faucets, restore the water supply slowly, and inspect every joint for drips or seepage. Tighten threaded connections a quarter-turn at a time if needed; solder, crimp, or cement leaks require draining and redoing the joint.
If you can't stop a leak after two attempts, call a plumber — a persistent drip means something is wrong with the fitting.
Step 7: Test the Preventer Function (If Possible)
For hose bibb types, turn on the faucet and confirm water isn't leaking from the top vents. For PVBs, briefly open the test cocks — water should flow out then stop as the check valves close.
If the device fails this check, or your local code requires annual certified testing, call a licensed tester to commission it properly.
Pro Tips
- Install Unions: Putting unions on both sides of the preventer makes future removal for testing or replacement much easier.
- Support the Weight: Larger preventers (PVB, DCVA) are heavy. Use pipe straps or a support bracket to prevent stress on the pipes.
- Insulate Against Freezing: If installed in a potentially freezing location (garage, crawlspace), wrap the preventer with insulation. Most types can't freeze without cracking.
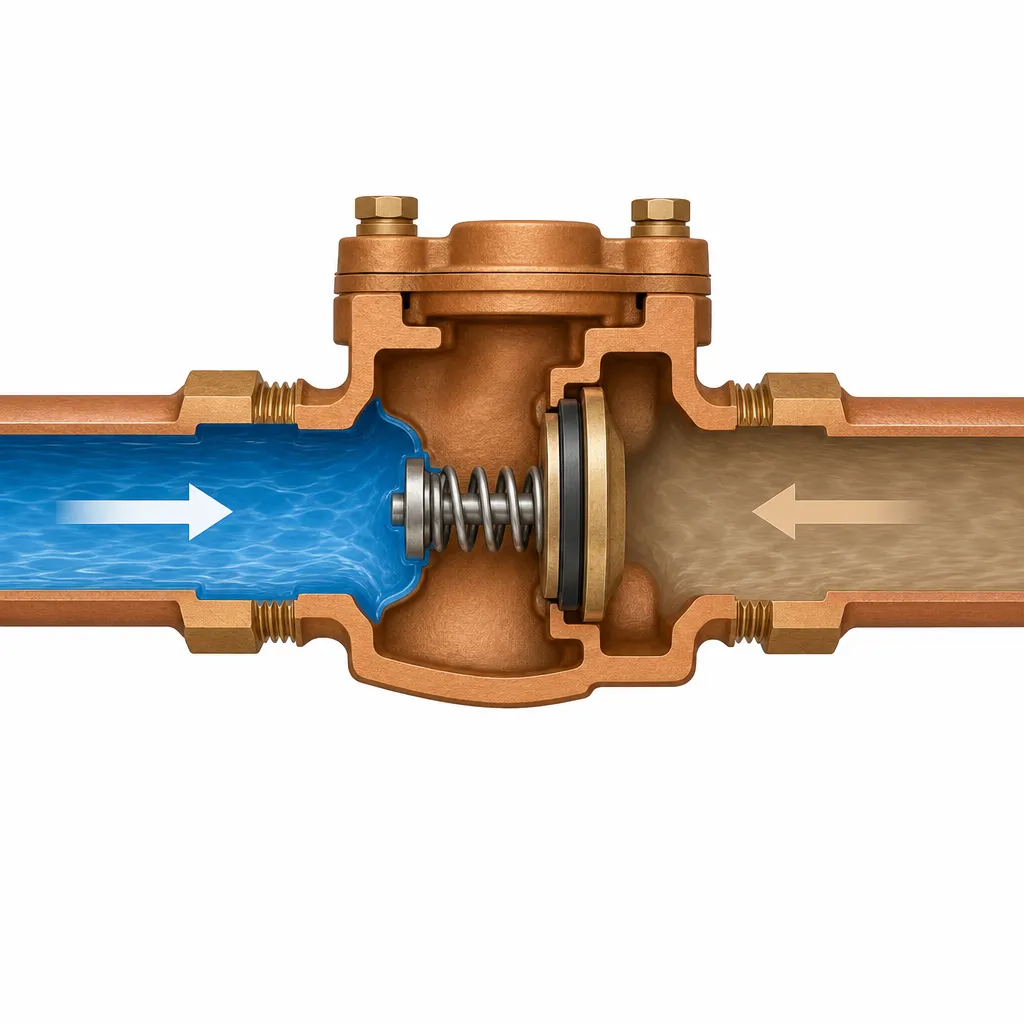
- Direction Matters: The flow arrow isn't optional — installing it backwards makes it useless.
- Teflon Tape Trick: Wrap tape clockwise (looking at the end of the male thread) so it doesn't unravel when you screw the fitting on.
- Photograph Before Disassembly: Helps immensely with reassembly, especially if the project spans a break.
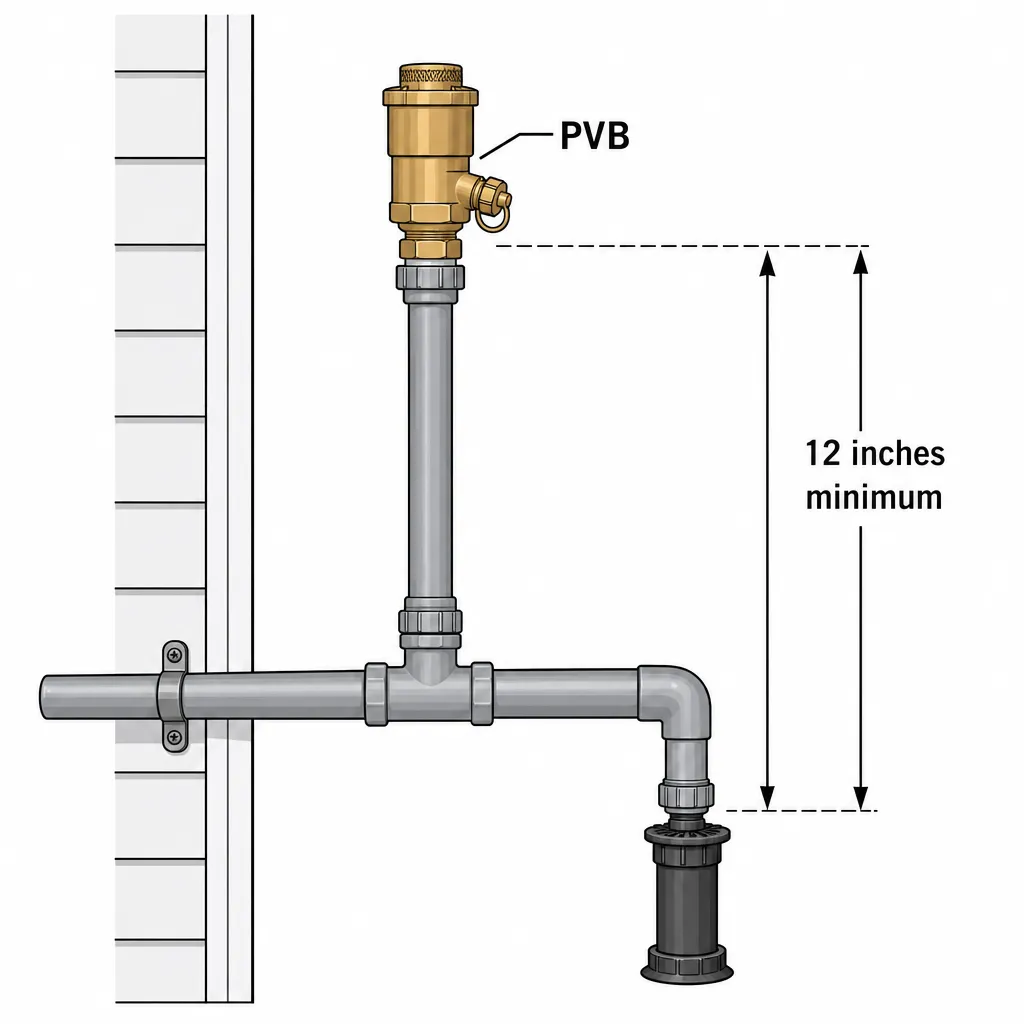
- PVB Height Requirement: A pressure vacuum breaker must be installed at least 12 inches above the highest downstream outlet — like the tallest sprinkler head or hose bib — to function correctly 1.
When to Call a Professional
Before you start, run a quick gut-check. If the preventer needs to go on the main water line entering the house, that's an RPZ job — call a licensed plumber. Same if your main shut-off valve is broken or leaking, or if you're dealing with galvanized, old lead, or a mix of pipe materials you're not comfortable joining. Local codes sometimes mandate professional installation outright, especially for whole-house devices — a quick call to your building department confirms whether that applies to you. And if the work involves soldering copper, crimping PEX, or cementing CPVC and you haven't done it before, hire a licensed plumber for that step.
Understanding the Problem in Detail
Backflow happens when water pressure reverses, sucking contaminated water from pools, hoses, sprinklers, or boilers back into your home's clean drinking water supply. That's a cross-connection, and it's dangerous. Experienced plumbers explain that backflow often occurs when a sudden pressure drop—like when a fire hydrant is flushed or a water main breaks—causes water to reverse flow, or from back-siphonage when a hose is submerged 2. In simpler terms: back-siphonage pulls water backward when supply pressure drops; back-pressure pushes it backward when downstream pressure is higher. A backflow preventer works as a one-way gatekeeper, using springs and check valves to block reverse flow.
If you're troubleshooting discolored or smelly water and suspect your irrigation system, it's unlikely to be the culprit unless you have a cross-connection with a secondary water source like a well 2.
Tools and Materials Guide
Quality adjustable wrenches (like Channellock) grip better than cheap ones. Tubing cutters give cleaner cuts than hacksaws on copper or PEX. A deburring tool is cheap but essential. For materials, the preventer type is non-negotiable—check your local code. Copper is durable but requires soldering. CPVC cements easily and is budget-friendly, though you'll want to check its temperature ratings. PEX is flexible and needs a crimping tool. Unions are worth every penny. Use lead-free brass fittings for drinking water lines. Buy from home centers or plumbing supply houses.
If you're starting from scratch, the job is more involved than just spinning on a pressure vacuum breaker. You'll likely need to tap into the house water line, drill a hole to the outside, run copper, install a shutoff, and then mount the backflow preventer 2. And if you're using a PVB, it must be installed at least 12 inches above the highest downstream outlet—that's code 1.
Safety Considerations
Before you pick up a wrench, let's talk about where you'll put the backflow preventer — because location mistakes can create hazards you can't see until it's too late. Under UPC Section 10.5.5, backflow preventers with atmospheric vents must not be installed in pits, vaults, or any spot that could flood 3. If the vent goes underwater, it can't do its job. You'll also need to keep the unit out of freezing areas unless you protect it with heat, insulation, or removable unions 7. A frozen preventer can crack and fail, leaving your water supply unprotected. If you're running exterior piping, IPC Chapter 3 requires burying it at least 6 inches below the frost line and at least 12 inches below grade 6. That depth keeps the line from freezing and shields it from surface damage.
Now for the hands-on safety basics. Always confirm the water is off and the pressure drained before you cut into any pipe. Metal and plastic shards fly when you cut — wear eye protection and gloves. If you're soldering, clear away anything flammable, use a flame shield like a piece of sheet metal, and keep a fire extinguisher within reach. Make sure the area is ventilated. CPVC primer, cement, and thread sealants are flammable and give off fumes, so use them in well-ventilated spaces and avoid sparks or open flame. Watch your body position too — don't twist into awkward angles that strain your back. And stay aware of any wiring near your work area so you don't accidentally nick a live line.
Troubleshooting Common Issues
Low water pressure after installing a backflow preventer is a common complaint, and it's often because the device is undersized or debris has gotten into the check valves 8. Hard water buildup can also restrict flow over time—one homeowner traced their pressure drop to mineral deposits inside the preventer 8. Start by checking that you installed the correct size for your pipe diameter and flow needs. If the sizing looks right, shut off the water, disassemble the preventer, and flush out any grit, sediment, or scale that might be blocking the valves. Make sure all valves are fully open before you test again.
Leaks at joints usually mean the connection isn't fully sealed. Tighten threaded joints carefully—just a quarter-turn at a time—so you don't crack the fitting. If it still drips, drain the line, take the joint apart, clean the threads, and reapply fresh thread sealant or tape before reassembling. For soldered, cemented, or crimped connections, a persistent leak means you'll need to cut out the joint and redo it.
If you installed a pressure vacuum breaker (PVB), it must sit at least 12 inches above the highest sprinkler head or hose bib it serves 5. When a PVB is mounted too low, it can't prevent backflow properly and may cause pressure problems. Check your installation height against the highest outlet on the line and raise the PVB if needed.
A preventer that drips or vents continuously usually has a faulty internal check valve or debris keeping it from sealing. In most cases, you'll need to replace the unit—internal parts aren't always serviceable. If you have no water flow at all, the most likely culprit is a backward installation. Look for the flow arrow on the body and make sure it points in the direction of water travel. A severe blockage could also be the cause, so inspect the inlet screen and internal passages if the arrow is correct.
Maintenance and Prevention
Most non-hose-bibb backflow preventers—like PVBs, DCVAs, and RPZs—legally require annual testing and certification by a licensed professional. Many municipalities mandate this, so skipping it can lead to fines or a shut-off notice 7. One homeowner reported paying $1,200 for city installation and ongoing maintenance, which shows how seriously local authorities take backflow compliance 7. Check your local codes, because your city might require annual inspections by a certified tester 7. Schedule your test before the deadline to stay ahead of any enforcement.
Between inspections, give your preventer a quick visual check every few months. Look for drips, corrosion, or anything that looks out of place. If you spot a leak, don't ignore it—even a small drip can signal a failing check valve or seal.
Freezing weather will destroy a backflow preventer if water is left inside. Before winter, drain the unit completely or wrap it with approved insulation. A cracked body from ice is a costly repair you can avoid with ten minutes of prep.
Hose-bibb vacuum breakers are the exception to the annual-testing rule. They're inexpensive and not designed to be rebuilt, so just replace them every few years or sooner if they leak or fail a simple test. It's cheap insurance against contaminated water siphoning back into your house.
Cost Analysis: DIY vs Professional
If you're weighing whether to tackle this yourself or call a pro, the numbers tell a clear story. DIY parts for a backflow preventer run $20 to $150 depending on the type—a simple hose bibb unit might cost $15, while a more complex pressure vacuum breaker (PVB) or double check valve assembly (DCVA) can push past $100 9. Fittings and pipe add another $10 to $50. If you already own basic tools or can borrow them, you're looking at a total DIY cost of roughly $25 to $250.
Professional installation, on the other hand, ranges from $135 to $1,100, with most homeowners paying around $350 9. That covers labor, the device itself, and any necessary permits or testing. The spread depends heavily on your location, the complexity of the job, and local labor rates.
But the initial install isn't the only expense. If your backflow preventer ever fails, repair costs typically run $100 to $700, while a full replacement can set you back $300 to $1,200 2. And don't forget annual testing: many jurisdictions require a certified tester to check your device each year, which adds $50 to $100 to your ongoing costs 10.
Before you commit to DIY, check your local codes. Some cities mandate that a licensed plumber handle the installation—one homeowner reported that their California city installed the backflow preventer for $1,200 and retains ownership of the device 11. Another noted that their water company simply won't allow DIY work 11. In fact, some municipalities require the city to install the backflow preventer, and they may also own and maintain it 11. A quick call to your building department can save you a costly do-over.
Related Plumbing Problems
A backflow preventer doesn't live in isolation — trouble elsewhere in your system often shows up at the preventer first. Low water pressure could mean a clogged preventer or an undersized pipe. Leaking outdoor faucets often need nothing more than a new hose bibb vacuum breaker. If your irrigation system isn't working right, you might have a faulty PVB or a zone valve issue. Boiler system pressure problems can point to a failing boiler feed preventer. And if you're dealing with mysterious water contamination, that's exactly why a functioning preventer matters.
Frequently Asked Questions
Is installing a backflow preventer really necessary? My house is old and never had one.
Yes — and not just for new construction. Building codes have evolved specifically to prevent backflow contamination incidents, which have caused serious illness. If you have an irrigation system, a boiler, or even just an outdoor faucet, the risk is real. Local codes now typically mandate backflow protection for these connections, regardless of how old the house is.
Can I install a backflow preventer myself, or is it illegal?
In many areas, homeowners can install certain types themselves — like hose bib vacuum breakers or irrigation PVBs — especially on their own property side of the meter. What matters legally is that the correct type is installed and functioning. Many devices (PVB, DCVA, RPZ) must be tested annually by a certified professional regardless of who installed them. Always check your local codes first — they dictate the type, placement, and testing requirements. Installing the wrong type or skipping required testing is where legal issues arise.
My backflow preventer is leaking from the bottom or vents. What does this mean?
Some dripping during pressure changes or after shutdown is normal for PVBs/RPZs. However, constant leaking or significant water flow from the vents usually indicates a problem: 1) Debris is preventing an internal check valve from sealing properly. 2) A worn-out spring or damaged seal inside the valve. 3) The relief valve is stuck open. Unfortunately, repair kits are often specific and complex. Replacement of the faulty module or the entire unit is frequently the most reliable solution, especially if it fails its annual test. Don't ignore it — it means the device isn't fully protecting you.
Will a backflow preventer reduce my water pressure?
There is always a slight pressure drop (called 'pressure loss') across any valve or device in a pipe. A properly sized and functioning backflow preventer should cause only a minimal drop, often imperceptible for typical household use. If you notice a SIGNIFICANT drop in pressure after installation, possible causes are: 1) You installed an undersized preventer (check specs). 2) Debris from installation clogged the device (try flushing). 3) The preventer itself is faulty or damaged. 4) An unrelated pressure issue coincidentally occurred.