
Why Is My Backflow Preventer Leaking?
A backflow preventer is a critical safety device required by plumbing code in irrigation systems to prevent contaminated water (fertilizer, pesticides, dirt) from flowing backward into your home's clean drinking water supply. When you notice water constantly dripping, spraying, or leaking from your backflow preventer, it's not just wasting water - it can indicate a malfunction that compromises the device's protective function.
The good news: most backflow preventer leaks are easy DIY fixes taking 10-30 minutes and costing under $10 in parts. This guide covers the 5 most common causes and how to fix them, ranked from easiest to most complex.
Understanding Your Backflow Preventer
Before you start troubleshooting, figure out which type you have:
Types of Backflow Preventers for Irrigation
1. Atmospheric Vacuum Breaker (AVB) - Most common for residential irrigation
- Mounts above highest sprinkler head
- Has a vent that opens to atmosphere
- Cannot be under constant pressure (must be downstream of valve)
- Typical leak point: Relief vent holes
2. Pressure Vacuum Breaker (PVB) - Common for larger systems
- Similar to AVB but can handle constant pressure
- Usually installed on a pipe riser 12"+ above ground
- Has test cocks for annual testing
- Typical leak points: Test cocks, air inlet valve, body seals
A PVB only protects against back siphonage, not backpressure 1. If your system has a pump or you're on a well with a pressure tank that could push water backward, you'll need a different device.
3. Double Check Valve (DCV) - Testable, commercial-grade
- No atmospheric vent
- Requires annual professional testing
- Typical leak points: Test cocks, internal check valves
Double check valve assemblies are used for non-health hazards—pollutants, not contaminants—under both backpressure and backsiphonage conditions 1. They're the right call when you're protecting against something that'd make the water unpleasant but not dangerous, like iron discoloration or odor.
4. Reduced Pressure Zone (RPZ) - Highest protection level
- Commercial/municipal use
- Has relief valve that discharges water during backflow events (this is NORMAL)
- Typical leak points: Relief valve (often not a leak, but function)
For this guide, we'll focus on AVB and PVB types, as they're most common in residential irrigation and have the most straightforward DIY fixes.
The 5 Most Common Causes of Backflow Preventer Leaks (And How to Fix Them)
Ask any experienced plumber and they'll tell you: a leaking backflow preventer almost always traces back to a faulty first check valve—usually a dirty or damaged disc or seat 2. But before you tear into the internals, let's work through the causes from easiest to hardest. You'll save time and probably fix it on step one.
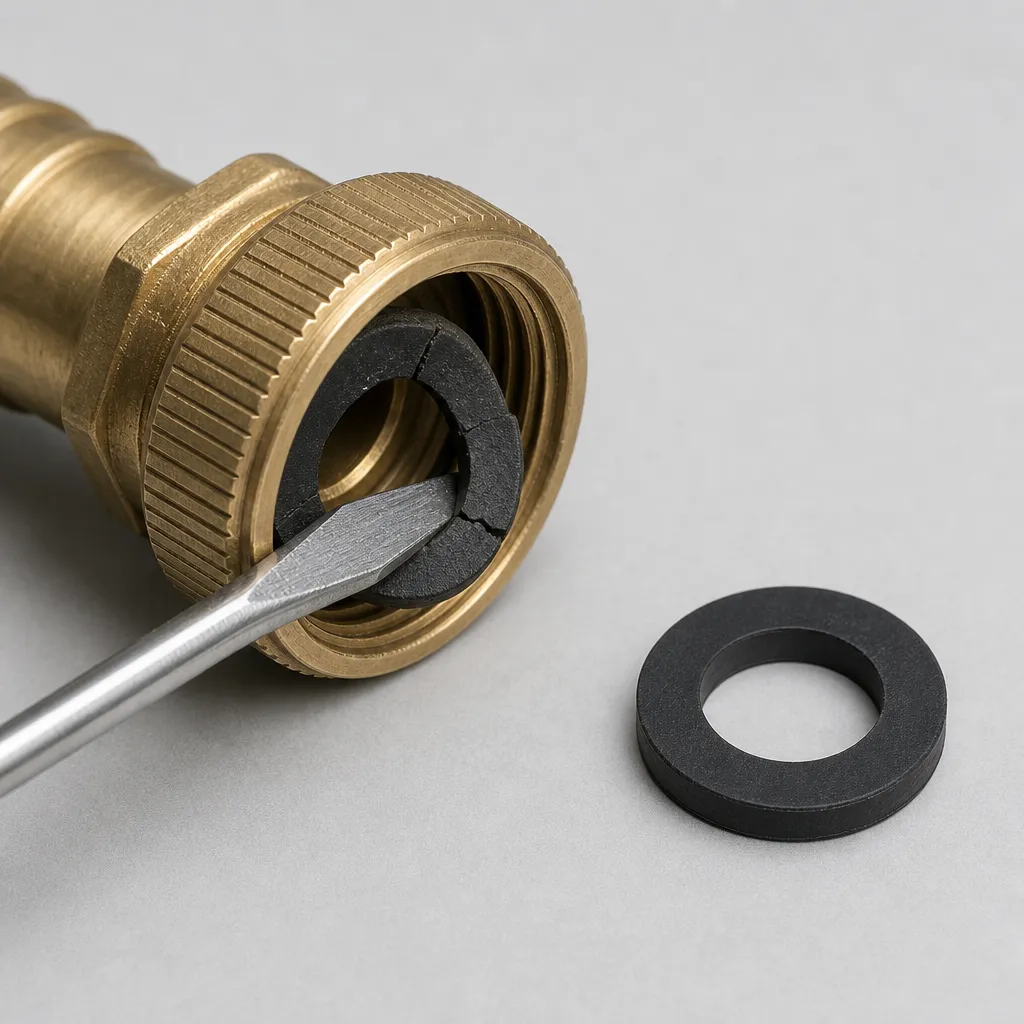
1. Deteriorated or Dry Rubber Washer Seal ⭐ MOST COMMON
Symptoms:
- Water dripping from the hose connection point
- Leak worsens when water pressure increases
- Leak started gradually and got worse over time
Why it happens: Rubber washers in the female hose connection deteriorate from:
- UV exposure (sun damage)
- Freezing/thawing cycles
- Chlorine in water supply
- Normal aging (typically 2-5 years)
How to fix (5-10 minutes, $2-5):
- Turn off the water supply to the irrigation system
- Disconnect the hose or pipe from the backflow preventer
- Inspect the rubber washer inside the female connection - look for:
- Cracks or splits
- Flattened/compressed appearance
- Hardening (won't flex when pinched)
- Remove the old washer - Use a small flathead screwdriver or pick to pry it out
- Install a new washer - Standard 3/4" hose washer fits most irrigation backflow preventers
- Ensure it's fully seated in the groove (push down firmly)
- Check orientation - flat side should face the fitting surface
- Reconnect and test - Hand-tighten only (see Mistake #4 below)
Pro tip: Replace washers proactively every 2-3 years during spring startup, even if not leaking yet. It prevents mid-season failures.
Where to buy: Hardware stores, home centers, irrigation supply shops - $1-3 for a 10-pack
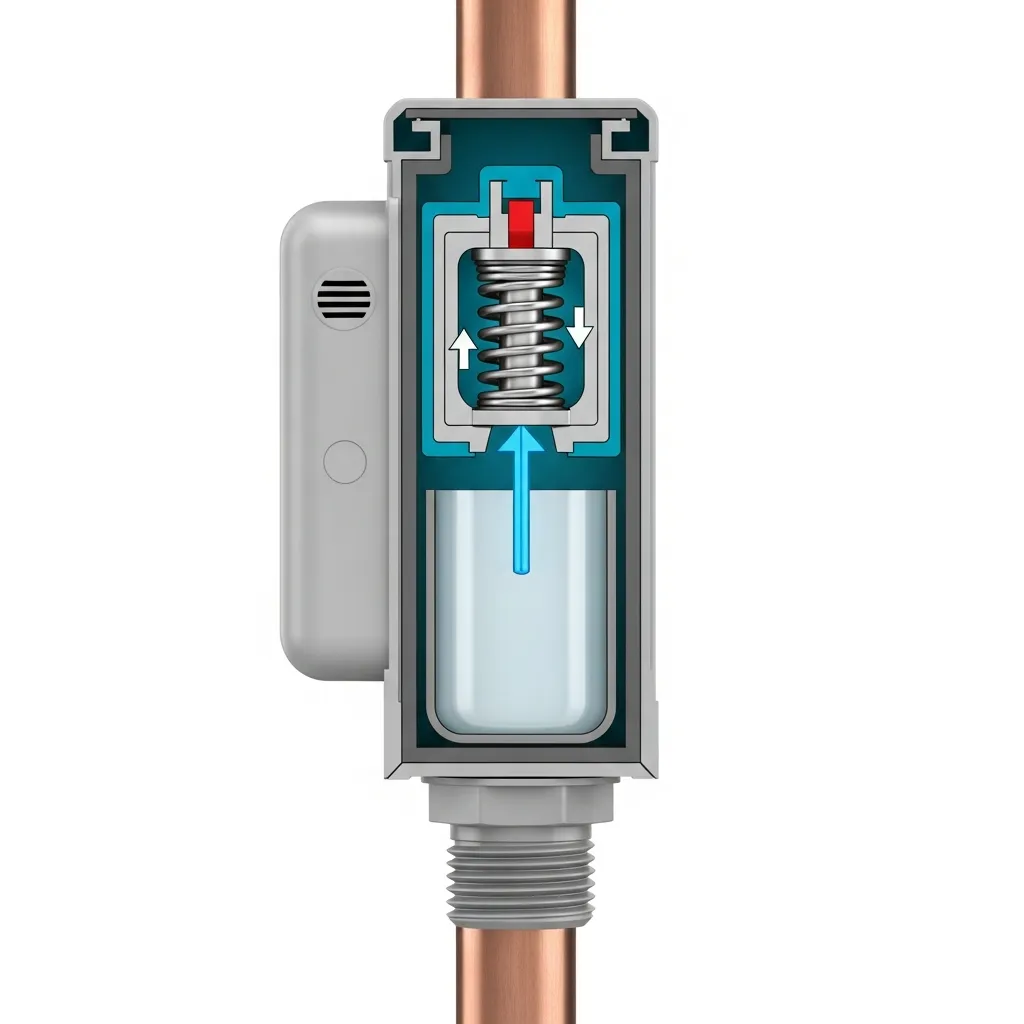
2. Debris in the Spring Assembly / Air Inlet Valve
Symptoms:
- Constant drip or spray from the top vent holes
- Leak occurs even when system is off
- Recent system startup or work done on sprinklers
Why it happens:
- Dirt, sand, or debris enters the device during installation or repairs
- Particles lodge in the spring mechanism, preventing the air inlet poppet from closing fully
- Water bypasses the seal and escapes through relief vents
How to fix (15-20 minutes, $0):
- Turn off water and relieve pressure - Open a downstream zone valve briefly
- Remove the bonnet (top cap) of the backflow preventer
- Usually hand-unscrews counter-clockwise
- Some have screws - use appropriate screwdriver
- Extract the spring assembly - Carefully pull out the entire mechanism
- Note the orientation for reassembly!
- Take a photo if unsure
- Inspect for debris - Look for:
- Sand or grit on the rubber seal
- Mineral deposits on the spring
- Stuck poppet valve
- Clean thoroughly:
- Run under tap water while compressing/releasing the spring 10-15 times
- Scrub the rubber seal gently with a soft brush (old toothbrush works)
- Remove any mineral buildup with white vinegar if needed
- Inspect the seal - If the rubber is cracked or damaged, replace the entire spring assembly (part costs $8-15)
- Reassemble - Ensure proper orientation, hand-tighten bonnet
- Test - Turn water on slowly, check for leaks
Pro tip: Install a sediment filter upstream of the backflow preventer if you have sandy or silty water. Prevents repeat debris issues.
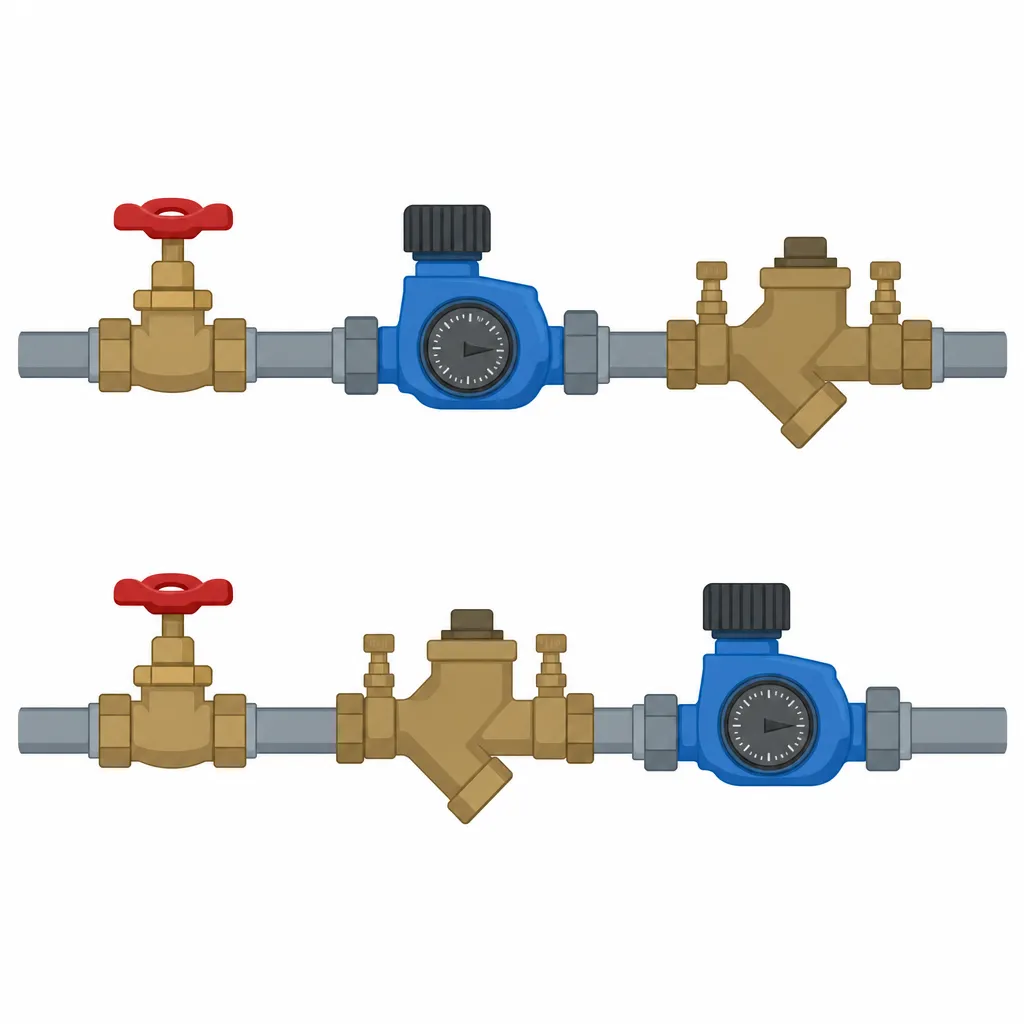
3. Incorrect Placement in System (Pressure Buildup)
Symptoms:
- Backflow preventer leaks ONLY when a timer/controller is installed
- Leak occurs when no zones are running
- Water drips from relief holes continuously
Why it happens: CRITICAL MISTAKE: Backflow preventer installed BEFORE the timer/controller valve instead of after.
When the timer valve closes (zones off), water pressure builds up between the valve and backflow preventer with nowhere to go. The pressure relief function activates, causing a "leak" that's actually the device protecting itself from damage.
Correct installation order (from water source):
- Main shut-off valve
- Timer/controller valve
- Backflow preventer ← Must be here!
- Zone valves
- Sprinklers
How to fix (30-60 minutes, varies by system):
Option A: Relocate the Backflow Preventer (Recommended)
- Move it downstream from the timer valve
- May require additional fittings/pipe
- Permanently solves the problem
Option B: Relocate the Timer Valve (If easier)
- Move timer upstream of backflow preventer
- Less ideal if you have an electric valve (wiring complexity)
Option C: Install Pressure Relief Valve (Temporary workaround)
- NOT a permanent solution
- Allows pressure to bleed off when zones close
- Can waste water if timer malfunctions
Pro tip: When installing a new system or adding a timer, always follow the plumbing standards for proper component sequence. Incorrect order not only causes leaks but can void warranties and fail inspections.
4. Over-Tightening / Cross-Threading Damage
Symptoms:
- Leak from threaded connection points
- Visible cracks in plastic body near threads
- Recent installation or maintenance work
Why it happens:
- Using tools (pliers, wrenches) on plastic hose threads
- Applying Teflon tape or pipe dope to hose threads (causes binding and over-torque)
- Cross-threading during installation
- Attempting to stop a leak by tightening more (makes it worse!)
How to fix:
For minor cracks (still salvageable):
- Remove the device and inspect threads carefully
- Clean both male and female threads - Remove any old tape/dope
- Install a NEW rubber washer (often the real culprit)
- Reconnect hand-tight ONLY - No tools!
- Finger-tight plus 1/4 turn max
- You should be able to unscrew by hand
For major cracks:
- Replace the backflow preventer - Plastic body is compromised
- Cost: $15-40 depending on type
- Cannot be repaired once cracked
IMPORTANT: Never use pipe thread sealant on hose threads!
- Hose threads seal with the rubber washer, not thread-to-thread contact
- Teflon tape or pipe dope causes binding → overtightening → cracks
- Only hand-tighten hose connections
Pro tip: If you must use a tool for leverage (stuck connection), use a strap wrench or wrap the jaws in cloth to avoid cracking plastic.
5. Failed Internal Check Valves (PVB/DCV Types)
Symptoms:
- Water flows backward through the device when system is off
- Leak from test cocks or body seals
- Device is several years old (5+ years)
Why it happens:
- Internal check valve springs weaken over time
- Rubber seals harden and lose elasticity
- Mineral deposits prevent valves from closing fully
- Corrosion in metal components
If you're dealing with an RPZ assembly, here's a specific diagnostic: if the relief valve discharges after you close the #2 shutoff valve, you've got a faulty first check valve—either a dirty or damaged disc or seat—or a leak through the relief valve diaphragm 3. That narrows things down fast.
One thing that trips people up: intermittent discharge from the relief valve. If it spits water now and then but doesn't run continuously, that's usually fluctuating supply pressure, not a failed check 4. Don't tear the thing apart for a pressure wobble.
On the flip side, a relief valve that's stuck shut and won't open at all is often caused by corrosion, scale buildup, or plugged sensing lines 3. That's a different problem entirely—and a dangerous one, since the device can't do its job if the relief can't open.
Testing check valves (without disassembly):
- Shut off upstream water supply
- Open test cocks (should drain a small amount)
- If water continues flowing from test cocks → check valve failed
DIY repair options:
- Rebuild kit: Some manufacturers (Watts, Febco, Wilkins) sell rebuild kits with new seals, springs, check valves ($20-50)
- Full replacement: Often more cost-effective than rebuilding if device is 10+ years old ($30-80)
When to call a pro:
- If you have a testable PVB or DCV that requires annual certification
- If you're uncomfortable disassembling the device
- If local codes require licensed plumber for backflow preventer work
Pro tip: Most jurisdictions require annual testing of testable backflow preventers by a certified tester. If your device fails testing, replacement is usually mandated within 30 days.
Preventive Maintenance: Stop Leaks Before They Start
The 2021 International Plumbing Code and International Residential Code mandate annual inspection for all backflow prevention assemblies 5. That's not just a suggestion—UPC Section 603.4.2 requires backflow prevention assemblies to be tested at installation, after repair or relocation, and at least annually thereafter by a certified backflow assembly tester 6. So mark your calendar.
Spring Startup (After Winterization)
- Visual inspection - Check for cracks, damage from freezing
- Replace rubber washers - Cheap insurance against mid-season failures
- Clean debris - Remove any dirt/insects from vent openings
- Slow startup - Turn water on gradually to avoid pressure shock
During Season
- Monthly check - Quick visual inspection for drips
- Clear vegetation - Keep plants away from device for airflow
- Monitor pressure - Sudden leaks can indicate excessive system pressure (install pressure regulator if > 80 PSI)
Fall Winterization (Cold Climates)
CRITICAL: Backflow preventers MUST be winterized or they WILL crack!
- Shut off and drain - Turn off water, open test cocks, drain fully
- Remove if possible - Take indoors for winter (best option)
- Insulated cover - If can't remove, use insulated backflow cover ($15-30)
- Never rely on heat tape alone - It can fail; use with insulation
When to Replace vs. Repair
Replace if:
- Device is 10+ years old
- Body is cracked or corroded
- Multiple internal components failed
- Annual testing fails repeatedly
- Cost of rebuild kit approaches replacement cost
Repair if:
- Simple washer replacement fixes it
- Device is relatively new (< 5 years)
- Only one component failed
- Rebuild kit is available and affordable
A word of caution: backflow preventer repairs should be performed by a licensed plumber or ASSE certified rebuilder, as many municipalities require re-certification after repair 2. If your local water authority requires annual testing, a DIY rebuild might not pass inspection even if it stops the leak. Check your local rules before you open the device up.
Typical lifespan:
- Atmospheric Vacuum Breaker: 5-10 years
- Pressure Vacuum Breaker: 10-15 years with maintenance
- Double Check / RPZ: 15-20+ years (but requires annual testing)
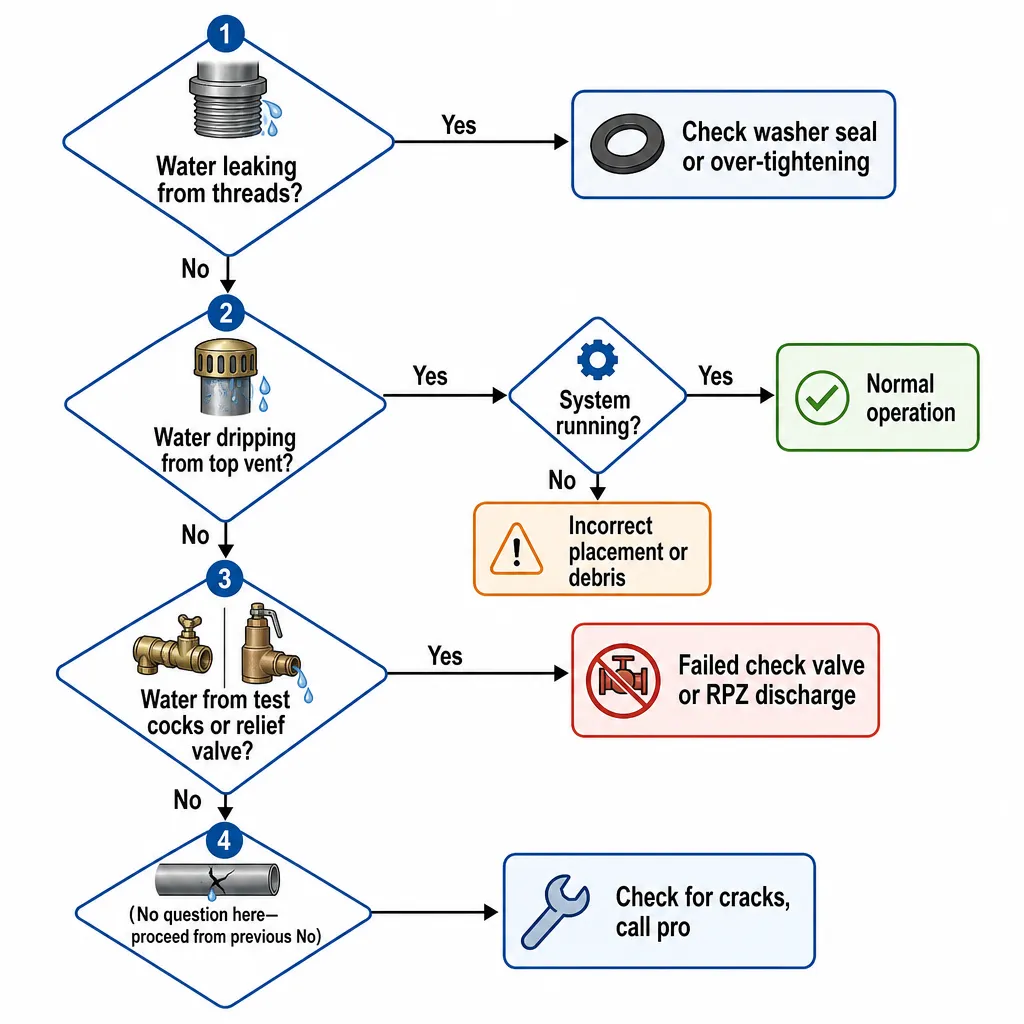
Troubleshooting Flowchart
Common Questions
Is some dripping normal?
During operation (zones running): A slight drip from atmospheric vacuum breakers is normal — the vent needs to open to atmosphere.
When system is off: NO dripping should occur. Any leak indicates a problem.
Can I use my irrigation system while the backflow preventer is leaking?
Yes, temporarily, but:
- You're wasting water
- The device may not be protecting your drinking water supply properly
- Fix it ASAP (usually takes < 30 minutes)
Do I need a backflow preventer?
Yes! It's required by plumbing code in virtually all jurisdictions for irrigation systems connected to potable water. Prevents:
- Fertilizer contamination of drinking water
- Pesticide backflow
- Bacteria from dirt/ponds entering municipal supply
Fines for non-compliance: $100-1,000+ depending on location
What's the difference between a leak and normal relief discharge?
Relief discharge (normal):
- Only occurs when backflow condition detected
- Water flows from designated relief port
- Stops when condition clears
Leak (problem):
- Continuous drip even when not in use
- Water from threads, seals, or cracks
- Doesn't stop on its own
Cost Breakdown
| Repair Type | DIY Cost | Time | Pro Cost |
|---|---|---|---|
| Washer replacement | $2-5 | 10 min | $75-125 |
| Clean spring assembly | $0 | 20 min | $100-150 |
| Relocate device | $10-30 (fittings) | 1-2 hrs | $150-300 |
| Rebuild internal valves | $20-50 (kit) | 1 hr | $150-250 |
| Full replacement | $15-80 (device) | 30-60 min | $150-350 |
DIY savings: $70-300 per repair
The bottom line
A leaking backflow preventer is annoying, but you'll usually fix it fast — and cheap. Nine times out of ten the answer is a $2 rubber washer and ten minutes with no tools. Grab a 10-pack from the hardware aisle next time you're out, and your next leak is fixed before the coffee gets cold.
The non-negotiables: hand-tighten only, never use pipe dope on hose threads, and winterize before the first freeze or the body will crack. If you're in a jurisdiction that requires annual testing on a PVB or DCV, book the certified tester before you rebuild — a DIY fix won't pass inspection even if it stops the drip.
Don't let a $2 washer ruin your summer irrigation season — check it now.