
That foggy mirror after a shower? The musty smell that won't quit? Without proper ventilation, moisture condenses on every surface, feeds mold, and slowly rots the structure behind your walls. The good news: installing a bathroom fan is entirely DIY-able with the right preparation. This guide walks you through every step so you can finally get a dry, fresh bathroom — and skip the $500 installation bill.
Tools Needed
- Stud finder (to avoid ceiling joists)
- Keyhole saw or oscillating tool (for clean ceiling cuts)
- Voltage tester (critical for electrical safety)
- Wire strippers (for clean connections)
- Drill with hole saw (for vent duct penetration)
- Fish tape (to route wires through walls)
- Screwdriver set (Phillips and flat-head)
- Measuring tape (precision matters!)
- Safety glasses & dust mask (non-negotiable)
Materials Needed
- Bathroom fan unit (match CFM rating to room size: 1 CFM per sq ft + 50 CFM per fixture)
- Rigid metal ducting (4-inch diameter, NOT flexible plastic — prevents mold buildup)
- Exterior vent cap (roof or wall mount with backdraft damper)
- Duct insulation sleeve (prevents condensation in cold climates)
- Wire nuts (UL-listed for secure connections)
- Electrical cable (14/2 NM-B if on 15-amp circuit)
- Support brackets or lumber scraps (for securing fan between joists)
- Silicone caulk (waterproof seal for exterior vent)
- Drywall patch kit (for any oops cuts)
Step-by-Step Installation
Step 1: Plan your location and kill the power
Find your fan location: centered between joists (use a stud finder), away from shower spray, and close to the main moisture source. Calculate your required CFM: room square footage × 1.1 + 50 CFM per toilet or shower. Then head to the breaker box — turn OFF the bathroom circuit and verify it with your voltage tester before you touch anything.
⚠️ Warning: DO NOT skip voltage testing. Live wires cause shocks or fires.
Step 2: Cut the ceiling hole precisely
Trace the fan's paper template onto the ceiling. Score lightly first, then cut slowly with a keyhole saw, angling the blade inward so you don't nick hidden wires. Put a bucket below to catch the drywall dust and throw a drop cloth over anything you care about.
⚠️ Warning: Check above the ceiling for wires and pipes before cutting. Wear eye protection.
Step 3: Secure the fan housing
Slide the housing into the hole flush with the ceiling surface. Extend the mounting brackets until they grip the joists tightly — use screws, not nails. No nearby joists? Install wood blocking between them first. Give the housing a wiggle test before moving on; if it moves, it'll rattle every time the fan runs.
⚠️ Warning: Over-tightening the brackets can crack the housing. Snug is enough.
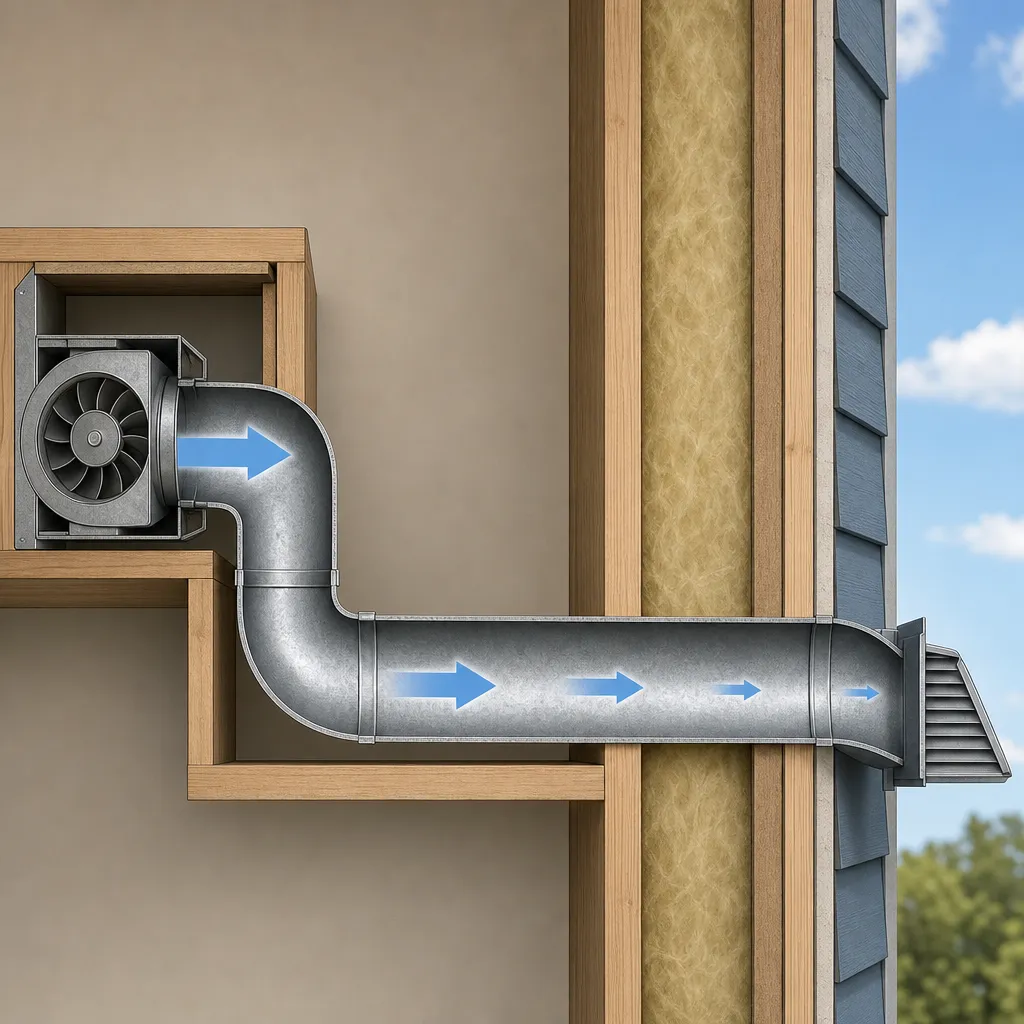
Step 4: Route the ductwork
Connect rigid metal duct to the fan collar with foil tape — not duct tape, which fails in heat. Run the shortest, straightest path to the exterior, slope it very slightly downward outdoors, and insulate it if it passes through an unconditioned attic. Seal every joint with foil tape.
⚠️ Warning: Never vent into the attic. That causes catastrophic mold growth.
Step 5: Wire it safely
Feed cable from the switch box to the fan housing using fish tape. Match wires: black to black, white to white, bare or green to the green ground screw. Twist clockwise before capping with wire nuts. Tuck everything neatly into the housing.
⚠️ Warning: Triple-check the breaker is OFF before touching any wire. Use wire nuts rated for the wire gauge.
Step 6: Install the exterior vent and grille
Cut the exterior vent hole with a hole saw. Caulk the flange generously before screwing the vent cap home. Attach the interior grille per the instructions — most snap on. Run the fan during the final caulking pass to exhaust the fumes.
⚠️ Warning: Use fall protection if you're on the roof. Never skip it.
Pro Tips
- Tap the ceiling before cutting — a hollow sound means a clear path
- Pick a fan with an integrated light or heater to get more out of the opening
- Use a laser level to confirm the vent cap slopes slightly downward toward the exterior
- Wrap duct joints with zip ties under the foil tape for extra security
- Test airflow with a tissue before the grille goes on — strong suction means proper airflow
When to Call a Professional
Call an electrician if your wiring looks damaged or you need a new circuit run. Hire a roofer if you're not comfortable working at height or cutting roof penetrations. And if you hit unexpected obstacles — plumbing in the ceiling, structural elements — stop and get a professional opinion before you push through.
Understanding the Problem in Detail
Getting the fan size right is the foundation of the whole project. You match your fan's power to the room using CFM — cubic feet per minute. The minimum airflow is (room length × width × height) ÷ 60, or simply 1 CFM per square foot for bathrooms under 100 sq ft. A standard 5'×8' bathroom with 8' ceilings needs at least 53 CFM to do its job 1. Don't just buy the bare minimum and call it done.
Your ductwork steals efficiency too. Derate the fan's rated CFM by 5% for every 10 feet of duct and another 10% for each 90-degree bend. A 50 CFM fan pushing air through 20 feet of duct with two bends delivers an effective 38 CFM — not enough 1. Working plumbers suggest oversizing by 20–30% to cover those real-world losses, so you're not left with a steamy room and a fan that's just spinning its wheels.
Tools and Materials Guide
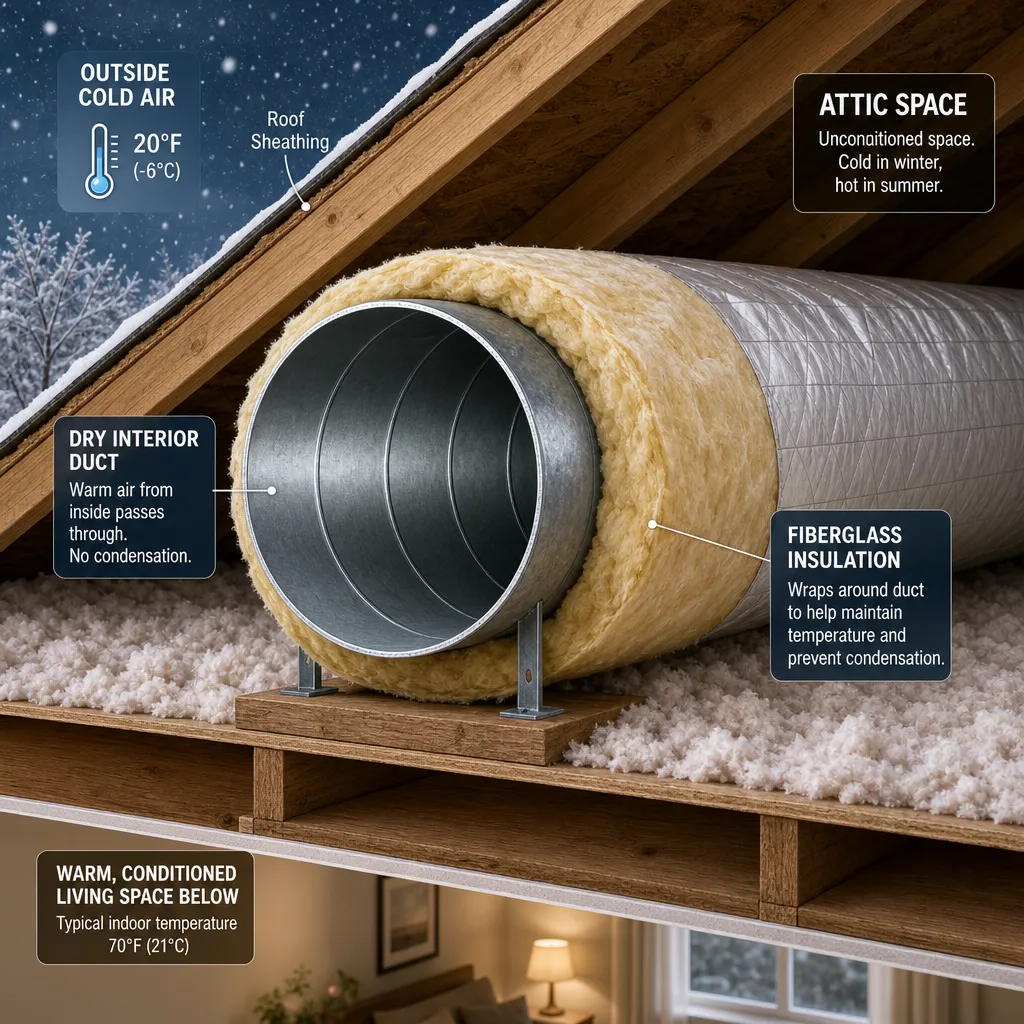
Rigid metal ducts move air roughly 40% better than flexible plastic — use them. For anything passing through an unconditioned attic, you can't skip insulation. Code requires it in those spaces, and R-6 duct wrap is the standard 2. Without it, warm moist air condenses inside the duct, drips back down, and ruins your ceiling or the fan itself. It's a cheap roll of material that saves a massive headache. For the fan unit itself, ENERGY STAR-rated models run quieter and mid-range units ($60–$120) offer the best value.
Safety Considerations
Before you touch a wire or cut into your ceiling, lock down three non-negotiables. First, confirm the power is truly off with a non-contact voltage tester — flipping the wall switch isn't enough. Second, wear sturdy gloves when handling metal ducts; those edges are sharper than they look. Third, if the install takes you into the attic or onto the roof, use proper fall arrest gear. Keep a fire extinguisher close when you're working near insulation.
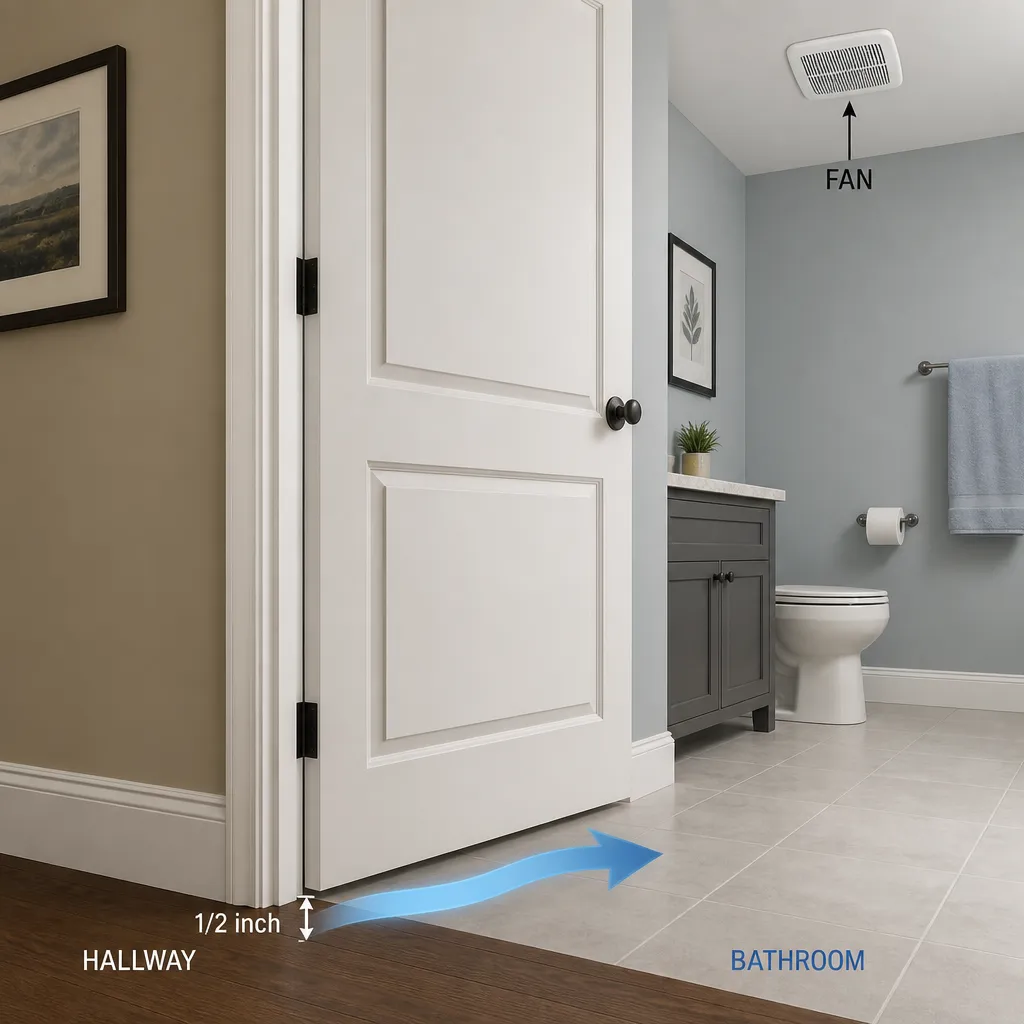
There's one more thing that's easy to overlook: make-up air. A high-CFM fan can create enough negative pressure to backdraft combustion appliances like your water heater. The IRC requires dedicated make-up air for fans over 300 CFM, but for typical bathroom fans in the 50–150 CFM range, the fix is simple — make sure your bathroom door has a ½-inch gap at the bottom 2. That gap lets the fan pull replacement air from the rest of the house instead of dragging combustion gases back down the flue. Working plumbers see this trip up DIYers regularly, and it's a silent hazard.
Troubleshooting Common Issues
Fan vibrating? Tighten the mounting brackets. Weak airflow? Check for duct kinks or a blocked exterior flap. Condensation dripping back through the fan? Insulate the ducts. Motor humming but not spinning? The capacitor likely failed — replace the unit.
If your fan is noisy or just not pulling its weight, don't live with it. Grab a simple anemometer to measure actual CFM and sones at the grille. A fan rated at 1.5 sones should be barely audible; if it's roaring, you've likely got a duct obstruction, a kinked line, or a fan that was undersized from the start 1. Experienced plumbers often trace the problem back to a crushed duct in the attic or a damper flap stuck shut. Check the easy stuff before you tear the unit out.
Maintenance and Prevention
Vacuum the fan grille monthly. Check the exterior flap once a year for debris and make sure it seals tight. Test airflow with the tissue method annually. Plan on replacing the unit every 10–15 years before it fails on you.
Cost Analysis: DIY vs Professional
The savings add up fast. A professional installation typically runs $300–$600, while a quality DIY fan kit costs $50–$150. One homeowner reported saving $350 by installing a Panasonic WhisperCeiling fan on their own 3. That's money you can put toward a quieter fan or a timer switch that makes the whole system hands-off. Splurge on a quiet fan — 1.0 sones or less — and you'll never think about it again. ENERGY STAR models also qualify for federal tax credits.
Related Plumbing Problems
Related projects worth tackling next: upgrading bathroom lighting, installing GFCI outlets, sealing tile grout, or adding a humidity-sensing fan switch.
Frequently Asked Questions
Can I install a fan without attic access?
Yes. Low-profile fans fit between joists and install entirely from below. Use telescoping metal ducts that adjust to tight spaces. It's trickier — take extra time on measurements — but it's doable.
What if my ceiling joists are in the way?
Shift the fan location if you can. If not, install joist-mount brackets (sold separately) that bridge across the joists. Never notch joists without engineering approval — it weakens the structure.
How loud should a bathroom fan be?
Look for ≤1.0 sones for whisper-quiet operation, roughly equivalent to a refrigerator hum. Budget models run 2–4 sones — noticeable but tolerable. Check the sone rating before you buy.
How long should I run the fan after a shower?
Don't flip the switch off when you leave the room. Run the fan for at least 20 minutes after a shower to fully clear the humidity — a 50 CFM fan in a 5'×8' bathroom removes about 90% of moisture in that window 1. The easiest way to nail this every time is a timer switch or a humidity-sensing fan that shuts itself off. Small upgrade, big difference in keeping mold at bay.