Conquer Cloudy Water & Bad Taste: Your Stress-Free Guide to Installing a Whole House Water Filter
Frustrated by sediment, chlorine smell, or stained fixtures? Learn how to confidently install a whole house water filter yourself. Step-by-step guide, essential tips & safety checks included!
That moment you pour a glass of water and see specks floating... or step into a shower that smells like a pool... or watch your brand-new appliances get coated in scale. It's more than an inconvenience; it feels like your home's water is working against you. You worry about what's really in the water affecting your family and your pipes. You want a solution that protects everything, but hiring a pro feels expensive, and DIY plumbing seems like a recipe for a flooded basement. We get it. This guide tackles that fear head-on.
Tired of gritty showers, funky-tasting coffee, or that stubborn orange stain in your sink? You know your whole house water needs help, but the thought of tackling plumbing feels overwhelming. Take a deep breath! Installing a whole house filter isn't rocket science, and this guide is designed to walk you through it like a trusted friend – clearly, safely, and without the jargon. Let's transform your water from frustrating to fantastic.
Tools Needed
- Tubing Cutter (for copper/PEX): Ensures clean, square cuts.
- Adjustable Wrenches (2): For tightening fittings without damaging them.
- Pipe Wrench (Large): For gripping and turning stubborn main pipes if needed.
- Hacksaw or Reciprocating Saw: Backup for cutting pipes if tubing cutter won't fit.
- Deburring Tool or Sandpaper: Removes sharp edges inside cut pipes (CRUCIAL!).
- Marker/Pencil: For marking pipe alignment and cut points.
- Tape Measure: For accurate placement and pipe length measurement.
- Torpedo Level: Ensures your filter housing sits straight.
- Screwdrivers (Phillips & Flathead): For mounting brackets and housing.
- Safety Glasses & Gloves: Protect eyes from debris and hands from sharp edges.
Materials Needed
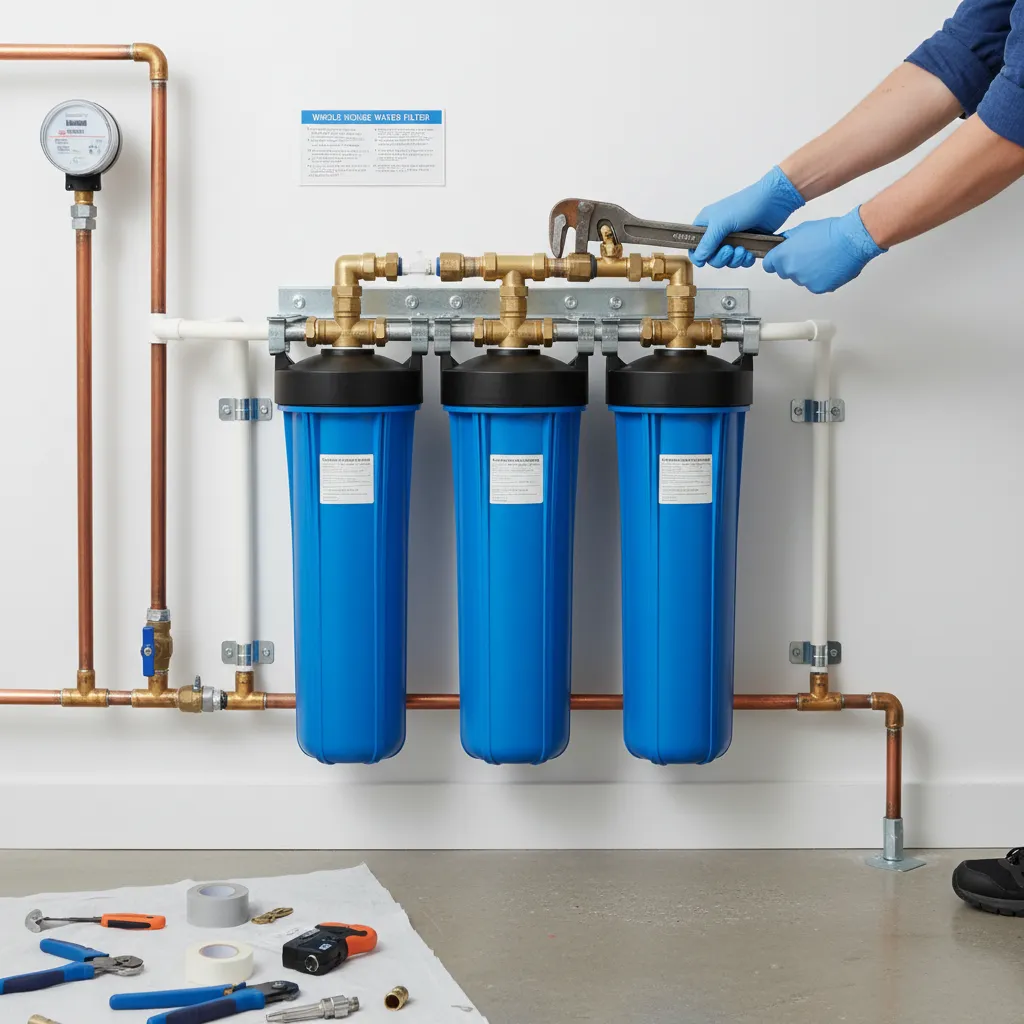
- Whole House Filter System: Choose correct micron rating & capacity (e.g., 20-micron sediment filter for well water, 5-micron carbon block for city chlorine).
- Filter Housing Bypass Valve (Highly Recommended): Allows water flow during filter changes/maintenance.
- Mounting Bracket/Straps: Secures the filter housing to wall/stud.
- Pipe & Fittings: Type/size MUST match your main water line (e.g., 3/4" Copper, 1" PEX-A, 1" CPVC). Include couplings, elbows, unions as needed.
- Teflon Tape or Pipe Thread Sealant: For sealing threaded connections.
- Pipe Hangers/Clamps: Secures new piping runs.
- Drain Pan/Bucket: Catches water when depressurizing and during first flush.
- Replacement Filter Cartridge: Have the first one ready!
- Emery Cloth/Steel Wool: Cleans pipe ends before soldering (if copper).
Solution (Intermediate - 2-4 hours (depending on plumbing setup and experience))
Step 1: Shut Down & Drain: Your Safety Net
Locate your main water shutoff valve (usually where the pipe enters your house, basement, or crawlspace). Turn it OFF clockwise. Open the lowest faucet in your house (like a basement sink or outside spigot) AND a faucet on an upper floor to drain the system completely. Flush toilets too. No water should flow from the open faucets when drained.
⚠️ Warning: CONFIRM water is OFF! Attempting cuts on a pressurized line is extremely dangerous and causes major flooding.
Step 2: Pick the Perfect Spot & Mount Up
Choose an installation point after the main shutoff and water meter, but before your water heater and any branch lines (like to outdoor spigots). A basement, garage, or utility room near the main line is ideal. Ensure easy access for future filter changes (leave 1-2 feet clearance below housing). Mount the filter bracket securely to wall studs or solid blocking using heavy-duty screws. Use your level!
⚠️ Warning: Avoid locations prone to freezing. Protect pipes in unheated spaces with insulation.
Step 3: Measure Twice, Cut Once: Mapping the Path
Identify the straight section of your main cold water line where the filter will go. Mark cut points far enough apart to fit the filter housing + bypass valve assembly. Factor in the length of fittings! Double-check measurements. Use your tubing cutter (preferred) or saw for a clean, square cut. Deburr the INSIDE and OUTSIDE of both cut pipe ends aggressively – sharp edges destroy seals!
⚠️ Warning: Support pipes on both sides of your cut points before cutting to prevent stress or movement.
Step 4: Assemble the Heart: Filter & Bypass
Follow the manufacturer's instructions to assemble the filter housing onto the bypass valve manifold. Typically, the housing screws onto the valve body. Hand-tighten firmly, then use the filter wrench (usually provided) for a final 1/4 to 1/2 turn – DO NOT overtighten. Install the bypass valve handles/knobs as directed. Ensure the bypass is set to 'OFF' (filtering mode).
⚠️ Warning: Leave the filter cartridge OUT for now. Install it after the plumbing is complete and you're ready to flush.
Step 5: Plumb It In: Connecting the Dots
Dry-fit all pipes and fittings between the cut ends and the filter bypass assembly. Pay attention to flow direction arrows on the bypass! Ensure everything aligns smoothly without strain. Disassemble, apply Teflon tape (clockwise) or thread sealant to male threads only. Reassemble connections, tightening firmly with wrenches – use two wrenches (one to hold, one to turn) to avoid twisting pipes. Support new pipe runs every few feet with hangers/clamps.
⚠️ Warning: Avoid using galvanized fittings with copper pipe (causes corrosion). Use dielectric unions if connecting dissimilar metals.
Step 6: The Big Moment: Turn On & Flush Out
Double-check all connections are tight. Place your drain pan under the filter housing. Slowly turn the main water supply back on. Immediately check EVERY connection for leaks – tighten slightly if needed (don't overdo it!). Open the bypass valve's filter housing vent (if equipped) or slightly loosen the housing to let trapped air escape until water spurts out, then retighten. Once pressurized and leak-free, open several cold water faucets throughout the house. Let water run for 5-10 minutes to flush out debris and air from the new pipes. Expect sputtering initially.
⚠️ Warning: Open valves SLOWLY. Sudden pressure surges can stress new joints. Watch for leaks like a hawk during initial pressurization.
Step 7: Install the Filter & Final Check
With water flowing and system flushed, turn the main supply OFF again briefly. Place the drain pan. Unscrew the filter housing (use the wrench if needed). Remove any protective packaging from the new filter cartridge. Insert it into the housing, ensuring it seats properly on the bottom gasket. Lubricate the housing's top O-ring with a tiny amount of food-grade silicone grease (often provided). Screw the housing back on – hand-tight plus 1/4 to 1/2 turn with the wrench. Turn the main supply back on. Check for leaks around the housing. Let water run from faucets for another minute to purge air from the filter.
⚠️ Warning: Never run water through an empty housing – it can damage the system. Ensure the O-ring is clean, lubricated, and seated correctly to prevent leaks.
Pro Tips
- Take photos of your existing plumbing BEFORE cutting. It's your roadmap if you get confused during reassembly.
- Mark pipe orientation with a marker before disassembly. A small line across a coupling/pipe ensures you twist it back exactly the same way.
- Use a union fitting near the filter assembly. This lets you easily disconnect the filter for servicing later.
- SharkBite push-to-connect fittings are a solder/glue-free option for copper, PEX, or CPVC. Great for beginners but more expensive than traditional methods. Ensure you use the correct insertion depth tool.
- Install a sediment filter before a carbon filter if using multiple stages. Sediment filters are cheaper and protect the more expensive carbon block.
- Set a calendar reminder for your first filter change (usually 3-6 months). Note your initial pressure – a significant drop later signals a clogged filter.
When to Call a Professional
Call a licensed plumber if: Your main shutoff valve is stuck or leaks; Your pipes are old galvanized steel (difficult to work with, prone to breaking); You discover significant corrosion or damage when cutting; You need to relocate major plumbing lines to make space; You are uncomfortable soldering copper or solvent-welding CPVC; You experience persistent leaks you can't fix after tightening; Your water pressure remains very low after installation and flushing.
Understanding the Problem in Detail
Your water picks up stuff on its journey – sand/silt (sediment), chlorine (from city treatment), minerals (hardness causing scale), rust from old pipes, or even hydrogen sulfide (rotten egg smell). A whole house filter acts as a gatekeeper right where water enters your home, trapping these contaminants before they reach any faucet, showerhead, appliance (like your water heater, washing machine, dishwasher), or ice maker. This protects your health, improves taste/odor, extends appliance life, prevents stains, and gives cleaner laundry.
Tools and Materials Guide
Crucial Match: Identify your main water pipe material (copper, PEX - usually blue/red, CPVC - beige plastic) and size (common: 3/4" or 1"). Buy matching fittings. Filter Choice: Sediment Filters: Trap dirt/sand (5-50 micron). Carbon Filters: Remove chlorine, taste, odor, some chemicals (0.5-10 micron). Combination: Best of both. Choose capacity (e.g., 4.5" x 20" Big Blue style is common). Bypass Valve: Non-negotiable for easy maintenance. Fittings: Couplings (straight connectors), Elbows (90/45 degree turns), Unions (for easy disconnection), Ball Valves (optional extra shutoffs). Sealant: Teflon tape for NPT threads, Pipe dope (thread sealant) for trickier joints. Buying: Big box stores (Home Depot, Lowe's), Plumbing supply houses, Online retailers (Amazon, specialized filter sites).
Safety Considerations
Water Pressure is Powerful: Always, ALWAYS confirm main water is OFF and system is drained before cutting. A small leak under pressure becomes a flood fast. Sharp Edges: Cut pipes leave razor-sharp burrs inside and out. Deburr thoroughly and wear gloves. Eye Protection: Essential when cutting, deburring, or soldering. Chemical Safety: If soldering copper, have fire extinguisher ready, clear flammable materials, use heat shields. If gluing CPVC, work in well-ventilated area. Heavy Objects: Support filter housings and pipes securely; they get heavy when full. Ladder Safety: Use properly if accessing pipes overhead.
Troubleshooting Common Issues
Leak at Connection: Turn water OFF. Disassemble, check for damaged threads, missing/worn O-ring (in compression/SharkBite), insufficient sealant/tape, or cross-threading. Reassemble carefully. Leak at Filter Housing: Turn water OFF. Open housing, check O-ring is seated, lubricated, not nicked/cracked. Clean housing groove. Reassemble, hand-tighten plus 1/4 turn. Low Water Pressure: 1) Check bypass valve is fully open to filter. 2) Is the filter new? Flush longer (10-15 mins). 3) Old filter? Replace it! 4) Check for kinks in new piping. 5) Confirm main valve is fully open. Air in Pipes (Sputtering Faucets): Run water from all faucets for several minutes to purge air. Filter Housing Won't Open: Use the wrench, tap gently around the seam with a rubber mallet. Try warm (not boiling) water on the housing to expand plastic slightly. Never use excessive force.
Maintenance and Prevention
Filter Changes: Mark your calendar! Change sediment filters more often (3-6 months), carbon blocks (6-12 months), depending on water quality and usage. Housing Care: Replace the housing O-ring annually or if damaged/lubricate during changes. Sanitize the empty housing with a mild bleach solution yearly (rinse THOROUGHLY). Pressure Check: Note your normal water pressure. A significant drop usually means a clogged filter. Bypass Valve Exercise: Turn the bypass valve to 'Bypass' and back to 'Filter' every few months to prevent seizing.
Cost Analysis: DIY vs Professional
DIY Costs: Filter System: $50 - $300+, Bypass Valve: $20 - $60, Pipe/Fittings: $20 - $100+, Tools (if buying): $50 - $150+. Total DIY Range: $150 - $600+. Professional Installation: Typically $500 - $1500+ (parts + labor). Money Savers: Choose standard filter sizes (Big Blue), source fittings carefully, borrow tools, skip complex mounting if safe pipe support exists. Ongoing: Filter cartridge replacements: $20 - $100 each, every 3-12 months.
Related Plumbing Problems
Low Water Pressure: Could be caused by clogged filter, undersized pipes, or other issues. Water Hammer (Banging Pipes): Often needs air chambers or water hammer arrestors installed. Rotten Egg Smell: May require specific iron/sulfur filters after sediment removal. Scale Buildup: Indicates hard water; a water softener might be needed AFTER the sediment filter. Rusty/Brown Water: Could point to corroding pipes needing replacement or specialized iron filters.
Frequently Asked Questions
Do I really need a bypass valve?
Absolutely YES! Imagine your filter clogs on a Sunday night or you need to change it – without a bypass, you have NO water to the house until it's fixed. The bypass lets you temporarily restore water flow around the filter.
Will a whole house filter make my water soft?
No. Standard sediment and carbon filters do NOT remove dissolved minerals (calcium, magnesium) that cause hard water and scale. You need a water softener (ion exchange system) for that, installed typically AFTER the initial sediment filter.
How often do I REALLY need to change the filter?
It depends heavily on your water quality and household usage. The manufacturer's recommendation is a starting point (e.g., 6 months). Pay attention! Noticeable drop in pressure, worsening taste/odor, or visible discoloration are clear signs it's time. When in doubt, change it sooner rather than later.
Can I install this on a well system?
Yes, and it's highly recommended! Well water often has significant sediment and sometimes sulfur smells. A sediment filter is essential first-stage protection. You might need additional filters (like carbon for taste/odor or iron/sulfur specific) depending on your well test results.
My water pressure dropped after install, is that normal?
A slight drop (1-5 PSI) is normal due to the filter's restriction. A significant drop usually means: 1) The filter is clogged (brand new? Flush longer! Old? Replace it!), 2) The bypass valve isn't fully open to filter, 3) You used undersized fittings/pipes, or 4) There's a kink in the new piping. Check these before worrying.