How to Adjust Rain Bird 5000 Series Rotor Sprinkler Heads: A Step-by-Step Guide

Rain Bird 5000 Series Rotor Sprinkler Heads are an essential tool for maintaining a beautiful and healthy lawn. These sprinkler heads are designed to deliver water to your lawn in a precise and efficient manner, ensuring that your lawn gets the water it needs without wasting water.
Rain Bird 5000 Series Rotor Sprinkler Heads are a popular choice for homeowners and landscapers alike, thanks to their durability, versatility, and ease of use. These sprinkler heads are designed to be installed underground and provide a rotating spray of water to your lawn.
But simply installing these sprinkler heads is not enough. To ensure that your lawn is getting the right amount of water and the spray is properly adjusted, you need to know how to adjust and maintain the Rain Bird 5000 Series Rotor Sprinkler Heads. In the following sections, we will discuss how to adjust and maintain these sprinkler heads.
How to Adjust Rain Bird 5000 Series Rotor Sprinkler Heads
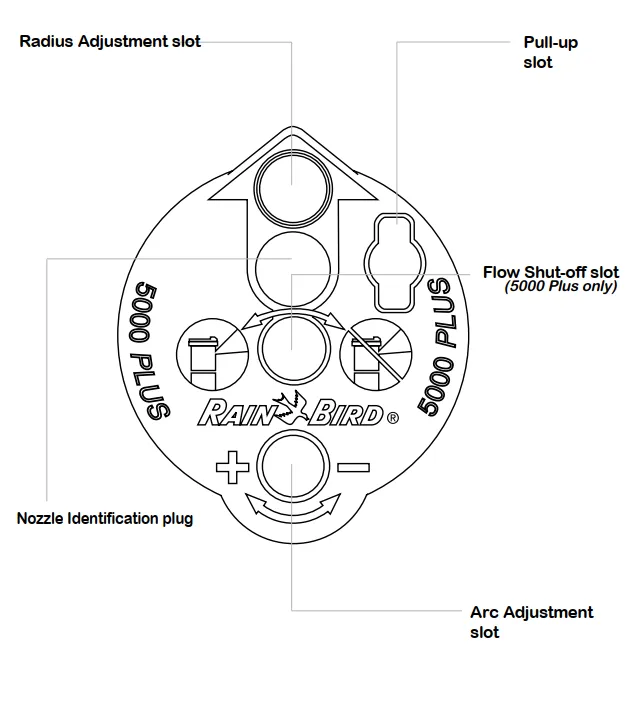
Adjusting Rain Bird 5000 Series Rotor Sprinkler Heads is a straightforward process that can be done by following a few easy steps. First of refer below sketch to identify the adjustment inserts of your sprinkler head.
Installing and Removing Nozzles
-
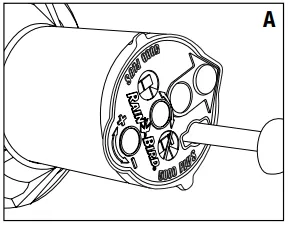
Insert the tool into the pull-up slot and turn it 90 degrees to lift up the stem. This allows access to the nozzle socket. (A)
-
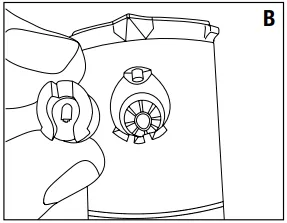
Insert the desired nozzle into the nozzle socket and turn the radius adjustment screw clockwise to secure the nozzle in place. (B)
-
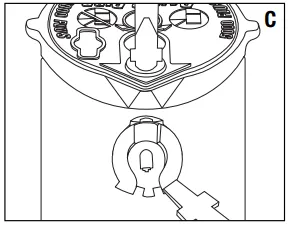
Insert the identification plug of the selected nozzle into the opening on the top of the rotor. To remove the nozzle, back out the radius adjustment screw. Place the blade of a screwdriver under the nozzle removal tab and press the handle down. (C)
Setting the Arc
The arc of the Rain Bird 5000 Series Rotor Sprinkler Head can be adjusted from 40 to 360 degrees. The rotor is factory set to 180 degrees.
Aligning the Fixed Left Edge
Pull up the turret and turn it counterclockwise to the left trip point. CAUTION: If the rotor does not turn easily to the left, first turn it clockwise to the right trip point. Rotate the entire case to the desired fixed left position or unscrew the cap and pull out the assembly. Rotate the internals to realign the left trip point to the desired position and reinstall.
To increase or decrease the arc: (D)
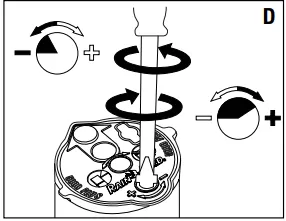 While holding the nozzle turret at the fixed left stop, insert a tool or screwdriver into the adjustment socket.
2a. Turn the screwdriver clockwise (+) to INCREASE the arc.
2b. Turn the screwdriver counterclockwise (-) to DECREASE the arc.
Each full clockwise turn of the screwdriver adds or removes 90 degrees of arc.
When the maximum arc of 360 degrees or the minimum arc of 40 degrees has been set, you will hear a ratcheting noise. Do not adjust the rotor beyond the maximum or minimum arc.
Radius Adjustment (E)
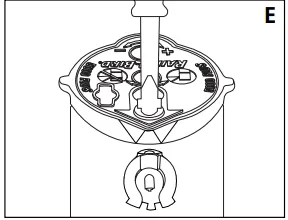 Radius adjustment allows you to reduce the spray distance of the Rain Bird 5000 Series Rotor Sprinkler Head by up to 25%.
Insert a screwdriver into the radius adjustment socket. Turn the screwdriver clockwise to reduce the radius and counterclockwise to increase it.
Turning Flow On or Off (5000 PLUS ONLY) (F)
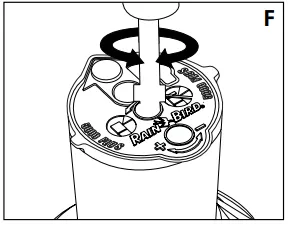 Insert a screwdriver into the flow shut-off slot.
Turn the screwdriver clockwise 180 degrees to stop the flow of water.
Turn the screwdriver counterclockwise 180 degrees to start the flow of water.
By following these detailed steps, you can adjust and maintain your Rain Bird 5000 Series Rotor Sprinkler Heads to deliver the right amount of water and ensure proper coverage for your lawn, keeping it healthy and beautiful.