
Achieve optimal water distribution, promote sustainability, and meet your gardening needs. Follow our expert tips and guidance to create a flourishing garden that conserves water and enhances your outdoor space.
You’ve been staring at patchy grass and wilting shrubs, wondering why your hose-end sprinkler never quite reaches the corners. Take a deep breath — you’re not alone, and a well-planned in-ground system will change everything. This guide walks you through measuring, zoning, and wiring your own residential sprinkler layout so you’ll get even coverage without wasting water.
Tools Needed
- 100‑ft measuring tape — for capturing property boundaries and distances between features.
- Graph paper (1/4‑inch grid) and pencil — to draw a scaled plot plan you can erase and adjust.
- Compass or phone compass app — helps note sun exposure for each zone.
- Soil probe or shovel — to check soil texture and drainage before zoning.
- Flag markers or landscape paint — for staking out head locations before you dig.
- Wire strippers and multimeter — essential when connecting valves to the controller.
Materials Needed
- PVC or polyethylene pipe (3/4‑in or 1‑in class 200) — match the diameter recommended in your design; smaller pipe chokes flow 1.
- Sprinkler heads (gear‑drive rotors, fixed sprays, bubblers, or drip emitters) — choose one type per zone; never mix gear drives with bubblers in the same circuit 1.
- Swing joints or flexible risers — let you fine‑tune head height and protect against vehicle bumps.
- Zone control valves (inline, 1‑in FPT) — one per zone, rated for your household water pressure.
- Controller/timer (indoor‑rated, 4‑to‑12‑zone) — most residential controllers belong in the garage near a 115‑V outlet 2.
- Color‑coded irrigation wire (18‑gauge, multi‑strand) — you’ll need one wire per valve plus a common wire; for a 5‑zone system buy at least 6‑conductor cable long enough to reach the valves 2.
- PVC primer, cement, and thread seal tape — for watertight joints on mainline and manifold connections.
- Backflow preventer (pressure‑vacuum breaker or reduced‑pressure assembly) — required by most codes to protect your drinking water.
Measure and Sketch Your Property
You’ll start designing an efficient residential sprinkler system by measuring and sketching your property. It’s the only way to really understand your landscape’s layout and dimensions. Take your time gathering the following information:
Measuring the Property:
Grab a measuring tape and measure your property’s length and width. Start from one corner and work your way around, jotting down the measurements as you go. Don’t forget to include any irregularities or angles that might affect the design.
Identifying Existing Features:
While you’re measuring, pay close attention to existing features like concrete paths, patios, driveways, and fences. Mark their locations and dimensions on your sketch. These features will help you figure out the best spots for your sprinkler heads.
Locating Trees, Shrubs, and Lawns:
As you explore your property, identify and mark where trees, shrubs, and lawns are. You need to know which areas require specific irrigation considerations. Note their sizes and shapes on your sketch — they’ll impact your water distribution requirements.
While you’re walking the perimeter, keep an eye on where pipes might run. No waterlines are allowed to be concealed in outside walls above grade unless you’ve made adequate provision to protect those pipes from freezing 3. Soil and waste traps must also be protected from freezing when they’re placed in an exterior wall or any unconditioned space 4. If a portion of your system will extend into an unheated area — say a detached garage or a crawlspace that drops below freezing — dry‑side wall or dry pendent sprinklers extending from a heated area into that cold zone must be protected by the sprinkler itself 5. Throughout the whole design, experienced plumbers stress that you’ll need to follow the manufacturers’ instructions for sprinklers and sprinkler pipe to make sure basic requirements are met 1.
Draw a Plot Plan to Scale:
Now that you've gathered the measurements, it's time to create a scaled plot plan. This plan gives you a visual of your property and its features, so you can design an efficient sprinkler system. Here's how:
Choose the Right Graph Paper:
Pick graph paper that lets you accurately represent your property. You'll want a large-scale grid where each square equals a specific measurement—like one square for one foot or ten feet.
Transfer Measurements to the Plot Plan:
Carefully transfer the measurements you took in Section 1 onto the graph paper. Start by drawing the outline of your property, using the scale you chose. Make sure every element—the house, concrete paths, patios, driveways, and fences—is accurately placed.
Include Existing Landscape Features:
Add the existing landscape features you identified in Section 1, like trees, shrubs, and lawns. Position them according to their measurements and scale. These features will help you decide where to place your sprinkler heads for proper coverage.
Label Zones and Areas:
Divide your property into zones based on different areas and their irrigation needs. Common zones include the front yard, back yard, side yard, and any sections with unique characteristics or vegetation. Give each zone a clear label or name so you can easily identify them later.
Divide the Property into Zones:
Zoning is where most DIY systems live or die. Group areas by sun, soil, and what’s actually planted there, and you’ll water each spot the right amount without drowning the next one over. Here’s how to draw the lines.
Analyze Sunlight Exposure:
Watch how the sun tracks across your yard over a full day. Mark the spots that get full sun, partial shade, and deep shade. A south‑facing lawn dries out twice as fast as a shaded bed under a maple, so they don’t belong on the same zone.
Assess Soil Conditions:
Dig a small hole in two or three spots and squeeze a handful. Sandy soil crumbles and drains fast; clay holds together and stays wet for days. Loam falls in between. Group similar soils together — a sandy zone needs shorter, more frequent runs, while a clay zone wants longer, less frequent soaks.
Consider Plant Types and Watering Needs:
Look at what’s actually growing in each area. Turf, vegetable beds, established shrubs, and drought‑tolerant natives all want different amounts of water. Put thirsty plants on one zone and tough ones on another so you’re not over‑watering the rosemary to keep the lawn green.
Determine Irrigation Methods:
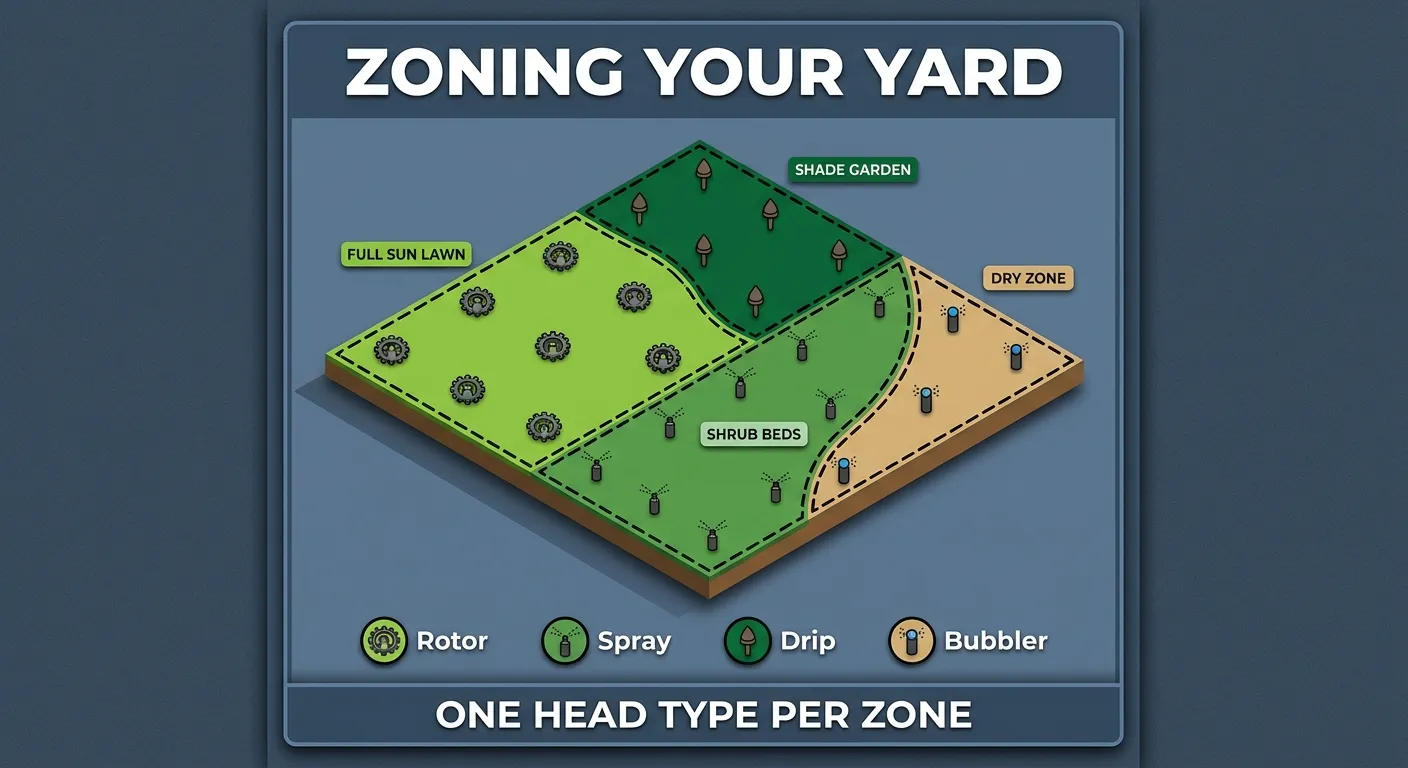
Match the method to the zone. Lawns want pop‑up sprays or rotors. Shrub beds do well with drip lines or micro‑sprinklers. Vegetable rows are usually drip. Don’t try to cover everything with one head type — pick the right tool for each zone, and budget your flow so no zone runs more heads than your pressure can feed.
The whole point of zoning is to separate areas based on their real watering requirements — shade versus full sun, lawn versus shrubs 6. Once you’ve drawn those boundaries, stick to one sprinkler type per zone. Don’t mix gear‑drive rotors, impacts, pop‑ups, and bubblers in the same circuit; they all deliver water at different rates, and mixing them guarantees dry spots and flooded patches 1. Also, don’t exceed the maximum number of heads recommended per zone — pushing past that limit starves the farthest heads and kills your water flow 1. Use the pipe size recommended in your design guide; smaller‑diameter pipe will decrease the water flow and leave the last head sputtering 1. Start grouping heads of the same type in the same area with the large‑area rotors first, then work your way down to the smaller spray heads 1.
Safety Considerations
- Call 811 before you dig. In most states you must have underground utilities marked at least two business days before you trench. Hitting a gas or electric line can be deadly.
- Shut off the main water supply before cutting into any existing plumbing. A pressurized line can whip and cause injury.
- Wear eye protection and gloves when cutting PVC or applying solvent cement. Primer and cement fumes are flammable — work in a ventilated area.
- Use a GFCI‑protected outlet for the controller transformer. Most residential controllers need a 115‑V outlet indoors, like in the garage 2.
- Install a backflow preventer per local code. Without it, contaminated water can siphon back into your drinking supply.
⚠️ Warning: Trenching near a foundation or retaining wall can undermine structural support. Keep trenches at least as far from the wall as the depth of the trench, and never undercut footings.
Cost Analysis: DIY vs Professional
A DIY residential sprinkler system for a typical ¼‑acre lot usually runs between $1,200 and $2,500 in materials, depending on the number of zones and head types. You’ll spend roughly $400–$700 on a quality controller, valves, and backflow preventer, $300–$600 on pipe and fittings, and $200–$400 on sprinkler heads and swing joints. Renting a trencher adds about $100–$200 per day. Hiring a professional for the same property typically costs $3,500–$6,000 installed, which includes design, permitting, trenching, and a warranty on workmanship. The DIY path saves you roughly 50–60% but demands a solid weekend of labor and a willingness to learn local code requirements.
Pro Tips
- Test your static water pressure with a gauge on a hose bib before you design anything. Write down the psi; it dictates how many heads you can run per zone.
- Head‑to‑head coverage is non‑negotiable. Space rotors and sprays so the spray from one head reaches the next head. Overlap prevents dry donuts.
- Install a master valve at the mainline tap. If a zone valve sticks open, the master valve stops continuous flooding.
- Use “funny pipe” (flexible polyethylene) risers instead of rigid risers. They’re forgiving when a mower or foot bumps a head, and they make height adjustments trivial.
- Label every wire and valve with a permanent marker and a valve‑box chart. Two years later you’ll thank yourself when troubleshooting.
Maintenance and Prevention
- Flush the lines before attaching heads. After gluing pipe, run each zone wide open for a minute to blow out debris that would clog nozzles.
- Clean or replace nozzles every spring. Mineral buildup and grit distort the spray pattern, creating wet spots and dry edges.
- Adjust heads seasonally. Turf needs less water in spring and fall than in peak summer. Reprogram the controller at least four times a year.
- Winterize before the first hard freeze. Drain the mainline, blow out each zone with compressed air (set the compressor to 50 psi max), and insulate the backflow preventer.
- Inspect valve boxes annually. Clear out dirt and ant nests, check wire nuts for corrosion, and manually cycle each valve to confirm it opens and closes fully.
Troubleshooting Common Issues
“I installed the system but one zone has weak pressure.” Check whether you’ve exceeded the maximum heads for that zone or used pipe that’s too small. Even one extra head or a step down in diameter can starve the circuit 1. Also verify the zone valve is fully open and the flow control stem isn’t partially closed.
“Heads pop up but water barely sprays — just bubbles.” You’ve likely mixed head types in the same zone. A bubbler or drip line on the same circuit as pop‑up sprays will steal all the flow. Re‑plumb that zone so every head is the same type 1.
“The controller won’t turn on a zone.” First, check the wiring. You need one dedicated wire per valve plus a common wire; a 5‑zone system requires at least six total conductors 2. Use a multimeter to test continuity from the controller to the valve solenoid. Also confirm the transformer is plugged into a live 115‑V outlet 2.
“Water pools around the lowest head after the zone shuts off.” That’s low‑head drainage. Install check valves in the heads or replace the lowest heads with models that have built‑in check valves. Also verify the zone isn’t sloped so steeply that water siphons through the valve.
“I’m getting ice damage in a zone that runs through an unheated space.” Dry‑side wall or dry pendent sprinklers must extend from the heated area into the freezing zone, and the sprinkler itself must protect that transition 5. If you ran wet pipe through an exterior wall above grade without freeze protection, you’ll need to reroute or insulate and heat‑trace that section 3.
When to Call a Professional
- You need a backflow preventer installed on the main line. This involves cutting into your household supply and must meet local plumbing code — mistakes can contaminate your drinking water.
- Your static water pressure is below 40 psi or above 80 psi. Low pressure requires a booster pump; high pressure demands a pressure‑reducing valve. Both are jobs for a licensed plumber.
- The property has steep slopes or retaining walls. Poor drainage design on a slope can erode soil and destabilize structures.
- You’re adding zones inside a freeze‑prone crawlspace or exterior wall. Protecting soil and waste traps and waterlines from freezing in unconditioned spaces often requires engineered solutions 4.
- Local code requires stamped drawings or a permit you’re not comfortable pulling yourself. A professional designer can produce a plan that passes the first time.
Frequently Asked Questions
How many zones do I need for a typical suburban yard? Most ¼‑acre lots use 4 to 8 zones. The exact number depends on your water pressure, flow rate, and how you’ve grouped sun, shade, lawn, and shrub areas 6.
Can I mix drip irrigation and spray heads on the same zone? No. Drip emitters operate at much lower flow rates and pressures than sprays or rotors. Mixing them in one zone guarantees uneven watering and stressed plants 1.
What pipe size should I use for the main line? Follow the manufacturer’s design guide for your heads and flow rate. Most residential systems use ¾‑in or 1‑in Class 200 PVC or polyethylene. Smaller‑diameter pipe will decrease water flow and hurt performance 1.
Where should I mount the controller? Most residential controllers should be installed indoors — the garage is the most common spot — and you’ll need a 115‑V electrical outlet to plug in the low‑voltage transformer 2.
How do I wire the valves back to the controller? Use color‑coded irrigation wire. You’ll need one wire for each valve plus one common wire. For a 5‑zone system, buy a bundle with at least six total conductors long enough to reach from the controller to the farthest valve 2.
Wrap‑Up: Controller and Wiring
Once your zones are mapped and the pipe is in the ground, the last piece is the controller. Mount it indoors — the garage is the usual spot — and plug the low‑voltage transformer into a 115‑V outlet 2. Run color‑coded irrigation wire from the controller to each valve: one dedicated wire per valve plus one common wire shared across all of them 2. So a 5‑zone system needs at least six conductors in the bundle, long enough to reach the farthest valve box 2.
Take your time on the planning stages. A good plot plan, honest zoning, and a wiring diagram you can read two years from now will save you more headaches than any expensive valve or controller can. Get those right, and you’ll spend the rest of the season watching the lawn fill in instead of digging things up.