
Replacing your water heater expansion tank is a simple way to extend the life of your water heater and prevent costly water damage. Most plumbing codes now require expansion tanks in closed-loop systems where thermal expansion can cause dangerous pressure increases. The International Plumbing Code specifies when expansion tanks must be installed to protect your water heater and plumbing system. Follow these steps for a safe and effective replacement.
Frequently Asked Questions (Before You Start)
Q: How do I replace a water heater expansion tank?
A: This guide shows the entire process—from shutting off power and water to installing and testing the new tank.
Q: Can I replace a hot water expansion tank myself?
A: Yes, this DIY task only requires basic tools and safety precautions.
Q: How often should it be replaced?
A: Usually every 5–10 years or when signs of failure appear (e.g., leaking, over-pressurization).
Q: How much does it cost to replace one?
A: Tanks cost $30–$60. DIYing avoids plumber fees of $150–$300.
Signs Your Expansion Tank Needs Replacement
- Leaking water around or under the tank
- Constant dripping from the water heater relief valve
- Expansion tank feels completely full (no air cushion)
- Unusual noises like banging or knocking (water hammer)
Step-by-Step Guide
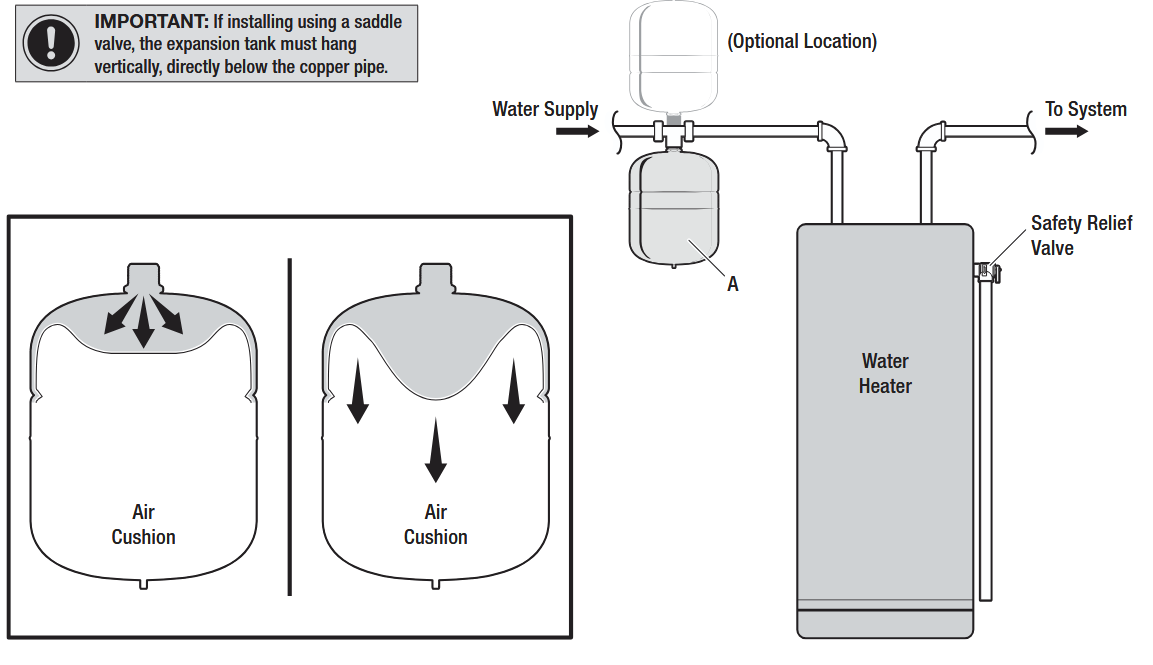
Step 1 – Locate and Inspect the Old Expansion Tank: Find the expansion tank, usually mounted above or near your water heater on the cold water supply line. Note its size and connection type. Most residential tanks are 2–5 gallons. Source
 Step 2 – Turn Off Water and Power:
Shut off the cold water supply to the heater. For electric heaters, turn off the breaker; for gas, set the control to "pilot." Allow the system to cool for at least 1 hour. Source
Step 2 – Turn Off Water and Power:
Shut off the cold water supply to the heater. For electric heaters, turn off the breaker; for gas, set the control to "pilot." Allow the system to cool for at least 1 hour. Source
Step 3 – Relieve Pressure and Drain: Open a hot water faucet to relieve pressure. Use a bucket under the expansion tank and open the bleeder valve (if present) to drain any water. Be careful—water may be hot and under pressure.
Step 4 – Remove the Old Tank: Use a wrench to unscrew the tank. Support the tank as you remove it to avoid stressing the pipes. Inspect the threads for corrosion.
Step 5 – Set the New Tank Pressure: Before installing, check the air pressure in the new tank with a tire gauge. It should match your home's water pressure (typically 50–60 psi; check with a gauge at an outdoor spigot). Adjust with a bicycle pump if needed. Source
Step 6 – Apply Teflon Tape: Wrap Teflon tape clockwise around the tank’s threaded connector to prevent leaks. Start a few threads back from the end.
Step 7 – Install the New Tank: Screw the new tank onto the fitting by hand, then tighten with a wrench. The tank should hang vertically and be installed according to local code requirements. Do not overtighten.
Step 8 – Restore Water and Power: Turn the water supply back on. Open a hot water faucet to purge air from the system. Check for leaks at all connections. Restore power or relight the gas heater.
Step 9 – Test the System: Once the heater is running, check for leaks and ensure hot water flows normally. Recheck the tank and fittings after a few hours.
✅ Quick Checklist
⏹️ [ ] Turn off water and power
💦 [ ] Drain pressure and water
🔧 [ ] Remove old tank
⚙️ [ ] Set pressure in new tank
🧵 [ ] Wrap Teflon tape
🛠️ [ ] Install new tank
🔁 [ ] Restore power/water
🔍 [ ] Test system for leaks
References:
- The Spruce: How to Replace a Water Heater Expansion Tank
- Family Handyman: How to Install a Water Heater Expansion Tank
- Home Depot: How to Install an Expansion Tank
By following these steps, you can replace your water heater expansion tank quickly and safely—no plumber required.