When to Call a Professional
Installing a sump pump means electrical work, cutting into your foundation, and tying into drainage systems — all of which can go wrong fast if you're not prepared. Before you gather tools, check whether your situation falls into one of these professional-only scenarios.
If your basement already has standing water, stop. Water and electricity don't mix, and you're dealing with a live hazard. Call a licensed plumber or waterproofing contractor.
If you need to install a new dedicated circuit for the pump, or your panel is full, that's electrician territory. Don't tap into an existing circuit — sump pumps need their own breaker to meet code and avoid tripping when you need them most.
If your discharge line needs to run uphill, through frozen ground, or tie into a storm sewer, you're beyond a simple DIY. Improper slope or backflow can flood your basement or freeze solid in winter. A pro will handle the grading and local utility rules.
If your home sits on a high water table or you're replacing a failed pump that couldn't keep up, you may need a larger basin, a secondary pump, or a battery backup system. That's a design job, not a swap.
Finally, if you're not comfortable breaking concrete, gluing PVC under pressure, or wiring a float switch, hire it out. A botched install can cost more to fix than the original job — experienced plumbers see it all the time.
DIY materials run $200–$500, while professional installation averages $1,200–$2,500 depending on complexity 1. If your project hits any of the above, the extra cost buys safety and a dry basement.
Safety Considerations
Before you start, know the code requirements: the 2021 IPC Section 712.3.1 says your sump pit must be at least 18 inches in diameter and 30 inches deep, and discharge piping must direct water at least 10 feet from the foundation 2. Discharge piping also has to direct water away from the building to prevent re-entry and comply with code 3.
ELECTRICAL: A GFCI outlet is non-negotiable — no extension cords. Make sure the circuit can handle the pump load, and always turn off power at the breaker before any electrical work. LIFTING: Pumps and wet gravel are heavy. Lift with your legs, not your back, and get help if you need it. DIGGING: Call 811 before you dig to avoid buried utilities. Wear eye and ear protection if you're using a jackhammer. CHEMICALS: Use PVC primer and cement in a well-ventilated area, and wear gloves and safety glasses. WATER: Wet surfaces are slippery — watch your footing. TESTING: Keep your hands clear of the basin interior when the pump is running.
Understanding the Problem in Detail
Groundwater constantly moves around your foundation. Soil becomes saturated during rain or snowmelt, creating hydrostatic pressure. This pressure pushes water through cracks, porous concrete, or even up through the floor slab. A sump pit acts as the lowest collection point; the pump actively removes this water, relieving the pressure and keeping your basement dry.
Step-by-Step Installation
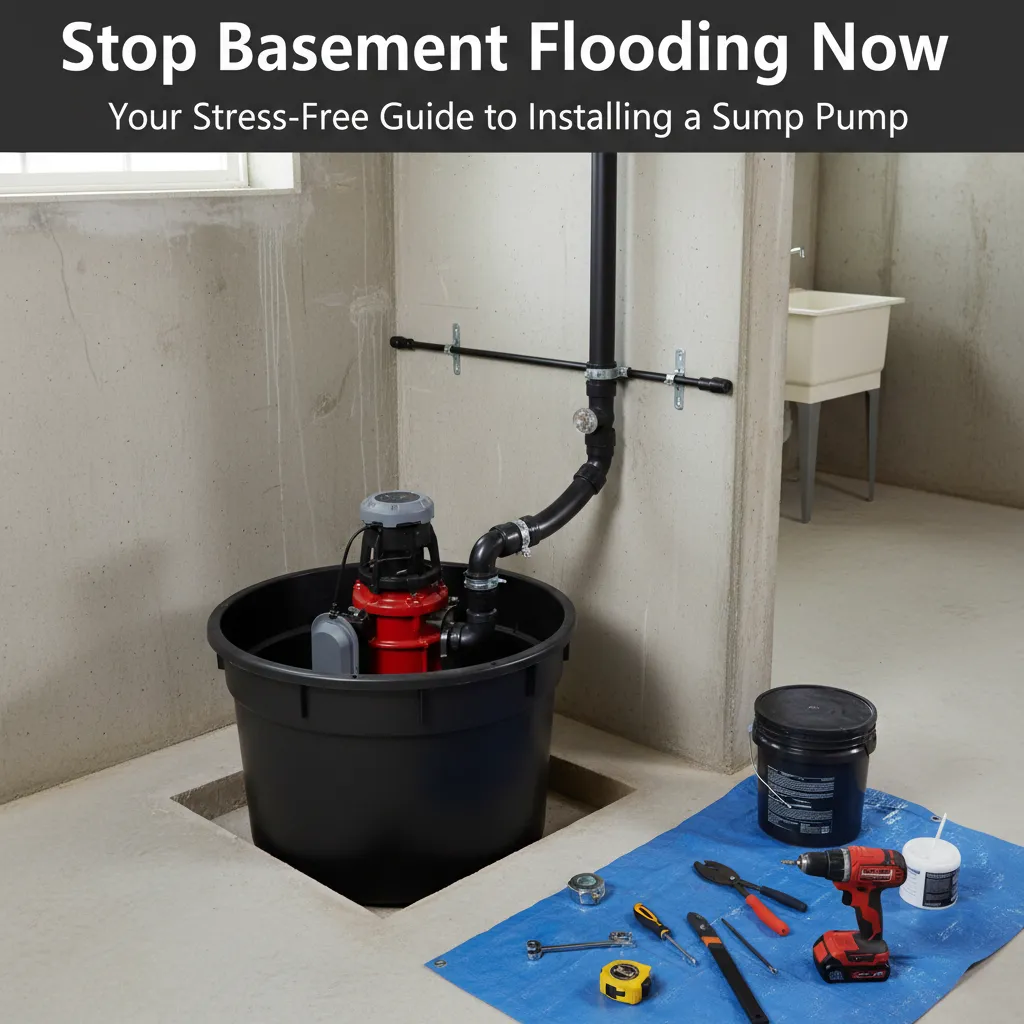
Pick a submersible pump with cast-iron or stainless components — 1/3 HP handles moderate water, 1/2 HP for heavier flow or longer discharge runs — paired with a perforated rigid-plastic basin and Schedule 40 PVC discharge pipe. A check valve is non-negotiable; it stops pumped water from draining back down and burning out the motor.
Step 1: Prepare the basin and dig the pit Mark the basin outline on the floor, then break the concrete and excavate a hole deep enough so the basin rim sits flush with the floor. Add a few inches of washed pea gravel at the bottom for drainage.
Step 2: Set the basin and backfill Place the basin in the pit, check that it's level, and backfill around it with more gravel. Tamp it down firmly so the basin doesn't shift.
Step 3: Install the pump and check valve Lower the pump into the basin, connect the discharge pipe, and install the check valve on the vertical pipe just above the pump. Make sure the arrow on the check valve points away from the pump. If you're gluing PVC pipe with solvent cement, call a plumber for this step.
Step 4: Drill the weep hole Drill a 3/16-inch hole in the discharge pipe between the pump and the check valve, angled downward. This prevents air lock by letting trapped air escape when the pump starts 4.
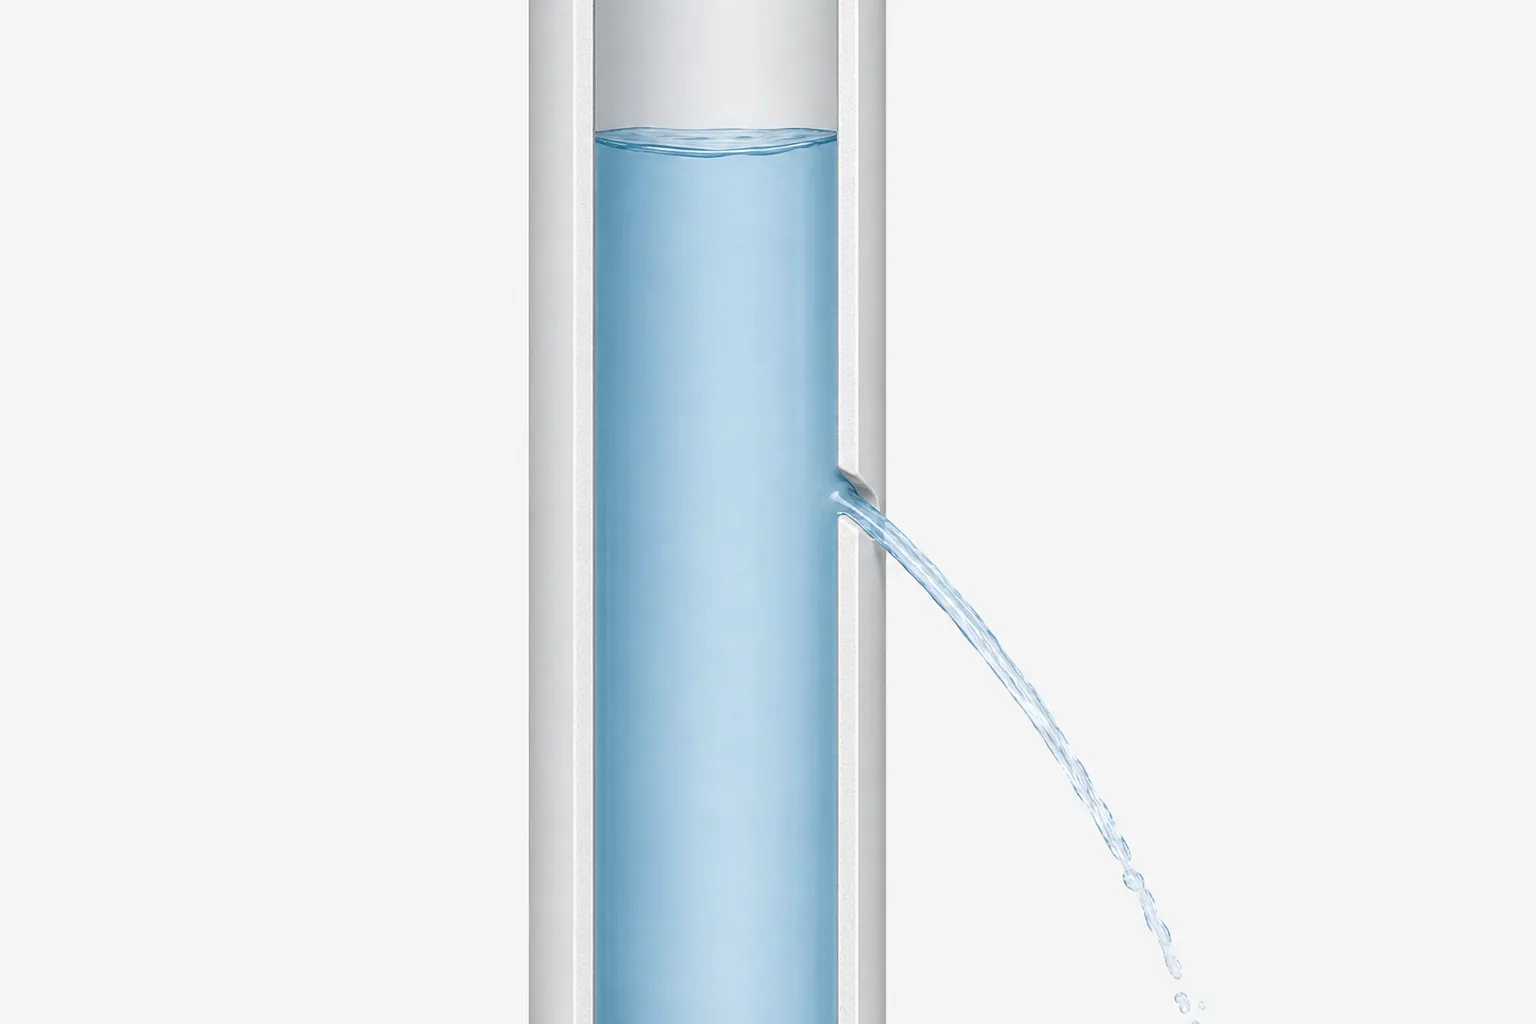
Step 5: Run the discharge line Route the discharge pipe to the outdoors, sloping it downward away from the house. Extend the outlet at least 10 feet from the foundation, and in cold climates, install a freeze relief device like the ELK Freeze Relief to prevent ice blockage 5. If you need to cut or join pipes inside a finished wall, call a plumber for this step.
Step 6: Connect the power Plug the pump into a dedicated GFCI-protected outlet. The circuit should be on its own breaker to avoid tripping from other appliances. If you need to run a new circuit or install a GFCI outlet, hire an electrician for this step.
Step 7: Test the system Pour a bucket of water into the basin to trigger the pump. Watch for smooth operation, no leaks at the check valve or pipe joints, and proper discharge flow outside.
Tools & materials: sledgehammer, shovel, level, drill with 3/16-inch bit, hacksaw, PVC pipe and fittings, check valve, washed pea gravel, GFCI outlet, freeze relief device (if needed).
Troubleshooting Common Issues
When your sump pump acts up, a few simple checks often get it running again. Start with the basics before assuming the worst.
Pump not running at all? First, check the power. Is the GFCI tripped or the breaker off? If the outlet is dead, reset it and see if the pump starts. Next, make sure the float switch isn't stuck against the pit wall or tangled in cords—jiggle it gently to free it up. If you hear a low hum but no water moves, the impeller might be jammed. Unplug the pump, clear any debris from the intake, and try again.
Pump runs but doesn't pump water? A clogged intake or discharge pipe is the usual suspect. Unplug the pump, pull it out, and clear any muck or stones from the bottom screen. If the discharge line is blocked, you'll need to snake it or disconnect sections to find the obstruction. Another possibility is a stuck check valve—tap it lightly with a screwdriver handle; if that doesn't free it, replace the valve. An air lock can also stop flow. That's why experienced plumbers always drill a small weep hole in the discharge pipe just above the pump: it lets trapped air escape so water can move 6. The weep hole is designed to prevent air locks—it's not a leak. For proper weep hole function, aim the hole away from the float switch to keep debris from collecting on the float. If the spray from the weep hole hits something sensitive, you can cut a reducing fernco to redirect it 4.
Pump runs constantly? A float switch stuck in the "on" position is the first thing to check—make sure it moves freely. A leaky check valve can also cause short-cycling: water flows back into the pit after the pump shuts off, triggering it again almost immediately. A failed check valve makes the pump short-cycle and waste energy 7. If you see water pouring back into the pit, the discharge pipe may have come apart or the check valve might be missing or broken 7. In rare cases, a high water table simply overwhelms the pump's capacity, and you'll need a higher-capacity model or a second pump.
Noisy pump? Debris in the impeller, loose mounting bolts, or failing bearings can all cause racket. If cleaning and tightening don't quiet it down, the pump may be near the end of its life.
Still having trouble after these checks? If you've ruled out the simple fixes and the pump still misbehaves, it's time to call a pro. Electrical issues, internal motor failures, or persistent water problems often need a plumber's diagnostic tools.
⚠️ Warning: If your discharge line runs outside and temperatures drop below freezing, a frozen pipe can cause pump failure and basement flooding. A freeze relief device like the ELK Freeze Relief can relieve pressure in the discharge line and help prevent sump pump and discharge line failure from freezing 5.
Pro Tips
A few practical pointers from experienced plumbers can make the difference between a sump pump that runs reliably for years and one that gives you headaches.
- Drill a weep hole. If your pump doesn't come with one pre-drilled, drill a 3/16-inch hole in the discharge pipe between the pump and the check valve. This prevents air lock by letting trapped air escape so the pump can prime 4. Angle it downward so the spray stays inside the pit.
- Test the check valve orientation. Before gluing anything, hold the check valve in place and blow through it. You should be able to blow in the direction of flow (away from the pump) but not back toward the pump. One homeowner reported a new pump that wouldn't move water because the check valve was installed backward 7.
- Secure the discharge pipe. Use a pipe clamp or strap to anchor the vertical pipe to the wall or floor joist above the pit. This keeps vibration from loosening connections over time.
- Protect the discharge line from freezing. If your discharge line runs outside and you live in a cold climate, install a freeze relief device like the ELK Freeze Relief 5. It opens automatically if ice forms, giving water a place to go instead of cracking the pipe.
- Test the pump before you need it. After installation, fill the pit with a 5-gallon bucket of water until the float triggers the pump. Watch for leaks, listen for odd noises, and make sure water flows freely out the discharge. Do this a few times to break in the float switch.
- Keep a spare check valve on hand. Check valves are cheap and fail more often than the pump itself. Having a replacement ready means you can swap it in minutes instead of waiting for a store to open during a storm.
- Label your circuits. If the pump is on a dedicated breaker, label it clearly in your electrical panel. In an emergency, you don't want to guess which switch kills the pump.
- Consider a water alarm. A battery-operated water alarm placed near the pit gives you early warning if the pump fails or the pit overflows. It's a $15 insurance policy.
These small steps take only a few extra minutes during installation but pay off every time the pump cycles.
Maintenance and Prevention
Test Monthly: Pour water into pit, ensure pump activates and empties it. Clean Quarterly: Unplug, remove pump, clean intake screen and basin bottom of silt/debris. Inspect Annually: Check discharge line for obstructions, ensure outlet extends far away, verify check valve function, test battery backup if installed. Every 2-5 Years: Consider replacing the pump proactively (lifespan varies). Keep the pit covered.
Cost Analysis: DIY vs Professional
A DIY sump pump install usually runs under $500 in materials. Professional quotes range from $1,100 to $6,500 8. One homeowner spent under $500 on the pit, pump, rock, and pipe, and wrapped up in half a day 8.
Pro installation averages $1,100 to $1,400, with a typical spread of $500 to $4,000 depending on pump type and complexity 1. Angi lists an average of $1,100 and a range of $800 to $3,000, while This Old House reports $1,400 on average and a range of $500 to $4,000 1.
DIY materials break down roughly as: pump ($150–$300), basin ($40–$80), pipe, fittings, and valve ($50–$100), gravel and sealant ($30–$50), and cover ($20–$50)—totaling $300 to $600. The savings over a pro install are significant. You can put that money toward a higher-quality pump or a battery backup, which adds $200 to $500 or more.
Related Plumbing Problems
Persistent leaks might mean you've got foundation cracks that need repair, improper exterior grading or downspouts that drain water toward the house, clogged perimeter drains (weeping tile), a high water table that calls for a more robust system, or gutter issues dumping water right next to the foundation.
Frequently Asked Questions
How often should I test my sump pump?
Test it at least once a month, especially before rainy seasons. Pour a bucket of water into the pit until the float rises and triggers the pump. It should turn on, pump out the water, and shut off automatically.
Is a battery backup really necessary?
It's strongly recommended. The most common time for basement flooding is during heavy storms, which often cause power outages. A battery backup pump kicks in automatically when the power fails, giving you critical protection when you need it most.
My pump is running constantly, what's wrong?
This could be a stuck float switch (try gently freeing it), a faulty check valve allowing water to flow back into the pit (listen for water flowing back after shutoff, replace valve), or an exceptionally high water table exceeding your pump's capacity. Check these first. If unsure, call a pro.
Can I install a sump pump if I already have water?
Yes, but it's messy. You'll need a wet/dry vac or a temporary 'trash pump' to remove standing water first so you can clearly see where to dig the pit at the lowest point. Ensure the area is safe and electrically isolated.
How long does a sump pump last?
Typically 5-10 years, but lifespan depends heavily on water quality, usage frequency, and quality of the pump. Regular cleaning and testing help extend its life. Budget for replacement proactively.