That maddening sound of water constantly running into your toilet tank isn't just annoying — it's money down the drain. Weak flush? Handle feels wrong? Water creeping toward the rim? Whatever's going on, the fix is probably simpler than you think.
Your toilet is a straightforward system: a few mechanical parts working together to fill, flush, and seal. When something goes wrong, it's almost always one of five things — the float, chain, flapper, water level, or a clog. This guide walks you through each one so you can pinpoint the problem and fix it fast, no plumber needed.
Solution (Beginner - 5-15 minutes emergency stop / 15-45 minutes adjustment / 30-60 minutes replacement)
Step 1: Shut Off the Water & Empty the Tank
Turn the supply valve behind the toilet clockwise until it stops. Flush and hold the handle to drain the tank. Sponge out the remaining water and lay towels around the base.
⚠️ Warning: Never skip shutting off the water. Confirm no water is flowing into the tank after flushing before you start working.
Step 2: Diagnose Which Part Is the Problem
Answer a few quick questions to pinpoint the right fix:
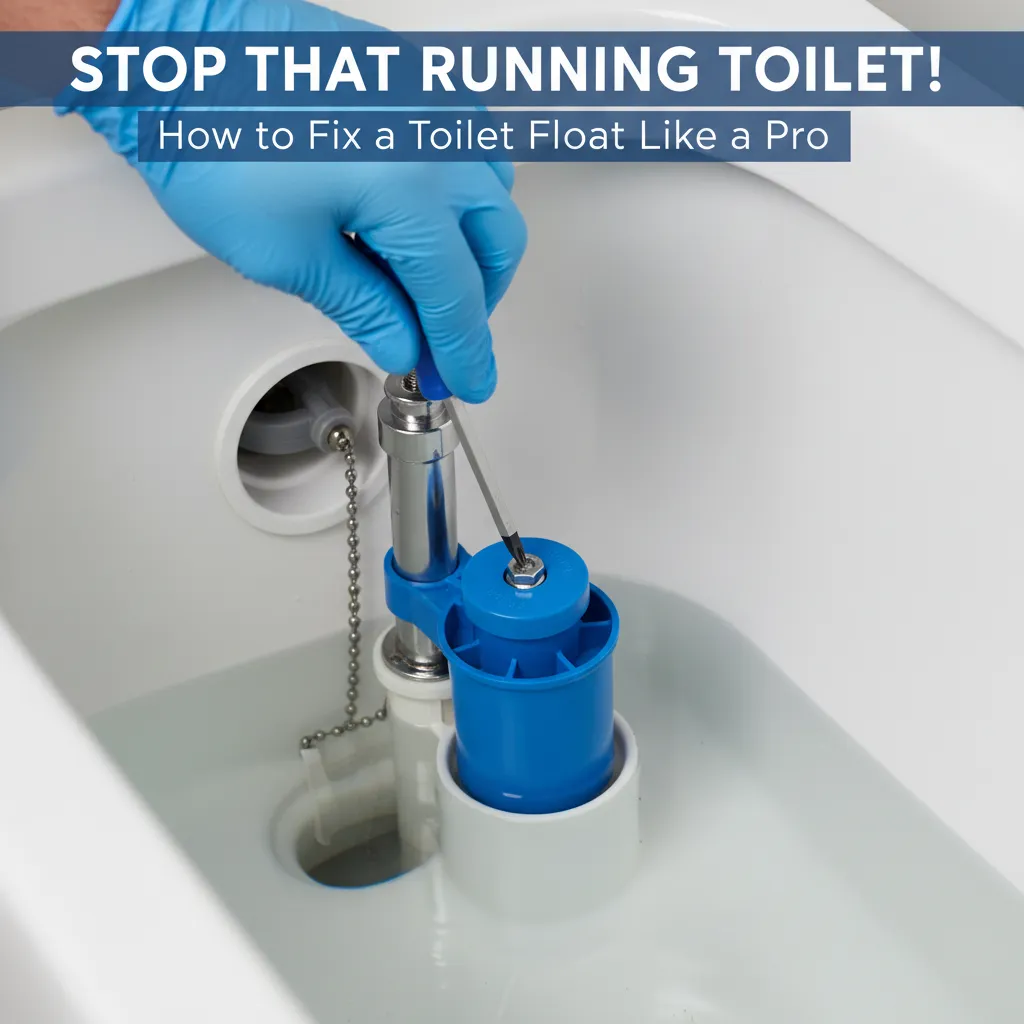
Step 3: Fix a Sticking or Misadjusted Float
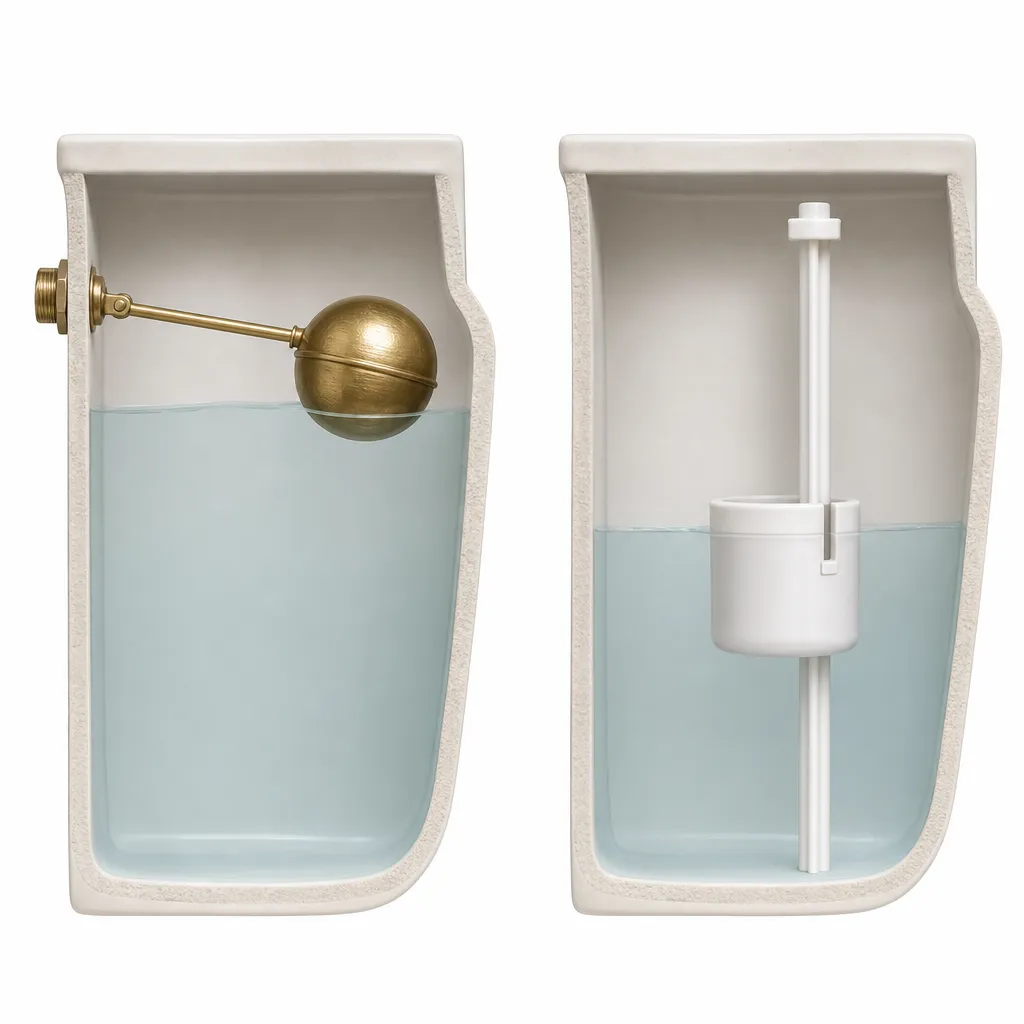
Look inside the tank. Plastic ball on an arm (ball float) or a cylinder sliding on a vertical tube (cup float)? Move it gently — does it stick? Is it cracked or waterlogged?
Ball float sticking? Bend the brass arm slightly downward or clean the pivot with vinegar. Cup float sticking? Pinch the clip, slide it free, and clean the shaft with vinegar. To adjust: ball float — turn the screw clockwise to lower water, counterclockwise to raise. Cup float — squeeze the clip and slide up (lower) or down (raise). After flushing, the water in your tank should sit 1/2" to 1" below the top of the overflow tube.
⚠️ Warning: Turn adjustment screws gently. Over-tightening can strip plastic threads. Don't force anything that feels stuck.
Step 4: Adjust or Replace the Toilet Chain
Pop the tank lid off and check the chain:
- Is it hooked properly? If the S-hook has slipped off the lever arm, reattach it. Add a small split key ring to the lever arm for a more secure anchor.
- Is it rusty or corroded? Brass chains degrade fast in water — stainless steel is the right choice. Swap a rusty chain by unhooking both ends, threading the new one through the flapper's attachment tab, and hooking it to the lever arm.
- Is the slack right? Aim for about 1/2 inch of loose chain when the flapper is closed. Too tight and the flapper can't seal (causing running). Too loose and the flapper won't lift fully (causing weak flushes). Adjust by moving the clip on the lever arm or removing links — pinch the chain sideways to pop a link open.
⚠️ Warning: Wear gloves if handling corroded metal — edges can be sharp. Avoid yanking plastic parts.
Step 5: Replace a Worn Flapper
The flapper is the rubber seal at the tank's bottom. Chlorine and minerals harden it over time, breaking the seal. Test with food coloring: add drops to the tank — color in the bowl within 15 minutes means it's leaking.
To replace:
- Unhook the chain from the flush lever.
- Slide the flapper's ears off the overflow tube pegs. Snap a photo first for reference.
- Wipe the valve seat with a vinegar-dampened rag. No abrasive scrubbers — micro-scratches cause leaks.
- Attach the new flapper centered over the valve. A dab of plumber's grease on the mounting points helps.
- Reattach the chain with about 1/2" slack.
Universal flappers (like Fluidmaster 502) fit most toilets, but match your flush valve size — 2" or 3". Bring your old flapper to the hardware store if you're unsure.
⚠️ Warning: Don't stretch or twist the flapper during installation — it should hang naturally over the valve opening.
Step 6: Fix the Water Level
If it's off:
- Too high — water spills into the overflow tube, causing constant running. Lower the float (see Step 3).
- Too low — not enough water for a strong flush. Raise the float.
- Inconsistent level — mineral buildup on the valve seal is the usual culprit. Try cycling the water off and on quickly a few times to flush debris out, or clean with vinegar.
Also check the refill tube (the small hose from fill valve to overflow tube). It should clip to the tube's rim, not sit inside it. If detached, the bowl won't refill properly.
⚠️ Warning: Watch for leaks at the supply line connection when turning water back on. Tighten slightly if it drips.
Step 7: Stop an Overflow Emergency
Water rising to the rim? Act fast:
- Kill the water supply. Turn the shutoff valve clockwise. Can't find it? Lift the lid and pull the float arm up.
- Contain the mess. Towels around the base. Scoop bowl water with a bucket if critical.
- Plunge. Flange plunger over the drain hole. Push down firmly, pull up sharply — keep the seal. Repeat 15-20 times. Gentle pressure waves beat violent thrusts.
- Auger if plunging fails. Insert a toilet auger and crank clockwise. Feel resistance? Gently push and pull to hook the debris. Retract fully before removing to avoid splashback.
⚠️ Warning: Wear rubber gloves — toilet water contains bacteria. Never pour boiling water into the bowl; it can crack the porcelain. Never use chemical drain cleaners — they rarely work on toilet clogs and can damage internal seals.
Step 8: Test Your Fix & Tweak
Turn the water supply back on counterclockwise. Watch the tank fill — water should stop just below the overflow tube. Flush 2-3 times. Tank fills and shuts off completely? No leaks at the fill valve or supply line? Run the food coloring test once more to confirm the flapper is sealing.
⚠️ Warning: Have towels ready when turning water back on. Watch diligently for any drips at connections.
Pro Tips
- Clean mineral buildup first. Soak crusty parts in vinegar overnight before adjusting or replacing — it often fixes sticking issues without buying new parts.
- Replace the flapper and fill valve together. They wear out around the same time. Doing both at once saves you from reopening the tank a month later.
- Listen for hissing. After the tank fills and shuts off, put your ear near the fill valve. A slight hiss often means debris is stuck in the valve seal. Try cycling the water off and on quickly a few times to flush it out.
- Take a phone pic first. Snap a picture of your tank's setup before disassembly — it's a lifesaver when reconnecting hoses and positioning parts.
- Use a paperclip in a pinch. If the chain breaks and you don't have a replacement, a bent paperclip works as a temporary emergency chain.
- Keep a dedicated toilet plunger. Sink plungers don't seal properly on toilets. A flange-style plunger is worth the few extra dollars.
- Buy a repair kit for $20. A kit with chain, flapper, and fill valve future-proofs your repairs in one trip.
When to Call a Professional
Call a plumber if: water leaks from under the tank, the shutoff valve won't turn, multiple drains back up, clogs recur weekly, or you're uncomfortable with any step. Average pro cost: $150-350.
Troubleshooting by Symptom
If your toilet runs for just a few seconds every several minutes—say, 3 seconds every 12 minutes—you've got a leaky flapper letting water trickle into the bowl and triggering periodic refills 1. A constantly running toilet can waste thousands of gallons per month; one homeowner saw 13,000 gallons used in a single week from a running toilet 2.
To confirm a leak, turn off the water supply and mark the water level in the tank. If it drops after an hour, the flapper is leaking 1. When you replace the flapper, measure the width of the existing one—a flapper that measures 3 inches across fits a 2-inch flush valve and takes a Fluidmaster 502 3.
If adjusting the float and replacing the flapper doesn't stop the running, the fill valve may be worn out. Experienced plumbers recommend replacing it with a Fluidmaster Pro45 (model 45) 2. Also check for a misaligned float arm 1.
If water is overflowing from the toilet's standpipe, adjust the float to shut off at a lower water level 4.
| Symptom | Most likely cause | Try first |
|---|---|---|
| Water still running after adjustment | Worn flapper or chain too tight | Food coloring test. If flapper leaks → Step 5. If not → check chain slack (Step 4) |
| Float sticks after cleaning | Mineral buildup warped the float or arm | Replace the float or entire fill valve assembly |
| Water level inconsistent | Debris in the fill valve seal | Cycle water off/on quickly 5-6 times to flush debris. Clean valve seal with vinegar |
| Weak flush after repair | Chain too tight or water level too low | Loosen chain slack (Step 4) and confirm water sits 1/2" below overflow tube (Step 6) |
| Plunging isn't working | Poor seal or too much air in the cup | Add water to cover the plunger cup. If still stuck, switch to the auger |
| Gurgling sounds when flushing | Blocked vent stack | Run a nearby sink while plunging to relieve pressure. If it persists, call a plumber |
| Hissing after tank fills | Debris in fill valve seal | Cycle water off/on quickly 5-6 times. If hissing continues, replace the fill valve |
| Handle feels loose | Loose mounting nut | Tighten the nut behind the handle cover inside the tank |
Maintenance and Prevention
- Test monthly. Add food coloring to the tank — color in the bowl within 15 minutes means the flapper is leaking.
- Clean the tank every 6-12 months. Turn off water, flush, add 2 cups vinegar, let sit an hour, then scrub.
- Check chain slack annually. Verify 1/2" slack. Replace every 1-2 years even if it looks okay — water degrades them.
- Replace the flapper every 3-5 years. They deteriorate even without visible damage.
- Skip bleach tablets. They destroy rubber parts. Stick to vinegar cleaning.
- Never flush wipes (even "flushable" ones) — they're the #1 cause of recurring clogs.
- Consider a high-efficiency toilet. If your toilet is old or you're remodeling, upgrading to a WaterSense certified model can save water and money. These toilets use no more than 1.28 gallons per flush, which is 20% less than the standard 1.6 gpf models 5. In California, new residential construction already requires toilets with a flush volume of 1.28 gpf or less under the CALGreen code 6.
Frequently Asked Questions
My toilet runs intermittently — a few seconds every few minutes?
Flapper barely sealing or float set a hair too high. Water leaks or spills into the overflow tube until the fill valve kicks in. Start with the food coloring test — if the flapper leaks, replace it. If not, lower the float slightly.
How much slack should the toilet chain have?
About 1/2" of loose chain when the flapper is closed. Lift the chain straight up — it should lift the flapper without resistance for the first half-inch. Too tight = can't seal (runs). Too loose = won't lift fully (weak flush).
I replaced the flapper but the toilet still runs. What else could it be?
90% of the time it's chain tension — check for 1/2" slack. If that's fine: 1) Clean debris off the valve seat with vinegar, 2) Check for a warped seat (may need a pro), 3) The fill valve may be set too high, 4) The new flapper may not be centered.
Is a running toilet an emergency?
Not a flood emergency, but a water-wasting one. A running toilet can waste 200+ gallons daily. Fix it as soon as you can. Shut off the supply valve if you can't fix it immediately.
Can a smart device help me catch a toilet leak?
A water monitoring device like Flume can detect toilet leaks by tracking real-time water usage and sending leak alerts. One homeowner reported using Flume to monitor water usage and receive leak alerts, finding it easy to install 7.