When to Call a Professional
Pipe insulation is a straightforward DIY job for most exposed pipes in basements, crawl spaces, and attics. But there are a few situations where you'll want to step back and call a licensed plumber before you start gathering tools.
If your pipes run through walls, ceilings, or enclosed chases, you're dealing with more than just insulation. Opening up finished surfaces means cutting into drywall, plaster, or even tile — and you might find surprises like old wiring or asbestos in homes built before the 1980s. Experienced plumbers warn that disturbing these materials without proper testing and containment can create a serious health hazard 1.
You should also call a pro if your pipes are already frozen or you suspect a freeze-related crack. Thawing pipes incorrectly — especially with an open flame — can cause steam explosions or start a fire. A plumber has the right equipment to thaw pipes safely and can pressure-test the system afterward to check for hidden splits.
Pipes that run close to combustion exhaust vents, like furnace or water heater flues, need special attention. Standard foam pipe insulation isn't rated for high heat, and placing it too close to a hot vent can create a fire risk 2. A plumber can recommend the right insulation material and proper clearance for your setup.
Finally, if your home has a complex plumbing layout — multiple zones, recirculating hot water loops, or pipes buried in concrete slabs — the insulation strategy isn't always obvious. A professional can assess your whole system and make sure you're not accidentally creating condensation traps or thermal expansion problems.
In any of these cases, the cost of a service call is small compared to a burst pipe repair, which can run anywhere from a few hundred dollars for a simple fix to over $5,000 for major water damage and mold remediation 3.
Safety Considerations
Wear goggles when cutting overhead. Check for electrical wires before drilling or sanding. Never insulate gas pipes—it's a fire risk. Keep insulation at least 6 inches from flues and heaters. In crawl spaces, use a knee pad and watch for nails.
If your home was built before the 1980s, the existing pipe insulation might contain asbestos. Disturbing it releases dangerous fibers. Experienced plumbers say if it looks like asbestos, don't touch it—encapsulate it with duct tape or wet rags instead 1.
Foam insulation near exhaust vents can be a fire hazard. One homeowner learned this the hard way when a working plumber spotted the issue and recommended cutting the insulation back a few inches 2. Keep all insulation at least a few inches away from any vent that gets hot.
Understanding the Problem in Detail
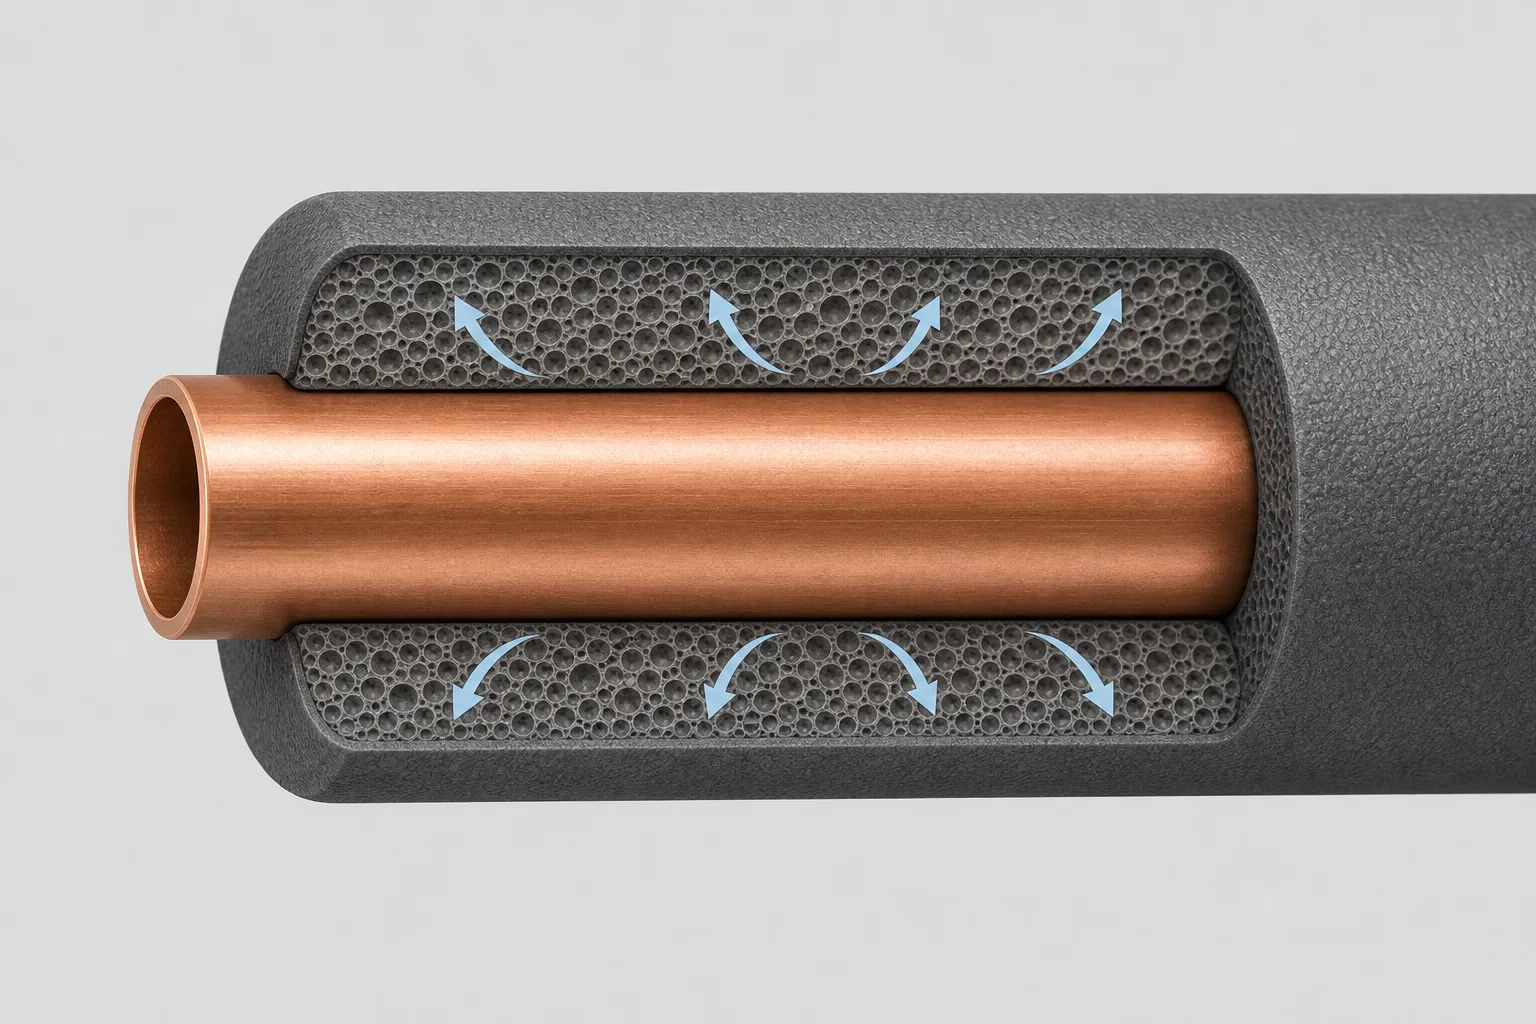
Insulation fails from age, moisture, pests, or just being installed wrong. Cold pipes sweat and grow mold. Hot pipes lose heat and waste energy. Uninsulated pipes in attics or crawl spaces can freeze when outdoor temperatures hit 20°F—the ice expansion generates over 2,500 PSI, enough to burst most residential plumbing.
Building codes don't treat pipe insulation as optional. The 2018 International Plumbing Code (IPC) Section 305.4 requires that water pipes in locations subject to freezing be protected by insulation or heat 4. This applies to all piping materials—plastic pipes need insulation too, a point often overlooked by homeowners who assume plastic is immune to freezing 5. For most residential pipes, the minimum insulation thickness is 1 inch (25 mm), completely surrounding the pipe 6.
For hot water or steam lines, the requirements get more specific. ASHRAE 90.1 ties insulation thickness to pipe size and operating temperature—for example, a steam pipe above 350°F that's larger than 1 inch NPS needs 5 inches of insulation 7. Most homes won't hit those extremes, but it shows how insulation isn't just about freeze protection; it's also about energy efficiency and safety.
At the hardware store, you'll find foam sleeves for cold water lines at $0.50–$1 per foot, and rubber insulation for hot water or steam at $1–$2 per foot. Foil tape ($5 a roll) handles heat-resistant sealing. Cheaper alternatives like fiberglass wrap exist, but they're messier to install. For small jobs, kits with pre-slit sleeves and tape save time.
Step-by-Step Installation
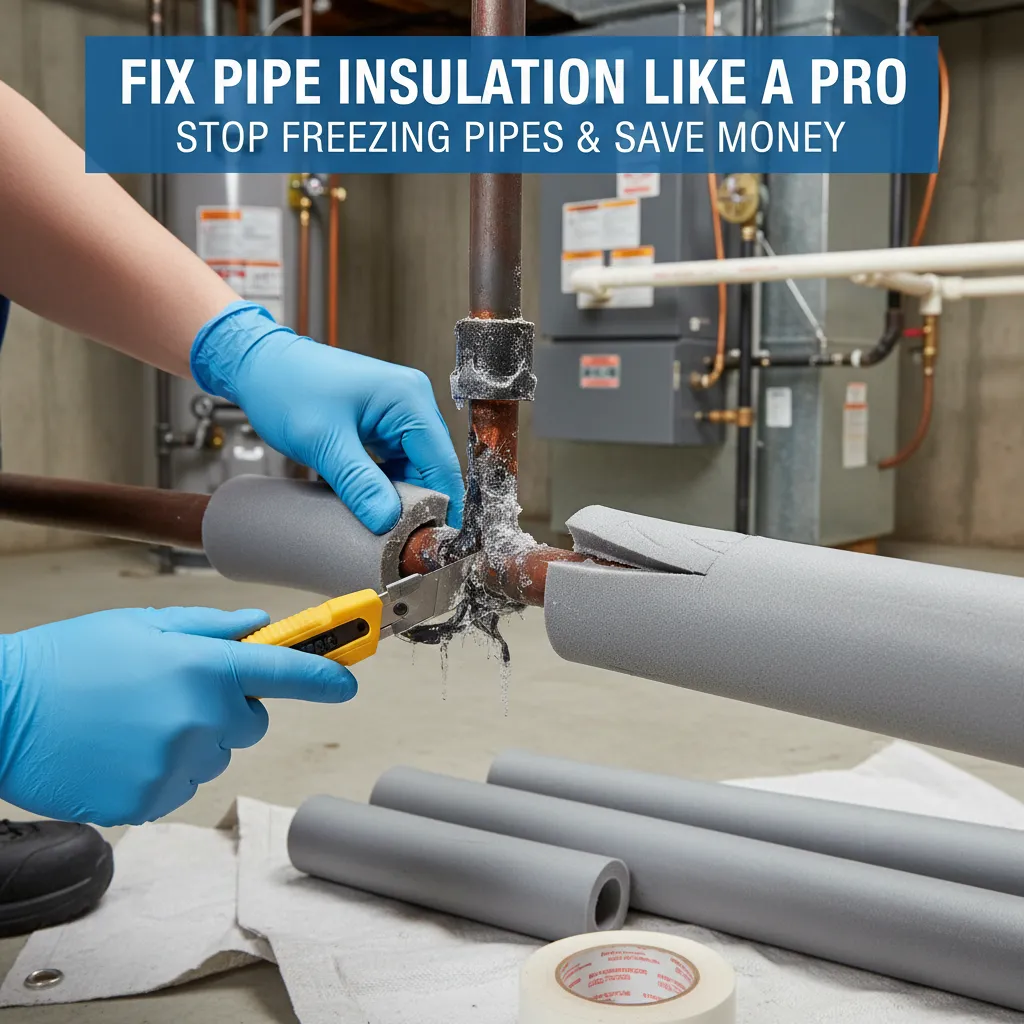
Step 1: Measure and cut the insulation Measure the exposed pipe you need to cover. Cut the foam or rubber sleeve to length with a utility knife or scissors. If you're using pre-slit sleeves, just press them open along the slit.
Step 2: Dry-fit the sleeve Slip the insulation onto the pipe without adhesive to check the fit. Butt the ends of adjacent sleeves tightly together — gaps let cold air reach the pipe.
Step 3: Seal seams and joints Peel the adhesive backing off the pre-applied tape strip (if your sleeve has one) and press the seam closed. For sleeves without self-sealing tape, wrap foil tape around every joint and seam. Foil tape handles heat better than duct tape and won't degrade over time.
Step 4: Secure loose insulation If the insulation feels loose or you're working on vertical runs, add zip ties or wire every 12–18 inches to keep it from sliding. Don't cinch them so tight that you compress the foam — that reduces its insulating value.
Step 5: Insulate elbows and tees For 90° bends, miter-cut two sleeves at 45° and tape the joint. Pre-formed elbow covers are easier if you can find the right size. Tees can be wrapped with fiberglass or taped with overlapping foam pieces.
Step 6: Check clearance around heat sources Keep foam insulation at least 6 inches away from flue vents, furnace exhaust, and water heater draft hoods. If insulation touches a hot surface, it can melt or ignite — experienced plumbers warn this is a common fire hazard. If you can't maintain clearance, call a plumber to evaluate heat shields or alternative materials.
Compact Tools & Materials: utility knife or scissors, measuring tape, foil tape, zip ties or wire, pre-slit foam or rubber pipe sleeves.
Troubleshooting Common Issues
Sleeves won't stay? Use straps instead of tape. Condensation after repair? Seal missed gaps with silicone caulk. Frozen pipe during fix? Thaw slowly with a hairdryer, never an open flame. Insulation still slipping? Roughen pipe surface with sandpaper for better grip.
Pro Tips
Before you wrap up, a few things experienced plumbers say make the difference between a job that lasts and one you'll redo next winter.
- If your home was built before the 1980s, check for asbestos on old pipe insulation before disturbing it. One homeowner with a 1967 house found asbestos on pipe elbows — if the wrap looks fibrous, white, or chalky, stop and get it tested 1.
- Keep foam insulation at least 6 inches away from exhaust vents, flues, or any pipe that gets hot. Some foam can ignite or melt, and working plumbers have seen scorched insulation near water heater vents 2.
- Don't compress the insulation — it works by trapping air. Squeezing it into a tight space cuts its R-value, so notch out obstructions instead of crushing the foam.
- On outdoor hose bibs, a foam cover alone isn't enough if you forget to disconnect the hose. A connected hose traps water against the valve, and that's what freezes first. Remove the hose, drain the bib, then put the cover on.
- For long pipe runs in unheated spaces, heat tape can be a lifesaver, but only if you follow the manufacturer's instructions exactly. Overlapping or wrapping it wrong creates a fire hazard — if you're unsure, hire an electrician.
- After insulating, snap a few photos of the work before closing up walls or ceilings. You'll thank yourself later when you need to know exactly where a pipe runs.
Maintenance and Prevention
Check insulation annually before winter. Feel for cold spots. Seal attic/crawl space drafts. Let faucets drip during hard freezes. Keep cabinet doors open to let warm air reach pipes. Install smart leak detectors near vulnerable areas.
Cost Analysis: DIY vs Professional
If you're weighing whether to insulate your pipes yourself or hire someone, the numbers tell a clear story. DIY materials run $20 to $50 for a typical home 3. Professional installation averages $600, with most jobs falling between $360 and $850 8. That's a big spread, and it's why many homeowners tackle this one themselves.
Now, if a pipe has already frozen and burst, the costs climb fast. A plumber charges $45 to $200 per hour, and the average burst pipe repair bill is $500 3. Compare that to a $20 roll of foam insulation and some tape—prevention is almost always cheaper.
Energy savings add up too. Proper insulation cuts heat loss by 80%, saving you $5 to $15 per month for every 10 feet of hot water pipe. Over a winter, that can offset the material cost entirely.
One thing many homeowners don't realize: your insurance likely covers water damage from a burst pipe, but it won't pay to fix the pipe itself 9. So that $500 repair comes out of your pocket, while the soaked drywall might be covered. Insulating now is a cheap way to avoid that headache.
Related Plumbing Problems
Frozen pipes, pipe corrosion, high water bills, mold growth, inefficient water heaters, rodent nesting in insulation.
Frequently Asked Questions
Can I reuse old insulation?
Only if it's intact, dry, and mold-free. Compressed or torn insulation loses effectiveness. When in doubt, replace it – it's cheaper than water damage.
What insulation is best for outdoor pipes?
Use thick rubber sleeves (min 1" wall) covered with UV-resistant wrap or PVC pipe. Outdoor insulation needs waterproofing and pest resistance.
How tight should insulation fit?
Snug but not squeezed. You should barely see the pipe outline. Air gaps reduce efficiency by 50% – if you can slip a finger under it, it's too loose.