When to Call a Professional
Some shower repairs are straightforward, but others can go sideways fast. Before you gather tools, know when the job needs a licensed plumber.
- You can't identify the valve brand or model. Without the right parts, you risk damaging the valve body. Experienced plumbers often rely on brand-specific pullers and know the visual cues that distinguish one manufacturer from another 1.
- The cartridge or stem is seized. If moderate force won't budge it, forcing it can crack the valve body or snap the stem inside the wall. Working plumbers see this most often with older Moen cartridges, where a specialized puller is sometimes the only safe removal method 2.
- You're dealing with a concealed leak or water damage. A drip you can see is one thing; water inside the wall cavity is another. If you spot staining, swelling, or mold around the shower surround, stop and call a pro.
- The job requires soldering, brazing, or main-line work. Replacing a whole mixing valve often means cutting into supply lines. If you're not comfortable with a torch or press tool, this isn't the place to learn.
- Your home has unconditioned spaces where pipes run. The International Plumbing Code requires freeze protection for water lines in unconditioned areas 3. If your shower plumbing runs through an exterior wall or unheated attic, a pro can ensure the repair meets code.
If you're unsure, err on the side of calling a plumber. A service call costs less than fixing a flooded bathroom.
Safety Considerations
Water off — verify it: Open a faucet after closing the main and confirm nothing flows. Electricity: Use a non-contact voltage tester near any outlets or fixtures before cutting into walls. Protect surfaces: Cover the tub floor and nearby fixtures with rags before using tools. No force: If something won't budge, penetrating oil and patience beat muscle every time — forcing breaks expensive parts. Eye protection: Wear safety glasses for both paths; debris and spray happen unexpectedly.
If your shower is in an unconditioned space like a basement or exterior wall, the 2024 International Plumbing Code requires water lines to be protected from freezing by insulation or heat 4. Check that your pipes are properly insulated before you start — a frozen pipe can burst and cause far more damage than a dripping shower.
Understanding the Problem in Detail
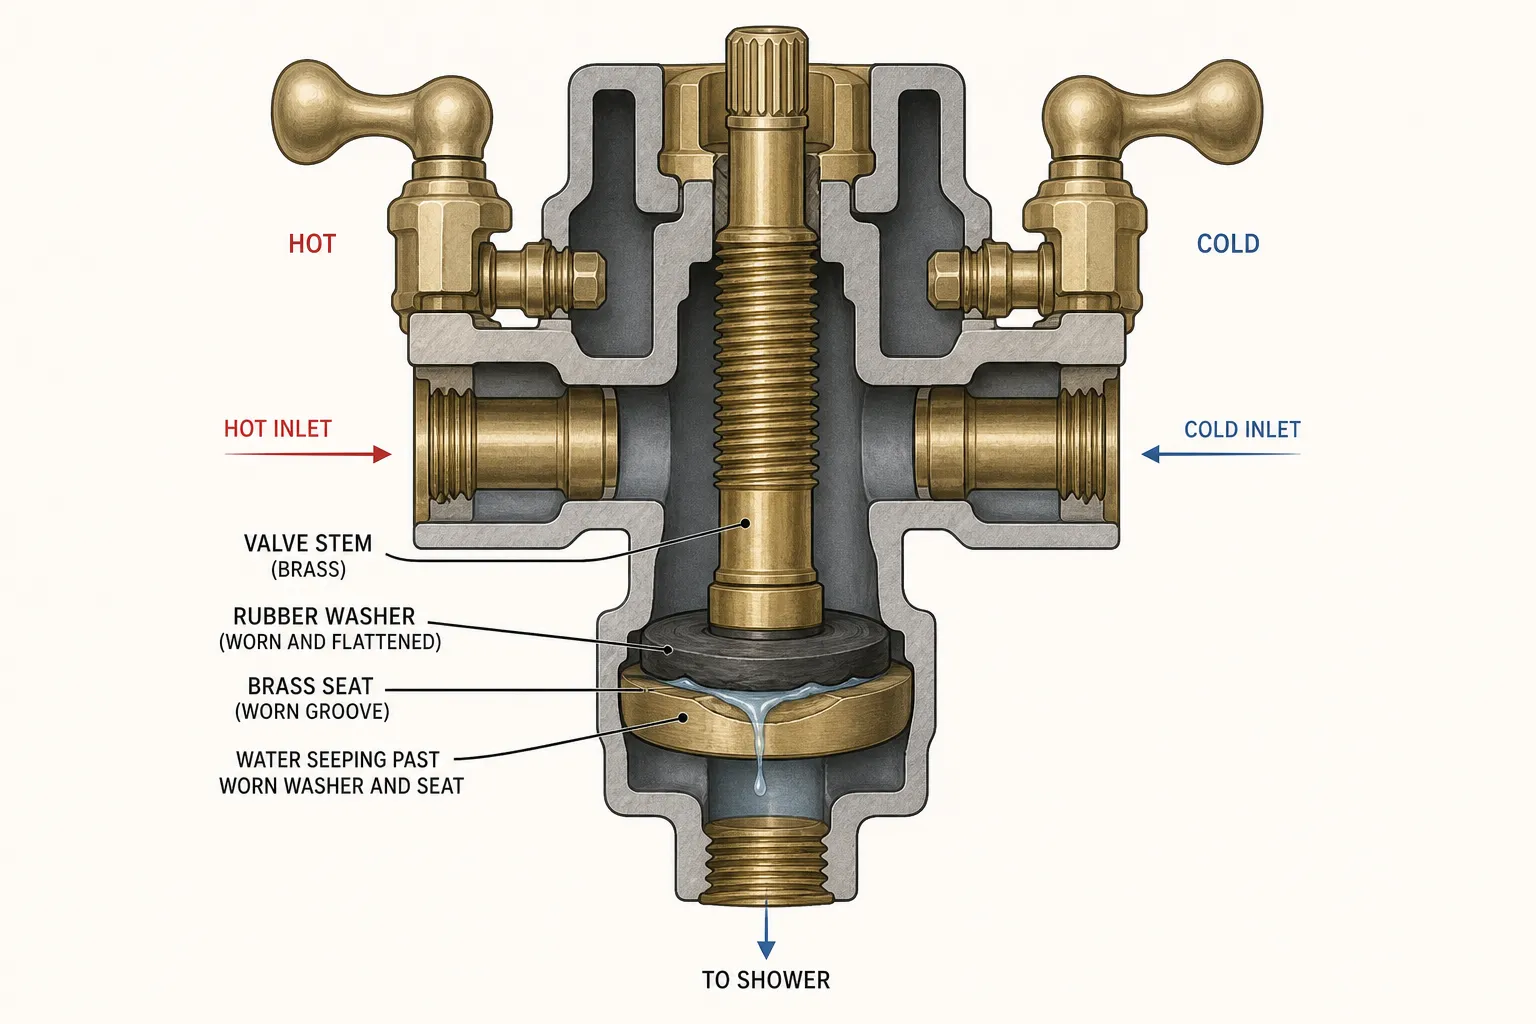
Valve stem (2-handle): The stem is a threaded shaft that screws in and out as you turn the handle. It pushes a rubber washer against a fixed brass seat to stop water flow. When the washer hardens or the seat grooves, water sneaks past — that's your drip. Mineral buildup can also jam the threads, making the handle hard to turn.
Mixing valve (single-handle): The valve body blends hot and cold water and sends the mix to the showerhead. The cartridge inside it is the moving part that wears first — usually that's all you need to replace. When the valve body itself corrodes, leaks develop at the pipe connections or behind the wall, and a full swap is the only fix.
Path A: Replace a Valve Stem (2-handle showers)
Turn off the main water supply. Open the shower and a downstairs faucet to drain the lines and relieve pressure. Remove the handle: find the screw hidden under the decorative cap, unscrew it, and pull the handle straight off. If you're dealing with a Delta handle and the screw is seized, drill off the screw head, pull the handle, then twist the remaining screw out with pliers — you won't damage the cartridge threads 5. Remove the escutcheon plate to expose the valve body and the retaining nut. Lay a towel in the tub to catch parts.
⚠️ Warning: Confirm the water is fully off — don't just assume. Turn the shower handle after shutting off the main and verify nothing flows.
Step 1: Remove the old valve stem
Fit a valve stem socket over the stem body and onto the large hexagonal retaining nut. Turn counter-clockwise. If it's stuck, apply penetrating oil around the threads and wait 10–15 minutes before trying again. Once loose, unscrew the nut by hand, then grasp the stem body (not the handle splines) and pull it straight out. Gentle rocking helps — avoid twisting.
⚠️ Warning: Forcing a stubborn stem can crack the valve body inside the wall, which turns a $30 repair into a major job. If it won't come after soaking and gentle effort, stop and call a plumber.
Step 2: Inspect, clean, and replace the seat
Shine your flashlight into the valve body opening. You'll see a small threaded seat — the flat surface the washer presses against. Use a seat wrench to remove it counter-clockwise. Inspect the seat and the spring behind it for grooves, cracks, or corrosion. Replace both: thread in the new seat clockwise with a dab of plumber's grease, snug only — don't overtighten. Clean any debris from the valve cavity with a rag.
⚠️ Warning: Skipping the seat is the number one reason a new stem drips again within weeks. The old grooved seat acts like sandpaper on the new washer.
Step 3: Install the new stem
Apply a generous coat of plumber's grease to all threads, O-rings, and the splines where the handle attaches. Insert the stem straight into the valve body, aligning splines for the "off" position. Push it fully in, then hand-thread the retaining nut clockwise. Tighten with the socket until firm — snug, not gorilla-tight.
⚠️ Warning: Use silicone or NSF-PG plumber's grease only. Never use WD-40, motor oil, or petroleum-based products — they degrade rubber seals.
Step 4: Reassemble and test
Slide the escutcheon back on, then the handle. Apply a dab of grease to the handle splines, orient it correctly for hot/cold/off, and tighten the screw. Turn the main water back on slowly. Check for leaks around the stem and at the spout. Turn the shower on and off several times — it should move smoothly and stop dripping completely.
Path A Pro Tips
- Photograph the stem orientation before pulling it out — reassembly reference you'll actually use.
- Take the old stem to a plumbing supply house for identification, not a big-box store. They're better at matching obscure brands.
- Apply penetrating oil the night before on a suspected tough stem — maximum soak time, less effort on the day.
- A stuck retaining nut: tap the side of the socket (not the stem) gently with a hammer while applying counter-clockwise pressure to shock it loose.
When to call a plumber (Path A)
Call a licensed plumber if: the stem is fully frozen after soaking and gentle effort; you find corrosion or cracks in the valve body itself; access requires cutting tile; or leaks persist after careful reassembly.
Path B: Replace the Mixing Valve Body (single-handle showers)
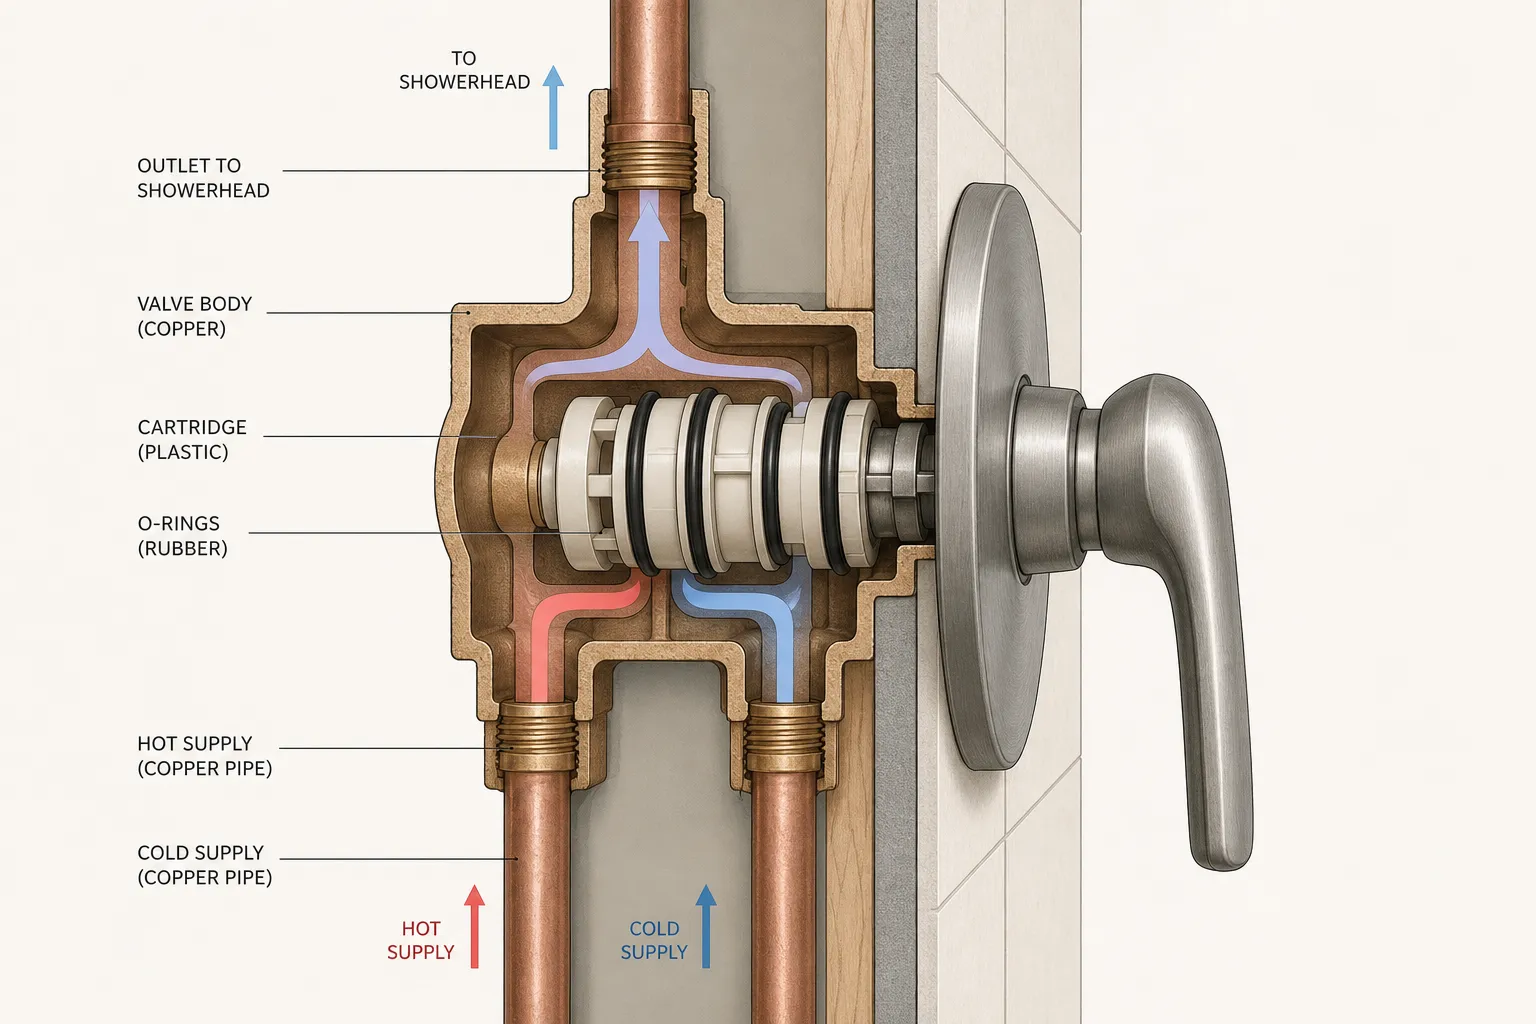
This is a bigger job — you're replacing the rough-in valve body inside the wall, not just the cartridge inside it. Budget 3–5 hours and confirm wall access exists before you start.
Step 1: Kill water and power
Turn the main water shutoff fully clockwise. Open every faucet in the house to drain the lines. Turn off the bathroom circuit breakers — water and electricity don't mix. Place a bucket under the showerhead to catch residual water.
⚠️ Warning: Don't test by "just" shutting off the shower valve — many homeowners have flooded a bathroom this way. Main shutoff only.
Step 2: Create safe wall access
Check the opposite side of the wall first — a bedroom closet often gives you access without touching tile. If you must cut drywall behind the shower, use painter's tape on surrounding tile to prevent cracking. Aim for a 12×12 inch opening centered on the valve. Probe carefully before cutting: assume live pipes run behind every wall.
⚠️ Warning: Never cut studs or load-bearing framing. If you're unsure, probe with a nail before using the saw.
Step 3: Remove the old valve and prep the pipes
Photograph all existing connections before touching anything. Label the hot and cold supply lines with tape immediately — crossed lines after reassembly are a common and annoying mistake. Disconnect supply lines with two wrenches (one holds the pipe, one turns the fitting). For soldered joints, heat with a torch while pulling the pipe free. If you're not comfortable soldering, call a plumber for this step. Clean copper ends with sandcloth until shiny. Measure the old valve depth — the new one must sit at the same depth for the trim plate to fit flush.
⚠️ Warning: Wear heat-resistant gloves when working with a torch. Keep a fire extinguisher within reach.
Step 4: Install the new valve and test
Apply thread sealant or plumber's tape to all threaded connections. Secure the new valve to its mounting bracket. For push-fit SharkBite connections, push onto the pipe until you feel and hear a click. Hand-tighten all connections, then give each a firm quarter-turn with the wrench — snug, not cranked. Turn the main water on slowly, then check every joint with a dry paper towel — a tiny leak shows as a dark spot. Test with the handle in the off position first to check valve body seals before moving water.
⚠️ Warning: Overtightening cracks fittings. If a joint leaks, disassemble and re-seal — cranking harder just makes it worse.
Step 5: Install the trim and finish
Before installing the new cartridge, make sure it's in the off position and that the O-rings are seated properly — they shouldn't be rolled back 6. If you're working with a Mira mixing valve, use only silicone-based lubricants when reassembling to avoid damaging the seals 7. Attach the handle and escutcheon plate; don't force it — misalignment means the cartridge isn't seated correctly. Set the temperature limit stop on the new valve (usually a plastic stop under the handle) to prevent scalding. Mount the access panel. Run the shower for 5 minutes to flush construction debris before using normally.
Path B Pro Tips
- Buy the valve manufacturer's removal tool for the old valve — it saves hours fighting corroded parts.
- If a Moen cartridge breaks apart during removal, tap the inside of the cartridge and thread in a bolt to pull it out 2.
- For stubborn cartridges, use a cartridge puller tool. One experienced plumber suggests buying one from Home Depot and returning it if unused — just keep the packaging intact 8.
- Wrap pipes with wet rags during soldering to prevent heat damage to nearby surfaces.
- Install shutoff valves on the hot and cold supply lines while the wall is open — makes future cartridge swaps a 30-minute job instead of a main-shutoff operation.
- Take photos of the old valve to the plumbing supply store — staff can identify compatible replacements much faster than you can search online.
When to call a plumber (Path B)
Call a licensed plumber if: pipes are severely corroded; you find mold or structural damage inside the wall; you have a multi-valve or thermostatic system; leaks persist after two careful attempts. If the tile work is expensive, the risk calculus shifts strongly toward a professional.
Troubleshooting Common Issues
- Stem won't come out: Confirm the retaining nut is fully removed. Soak longer in penetrating oil, gently rock rather than twist.
- New stem drips immediately: Almost always a worn seat that wasn't replaced. Also check the retaining nut is tight and O-rings are greased.
- Handle still hard to turn: Did you grease the stem splines? Wrong replacement stem model?
- Mixing valve leak at handle after install: Loose trim plate or cartridge not seated fully.
- Low hot water after mixing valve install: Crossed supply lines — double-check your hot/cold labels.
- Post-repair leak behind the wall: Isolate the source. Valve body leak = improper seat or unseated fitting. Pipe connection leak = re-seal or redo the joint.
Pro Tips
After you've finished the repair, a few extra checks can keep your shower running smoothly. Experienced plumbers recommend turning the water back on slowly — crack the main valve a quarter turn and listen for odd noises before opening it fully. This gives you a chance to catch a loose connection before it sprays. If you replaced a cartridge, cycle the handle through its full range a few times to help the new seals settle evenly.
For older valves, take a photo of the stem or cartridge next to a ruler before you head to the store. One homeowner reported that a picture saved them a second trip when the counter staff spotted a subtle difference in the broach pattern. If you're dealing with a seized screw, a few drops of penetrating oil and a five-minute wait often works better than brute force — stripped screws turn a quick job into a wall-opening project.
When you're shopping for parts, bring the old component with you. Even if you think you know the brand, manufacturing changes over the years mean the new version might not fit. And if the valve body itself is pitted or cracked, stop — no new cartridge will seal against a damaged seat. That's the point where you'll need to call a plumber to replace the whole valve.
Maintenance and Prevention
Turn handles gently — just enough to stop the flow. Cranking hard accelerates washer and seat wear.
On 2-handle showers: if the shower isn't used regularly, exercise the valves fully on and off once a month. This keeps them from seizing.
On single-handle showers: flush the cartridge annually. Remove the handle and cartridge, soak in vinegar for an hour, then reinstall.
Hard water accelerates wear on both valve types. A whole-house water softener is the most effective long-term fix.
Cost Analysis: DIY vs Professional
A typical shower valve replacement costs around $375, with a range from $20 to $750 depending on valve type and complexity 9. Angi reports a similar range of $150 to $550 for the job 10.
Valve stem DIY: Stem $10–$30, seat and spring kit $5–$10, grease $5. Total: ~$20–$50. Professional: $150–$400 including service call and labor.
Mixing valve DIY: Valve $80–$300, SharkBite fittings $20–$40 (if used), tools. Total: ~$120–$400. Professional: $350–$900. Investing in quality valves (Moen, Delta, Kohler) pays off — they last 20+ years with routine cartridge maintenance.
Related Plumbing Problems
Once your shower stops dripping, you might notice other issues that share a common cause. A stiff handle or sudden temperature swings often point to the same worn cartridge or valve stem you just replaced. If you're still getting uneven temperatures after a mixing valve swap, check whether the hot and cold supply lines are reversed—experienced plumbers see this more often than you'd think 1.
If the drip is gone but your water pressure feels weak, the new cartridge may have a built-in flow restrictor that's clogged with debris. Unscrew the showerhead and clean the screen before assuming the valve is faulty. For homes with hard water, a whole-house water softener can prevent mineral buildup that shortens the life of any valve you install.
When the problem moves from the shower to the sink, a dripping faucet usually means a worn washer or cartridge—the fix is similar but the parts are smaller. And if you hear banging in the walls when the shower turns off, you're dealing with water hammer, not a valve issue. A plumber can install a hammer arrestor at the supply lines to quiet the pipes.
For older homes, persistent leaks after a valve replacement might mean the pipe threads behind the wall are corroded. That's a job for a pro, since it involves cutting into the wall and replacing the drop-ear elbow. If you're not sure where to start, a licensed plumber can diagnose the whole system in one visit.
Frequently Asked Questions
How do I know what brand my valve is to buy the right stem or cartridge?
Look for a brand name on the handle, trim plate, or showerhead. Remove the handle and trim — the stem or cartridge often has a model number stamped on the side facing the wall. Take photos and the old part to a plumbing supply house (not a big-box store) — they're much faster at identification.
My stem is frozen and won't pull out. What now?
Confirm the retaining nut is completely off. Apply penetrating oil liberally around the base where the stem enters the valve body. Wait 30 minutes or more. Try gently rocking back-and-forth (not twisting) while pulling firmly straight out. If it still won't budge, stop — forcing it risks cracking the valve body. Call a plumber; they have specialized extraction tools.
Do I really need to replace the seat and spring too?
Yes. A worn seat acts like sandpaper on the new washer — you'll be back doing the same repair within weeks. Seat-and-spring kits cost $5–$10 and take two minutes to install. It's the cheapest insurance in residential plumbing.
Can I replace just the cartridge instead of the whole mixing valve?
Usually yes. If the valve body isn't corroded or cracked, a $20–$60 cartridge replacement fixes most drips and temperature problems. Full valve body replacement is only needed when the body itself is leaking or damaged — see the cartridge replacement guide first. Always isolate the water supply before replacing a shower cartridge to avoid flooding 11.
Can I do a single-handle mixing valve replacement without soldering?
Yes. SharkBite push-fit couplings connect to copper, CPVC, or PEX by pushing onto the pipe until it clicks — no torch required. They cost roughly 3× more than solder fittings but are reliable and inspectable. Most inspectors accept them for in-wall repairs.
Water is leaking from around the stem base after reassembly. What did I do wrong?
The retaining nut isn't tight enough, or the O-rings on the stem body weren't greased or were nicked during installation. Turn the water off, carefully tighten the nut a fraction more. If it still leaks, disassemble, inspect the O-rings closely for damage, apply fresh plumber's grease, and reassemble with the stem fully seated before tightening.