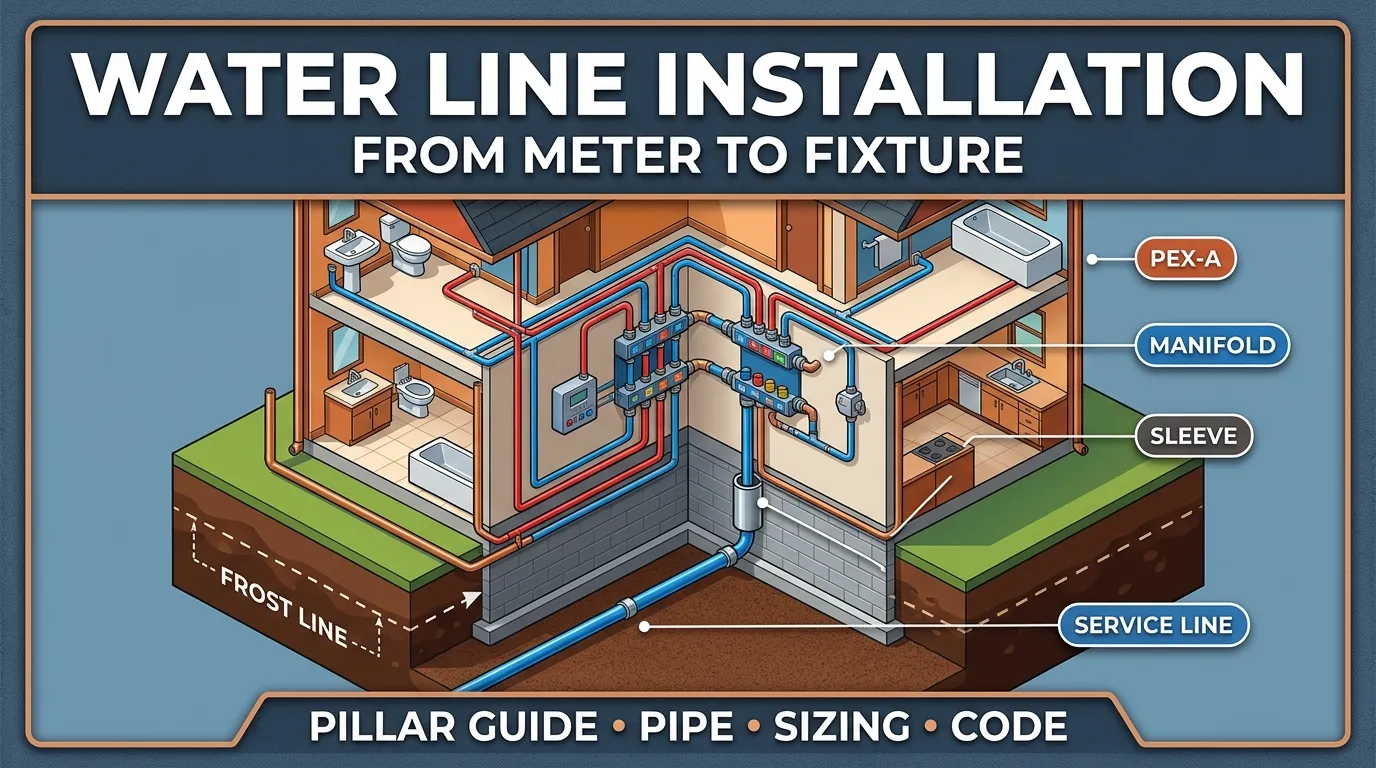
If you're searching "water line installation," you probably mean one of three very different projects: replacing the service line between your water meter and your house, repiping the supply system inside your walls, or extending a branch line to add a new bathroom, outdoor spigot, or appliance. Each has different materials, code requirements, and risk profiles — and getting the scope right at the start saves thousands of dollars and weeks of rework later.
This guide covers all three at a level that lets you plan the job, pick the right pipe, size the lines, and know when you legally have to hand the keys to a licensed plumber. For small-bore 1/4" appliance hookups — a refrigerator ice maker, reverse-osmosis unit, or under-sink filter — see the narrower How to Install a Refrigerator or Under-Sink Water Line instead; those projects live in the cabinet, not in the walls.
Which project are you actually doing?
Start by placing the work into one of these buckets. The answer changes everything downstream — materials, code, permits, who can legally do it.
| Project | What it means | Who can do it |
|---|---|---|
| Service line replacement | Underground supply from meter or curb stop to where it enters the house | Licensed plumber in nearly all jurisdictions. Utility involvement at the meter end. Excavation requires an 811 locate.5 |
| Whole-house repipe | Replacing all cold + hot supply piping inside the building | Licensed plumber in most jurisdictions. Owner-occupied DIY is legal in some states with a permit and inspection. |
| Branch line addition | New run from an existing trunk or manifold to a new fixture | Homeowner-permit work in many jurisdictions; pulled permits required in most. |
| Appliance hookup (1/4"–3/8") | Fridge, RO, bidet, under-sink filter | Homeowner-DIY friendly — see the appliance guide. |
⚠️ Permits aren't optional. Unpermitted plumbing routinely shows up in home-inspection reports at sale — and unpermitted work affecting the water service can void homeowners' insurance after a failure. Pull the permit, or hire the plumber who will.
Pipe material: what to install today
The short version most working plumbers will tell a homeowner: PEX-A for repipes and branch lines inside the house, Type K copper or AWWA C901 polyethylene for the service line, and skip CPVC and galvanized entirely. The longer version follows.
PEX-A vs PEX-B vs PEX-C
All three meet ASTM F8763 and are rated for the same 80 psi at 200°F and 160 psi at 73°F working conditions. The differences that matter in the field:
| Property | PEX-A (Engel) | PEX-B (silane) | PEX-C (radiation) |
|---|---|---|---|
| Degree of crosslinking | ~85% | ~65–70% | ~70–75% |
| Flexibility / kink recovery | Highest — kinks relax with a heat gun | Moderate | Lowest |
| Fitting systems | Expansion (Uponor ProPEX) + crimp + cinch | Crimp + cinch + press | Crimp + cinch |
| Chlorine/oxidative resistance | Best | Good | Good |
| Typical cost | Highest | Mid | Lowest |
| Common brands | Uponor Aquapex, Rehau | Viega, SharkBite, Apollo | Watts |
For a repipe, PEX-A with expansion fittings is the current best-practice combination — the fitting goes inside the tubing (no flow restriction), and the expansion tool is forgiving of imperfect work. PEX-B with a decent crimp tool is a distant but acceptable second, mostly for cost. PEX-C is uncommon enough that most supply houses don't stock the fittings.
Copper: keep it if you have it, usually
Copper isn't obsolete. One 55-year-old copper system asked about on a plumber forum drew a near-unanimous "don't repipe" response from working plumbers when the outside of the tube looked sound.2 Copper typically develops pinhole leaks before it develops a catastrophic failure, which means you get warning. The case for ripping it out is limited: low-pH water, chronic pinholes, or a switch to a manifold layout that's impractical in copper.
- Type M (thinnest) — interior distribution only. Not acceptable underground or in some commercial jobs.
- Type L — interior distribution. What most retail copper is.
- Type K (thickest) — underground and service lines. The right choice if you're running copper through a slab or outside.
A 23-year plumber, commenting on a galvanized-vs-copper photo set, summarized the everyday rule: "I don't see major signs of corrosion anywhere… the galvanized pipe is junk and will choke off over time."1 Galvanized supply line is the material that ages out; copper usually isn't.
Materials to avoid on a fresh install
- CPVC. Brittle at cold temps, cracks under freeze expansion, and unpopular with rebuy-minded inspectors. "The 55-year-old copper will probably still outlast that CPVC" is a sentiment every pro forum repeats.2
- Qest / polybutylene (PB). If you still have gray PB from the 1980s–90s, that's the actual ticking time bomb. Crimp rings fail at the fittings and the manufacturer paid out a class-action for exactly this. Replace on any repipe.
- Galvanized steel. Tuberculation chokes the bore over decades and drops pressure; corrosion products stain fixtures. Replace when the walls are open.
- Self-piercing saddle valves for any new branch tap. Valid only for 1/4" appliance hookups at best, and even there we recommend a proper angle-stop tee instead.
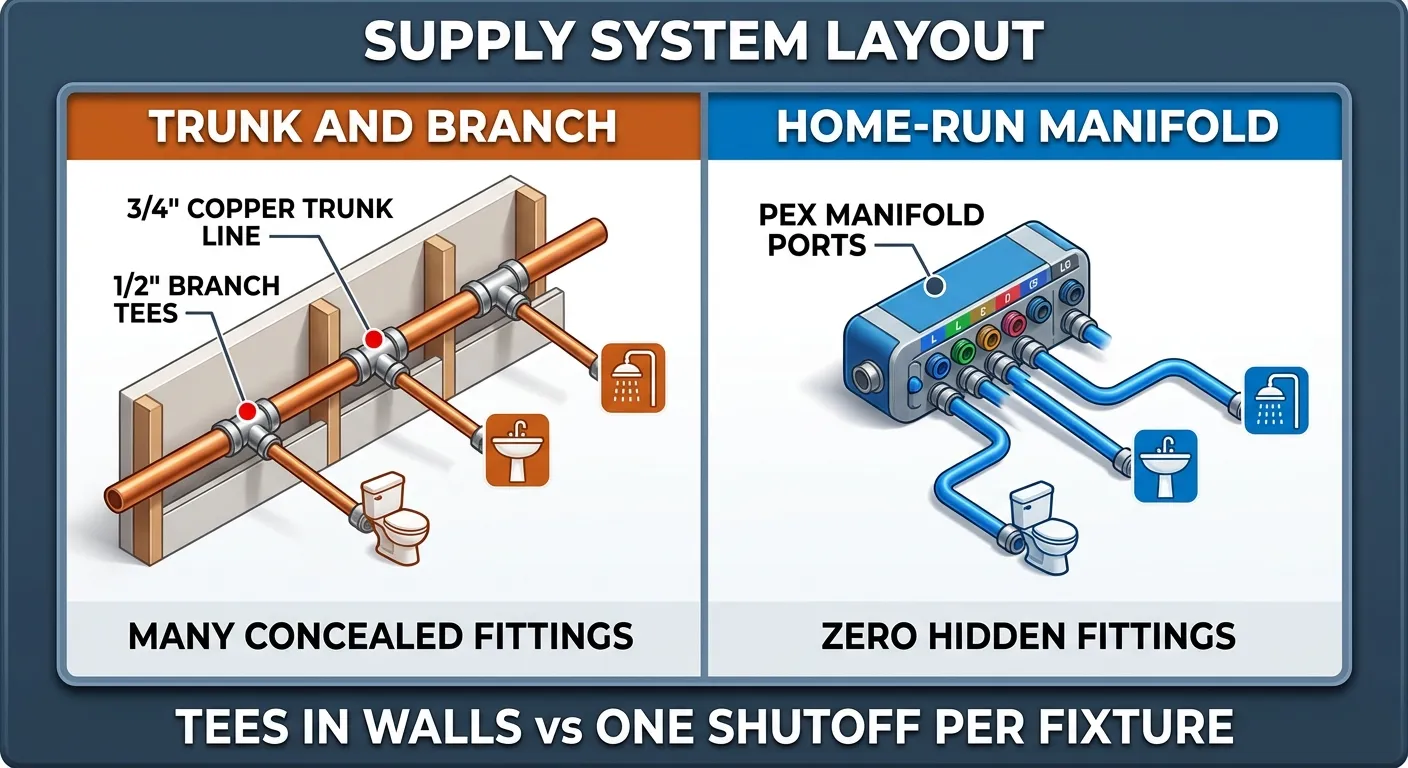
System layout: trunk-and-branch vs home-run manifold
Whole-house supply systems come in two layouts. You choose during the rough-in stage, and the choice shapes materials, fitting count, and how the house behaves when two fixtures run at once.
Trunk-and-branch
A main "trunk" line (typically 3/4") runs through the house; branches tee off to each fixture (typically 1/2"). Every tee is a fitting, every fitting is a potential leak point, and the trunk has to be sized for the peak simultaneous demand of everything downstream.
Pros: least total tubing, familiar pattern for copper crews, easy to repair in segments. Cons: most fittings in wall cavities, pressure drop stacks across each tee, and isolating one fixture for service means shutting down a run.
Home-run (manifold)
A central manifold (a copper or PEX plastic block with individual ports) feeds each fixture with its own dedicated line — typically 1/2" for tubs/showers, 3/8" for lavs and toilets. Zero tees in the walls; every fixture has its own labeled valve at the manifold.
Pros: no concealed fittings (huge advantage under a slab or behind finished drywall), independent shutoff per fixture, and the manifold simplifies the hot-side recirculation loop if you ever add one. Cons: more total tubing (you're running parallel lines instead of branching), and the manifold wants 18–24" of dedicated wall space, usually in a mechanical room or laundry.
Most DIY-friendly repipes default to PEX-A home-run manifold today. If you're planning the work from scratch and have the space for a manifold, it's the layout working plumbers tend to prefer.
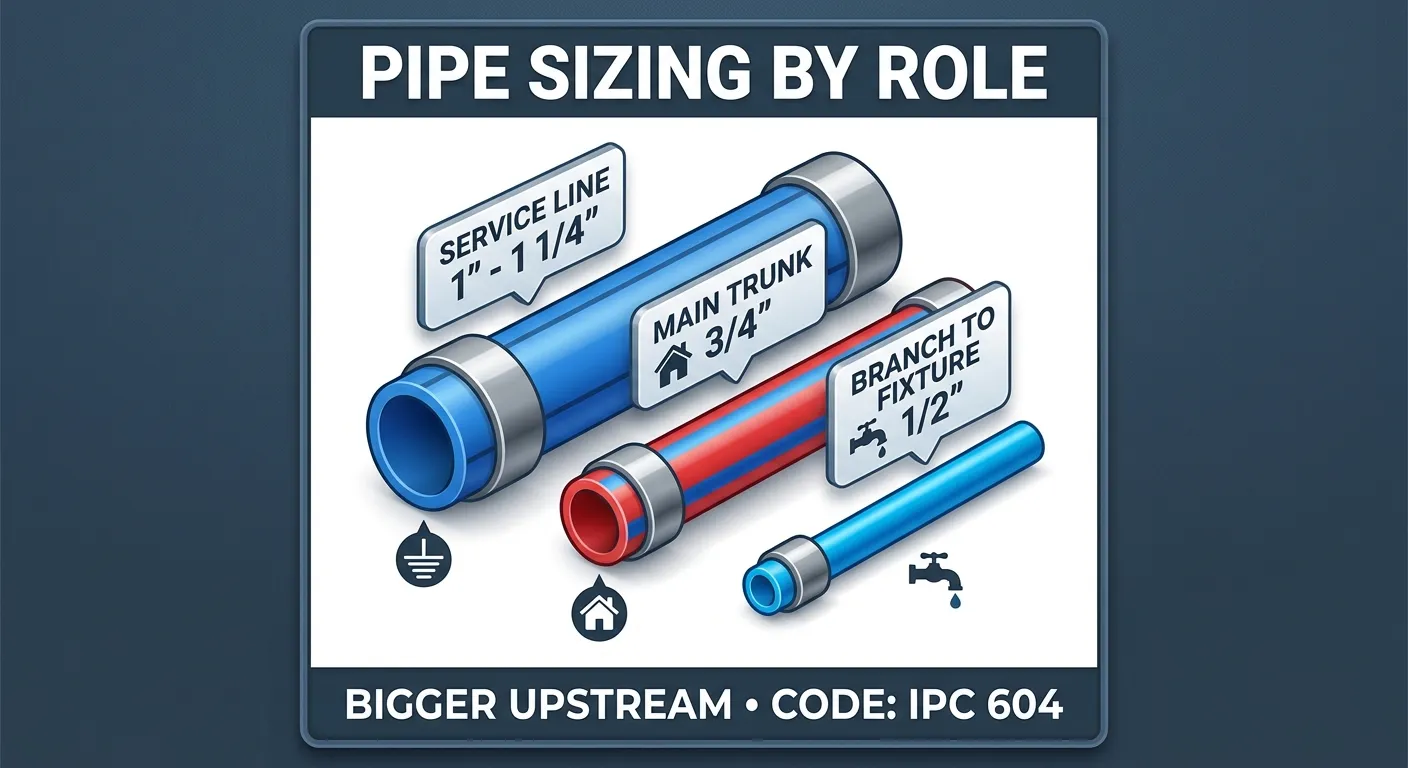
Pipe sizing: 1/2" vs 3/4" isn't a guess
The temptation is to run 1/2" everywhere because it's cheaper and easier to route. Don't. Undersized supply is the single most common complaint a year after a DIY repipe — "the shower drops when the toilet flushes" is a 1/2" trunk problem.
Both model codes size supply by the water supply fixture unit (WSFU) method. IPC 604 and UPC 610 publish the tables;4 the practical shorthand most residential plumbers use:
| Line role | Recommended pipe size |
|---|---|
| Service line (meter to house, typical home) | 1" or 1-1/4" PE/copper |
| Main trunk inside house | 3/4" |
| Branch feeding ≤2 fixtures | 1/2" |
| Home-run from manifold to tub/shower | 1/2" |
| Home-run from manifold to lav or toilet | 3/8" acceptable; 1/2" preferred |
| Refrigerator / RO / ice maker tap | 1/4" (see appliance guide) |
The sizing depends on static pressure at the meter, elevation head from meter to the highest fixture, and fixture-unit load. If your static pressure is below 50 psi or you have more than two floors above grade, step the trunk up to 1" and keep the branches at 1/2". When in doubt, run the IPC Chapter 6 worksheet — it's about fifteen minutes with a spreadsheet and it's the same math a permit reviewer will do.
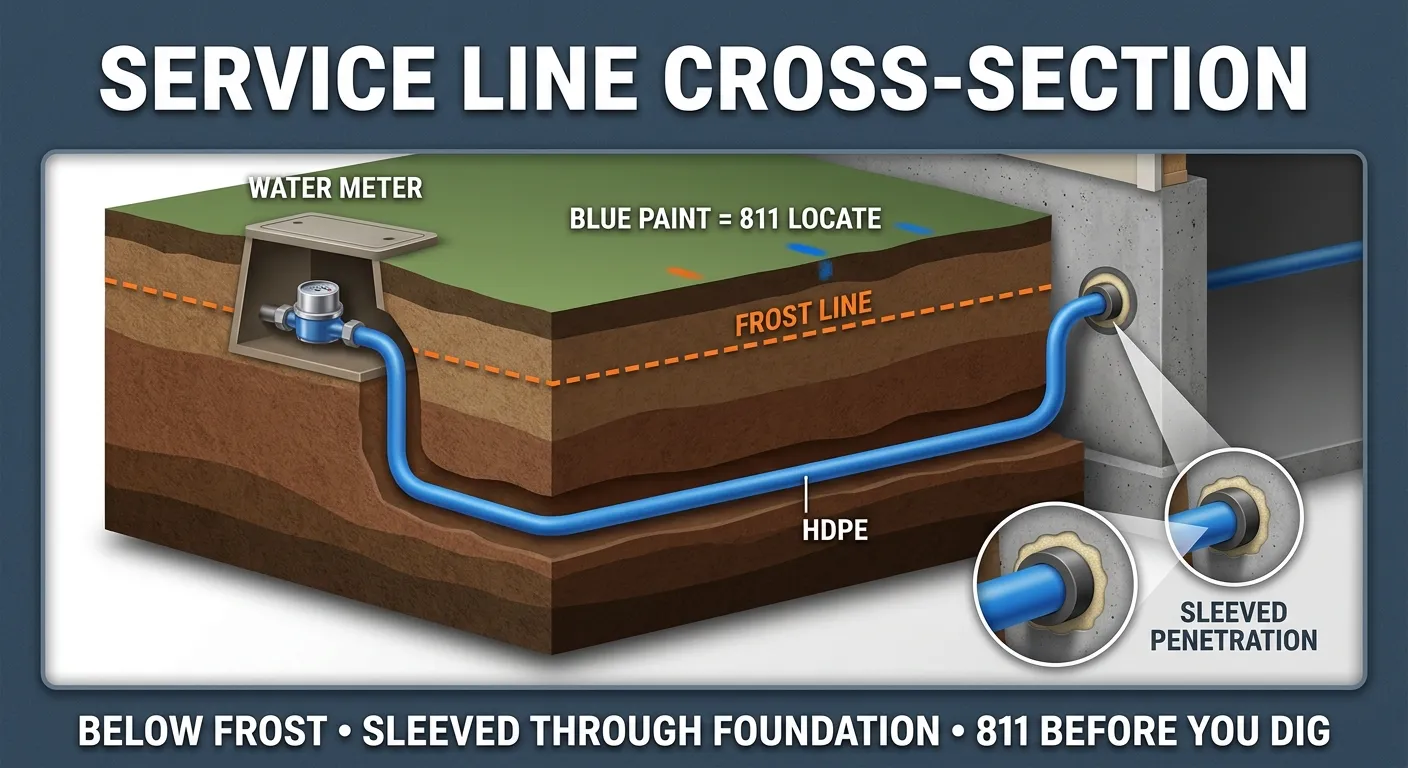
The service line: meter to house
The service line is structurally different from interior distribution: it's buried, continuously pressurized, and usually the single largest-diameter run in the whole system. Three material choices are reasonable in 2026:
Type K copper
The old standard. Thick wall, bends without special fittings, soldered joints at the meter and house penetration. Expensive per foot, but proven for 50+ year service. Bring it up inside a sleeve through the foundation wall (the sleeve protects against point loads and prevents the concrete from galling the pipe).
PE/HDPE (AWWA C901)
Polyethylene service tubing manufactured to AWWA C901 6 — the typical black or blue-stripe coil you see on new construction service lines. Ships in long continuous lengths (no joints in the run), fused or mechanically fitted at the ends. Rated for the underground pressure service; CTS-OD sizing integrates with standard brass compression and pack-joint fittings. This is what most service-line replacement crews install today.
PEX-A with approved underground sleeve
Allowed in some jurisdictions for service work when run inside a continuous HDPE sleeve. The sleeve is non-negotiable — PEX alone under a yard doesn't have the mechanical abrasion rating, and it is vulnerable to both UV exposure during staging and rodent damage once buried near organic debris.7 A US plumber commenting on a rodent-damaged PEX gallery noted the European practice of running PEX inside HDPE conduit: "That way it is supported along the whole run, protected along the whole run, and repiping means pulling the new PEX through and terminating."7
Before you dig: 811
Anywhere in the US, call 811 at least 2–3 working days before you break ground.5 The locate is free; hitting a gas line, a buried cable, or the neighbor's irrigation main is not. Mark the requested dig area with white paint before you call; responders paint the conflicts in standard colors (red = electric, yellow = gas, orange = comm, blue = potable water). Note the ticket number — many jurisdictions require it on the excavation permit.
Frost depth and sleeve
The service line must be buried below the local frost line. 36" covers most of the continental US; 48–60" is common in the upper Midwest and northern New England; 6" to 12" is fine in Gulf coast regions. Check with the building department — they publish the depth and will fail an inspection for a shallow bury. Sleeve the pipe through the foundation wall and seal the annulus with a link-seal or foam-and-caulk stack; slab penetrations see the most settlement damage, and an unsleeved copper pipe through concrete will eventually fail at the entry point.8
Pressure regulation and backflow
Two often-skipped components at the service entrance:
- PRV (pressure-reducing valve). Required where static pressure exceeds 80 psi. Set to 55–65 psi for a comfortable shower pressure that doesn't destroy flex connectors. Check with a gauge on an outdoor hose bib before you set the PRV — the installer should set it to your actual measured street pressure, not the spec-sheet default.
- Backflow preventer / dual-check. Most utilities require a backflow device at the meter now. Irrigation and fire sprinkler systems also require their own devices downstream. Scope depends on the risk classification — confirm with the authority having jurisdiction (AHJ) before final plumbing.
Installation sequence for a repipe
The order matters. A repipe done out of sequence usually means punching holes in drywall that just closed up.
- Permit pulled, inspection schedule set. Rough-in inspection before insulation/drywall close.
- Shutoff and drain the existing system. Water heater off first; on electric, kill the breaker or the element will burn out dry.
- Mark the routing. Trunk path, manifold location (home-run), fixture stub-outs.
- Run new supply before demo. If you're parallel-running, get PEX to every fixture stub-out first.
- Re-connect fixtures to new supply. Cut over one branch at a time to keep the house livable if the job takes multiple days.
- Air test and water test. See below.
- Rough-in inspection.
- Remove the old piping. Not before — leaving it in place during transfer prevents a worst-case "no water in the house" state.
- Insulate, sleeve, and close walls.
- Final inspection.
Pressure test before you close the walls
Most codes require a pressure test at 1.5× working pressure, held for a specified duration (often 15 minutes on air test, 30 minutes on water test). The working number most residential AHJs want to see:
- Air test: 100 psi held with no drop for 15 minutes.
- Water test: 150 psi held for 30 minutes.
Test with air before you water-fill. It's the only way to find a leak dry, and a failed air test inside an insulated wall is much cheaper to fix than a failed water test inside a finished wall. Document the gauge reading at start and end — inspectors often want the photo.
Field-observed failure modes
What the inspection often passes but the plumber-of-record sees back in six months:
Side-load at transitions
A PEX run terminating into a copper riser at a weird angle puts constant side-load on the fitting. One plumber diagnosing a recurring basement flood spotted the pattern instantly: "It looks like they just keep trying and getting surprised by the same result… it's the same coupling every time."8 The fix is to route the PEX so it enters the fitting square and is supported with a clamp within 6" of the fitting.
Missing foundation sleeves
Pipes through concrete without a sleeve will eventually fail where the concrete contacts them. The same basement-flood diagnosis called this out: "I don't see a sleeve going through the foundation. That penetration should be sleeved and sealed — that is another wear and leak point."8
SharkBite as a primary connection
Push-to-connect fittings are great for emergencies and temporary work, and they're fine behind an accessible panel. Using them as primary connections behind drywall is an anti-pattern. If you see a reviewer use "that's the oldest looking SharkBite I've ever seen"2 in a repipe post-mortem, that's the giveaway — they were never meant to live unseen for decades.
UV-exposed PEX
PEX degrades under UV. Tubing stored outdoors in the sun before install, or run exposed in a garage window well, can lose its pressure rating before the system is even turned on. Keep PEX in its packaging until install and run exposed sections in conduit or behind finish material.
Rodent damage
PEX is chewable. Rodent intrusion into wall cavities or crawl spaces can chew through PEX, particularly when a homeowner uses bait poison — "you used rat poison, didn't you? I only ever see damage like this from people using rat poison. It dehydrates them and makes them go insane with thirst. They will chew through just about anything to get to water."7 Non-poison rodent control and running PEX inside HDPE conduit where pests are a known issue are both reasonable mitigations.
"Can we repipe without cutting drywall?"
In a word: mostly, no. Marketing for "drywall-free repipes" exists, but experienced plumbers react to the pitch the way you'd expect. A working plumber responding to a two-story-bathroom-repipe-no-drywall-cuts request summarized the consensus: the physics of fishing 1/2" PEX through multiple stud bays and plates, around HVAC runs, past electrical, and up to second-floor fixtures, without opening anything, doesn't pencil out.9
You can minimize the cuts. You can't eliminate them. Budget for drywall patching as part of any repipe estimate — a painter and a drywaller after the plumber is the realistic crew.
DIY vs hire: a cold look
| Job | DIY feasibility (if code permits) |
|---|---|
| Add a branch line to a new bathroom | Moderate. PEX-A with expansion fittings is within reach of a careful homeowner. Permit + inspection. |
| Whole-house repipe | Hard. Physically demanding, requires full-house water shutoff staging, and one bad joint behind drywall is a four-figure repair. |
| Replace water heater supply + expansion tank | Moderate. Localized work; straightforward copper or PEX. |
| Service line from meter to house | Don't. Utility tie-in, mechanical excavation, backfill compaction, sleeve details, and most jurisdictions require a licensed plumber for anything on the street side of the meter. |
The economics also shift in the pro's favor at scale. A homeowner buying PEX-A and an expansion tool for one repipe pays the retail premium on both; a plumber amortizes the tool over dozens of jobs and pays wholesale for materials.
Working plumbers in homeowner forums consistently give the same advice when a repipe quote lands on a system that isn't obviously failing: get a second opinion. One plumber pushing back on a "ticking time bomb" diagnosis noted that many shops use high-pressure sales software to "bully homeowners into changing out things that are for the moment fine" — a rhetorical flag to listen for when pricing a five-figure job.1
Cost analysis
Ballpark 2026 numbers for typical US markets; your mileage varies by region, access, and pipe routing.
| Project | Material-only DIY | Professional install |
|---|---|---|
| Branch line addition (one bathroom) | $150–$400 | $800–$2,500 |
| Whole-house PEX-A repipe (2 bath, 1,800 sqft) | $800–$1,500 in materials | $4,000–$10,000 |
| Whole-house copper repipe (same house) | $2,000–$3,500 | $10,000–$18,000 |
| Service line replacement, 40 ft run, HDPE | $400–$800 in materials | $3,500–$8,000 (mostly labor + excavation + restoration) |
| Service line replacement, same run, copper | $900–$1,800 in materials | $5,000–$12,000 |
Drywall repair adds $500–$2,500 to any interior repipe. Excavation restoration (grass, concrete, asphalt) adds $500–$5,000 to service-line work. Neither is included in the plumber's line-item estimate unless you specifically ask — request an itemized quote.
FAQ
What's the difference between a water line, water main, and water service line?
"Water main" almost always means the public main in the street owned by the utility. The service line is the private run from the curb stop (or your water meter) to your house — your responsibility to maintain. "Water line" is an informal umbrella for any of the above plus interior branches.
Do I really need a permit for a branch line addition?
Yes, in nearly every US jurisdiction, even for a homeowner doing it themselves. The permit costs less than the fine for an unpermitted-work disclosure at resale, and inspection catches the one thing you'll regret after drywall goes up.
How long should a PEX supply system last?
Most PEX-A manufacturers warrant 25 years with a 50-year design life. UV exposure, rodents, and a few chemicals (some solvents, concentrated disinfectants) shorten that. Installed correctly and protected from UV and rodents, 50+ years is a realistic expectation — the tubing itself is governed by ASTM F876.3
Can I mix PEX and copper in the same system?
Yes, routinely. Use a PEX-to-copper transition fitting (sweat adapter + PEX connection) and support both sides so there's no side-load on the joint. The "same coupling fails every time" pattern in repeated-leak diagnoses almost always traces back to an unsupported transition.8
My house is on galvanized — do I have to repipe?
If flow is already restricted or water is showing rust, yes. If the pipes are old but flow is normal and the water is clean, you can hold off until another trigger (a renovation, a move of existing fixtures). Plan for the repipe — galvanized doesn't improve with age — but don't panic-schedule it.1
What about whole-house filters — do they affect sizing?
Yes. A sediment or carbon filter adds pressure drop (typically 3–10 psi at rated flow), which eats into your available working pressure. Size the trunk one step up if you're installing a whole-house filter ahead of it, and check the filter's pressure-drop curve at your expected peak flow.