Your electric water heater is always on — heating water through the night, while you're at work, through the weekend. That standby cycling drains your wallet and wears the heating elements faster than necessary. A timer breaks the cycle by cutting power during the 8–16 hours you genuinely don't need hot water. The wiring feels intimidating, but the actual job is straightforward once you understand what you're connecting.
This guide walks you through every step, from killing the breaker to verifying the first on/off cycle.
Steps
Step 1: Kill the Power - Absolutely
Locate your main electrical panel and flip the breaker controlling your water heater. Verify power is off using your non-contact tester at the heater's wiring access panel. Place tape over the breaker so no one accidentally turns it back on. Do this during daylight hours so you're not working in the dark.
⚠️ Warning: Failure to confirm power-off is the #1 cause of DIY electrical accidents. Test twice!
Step 2: Access & Document Wiring
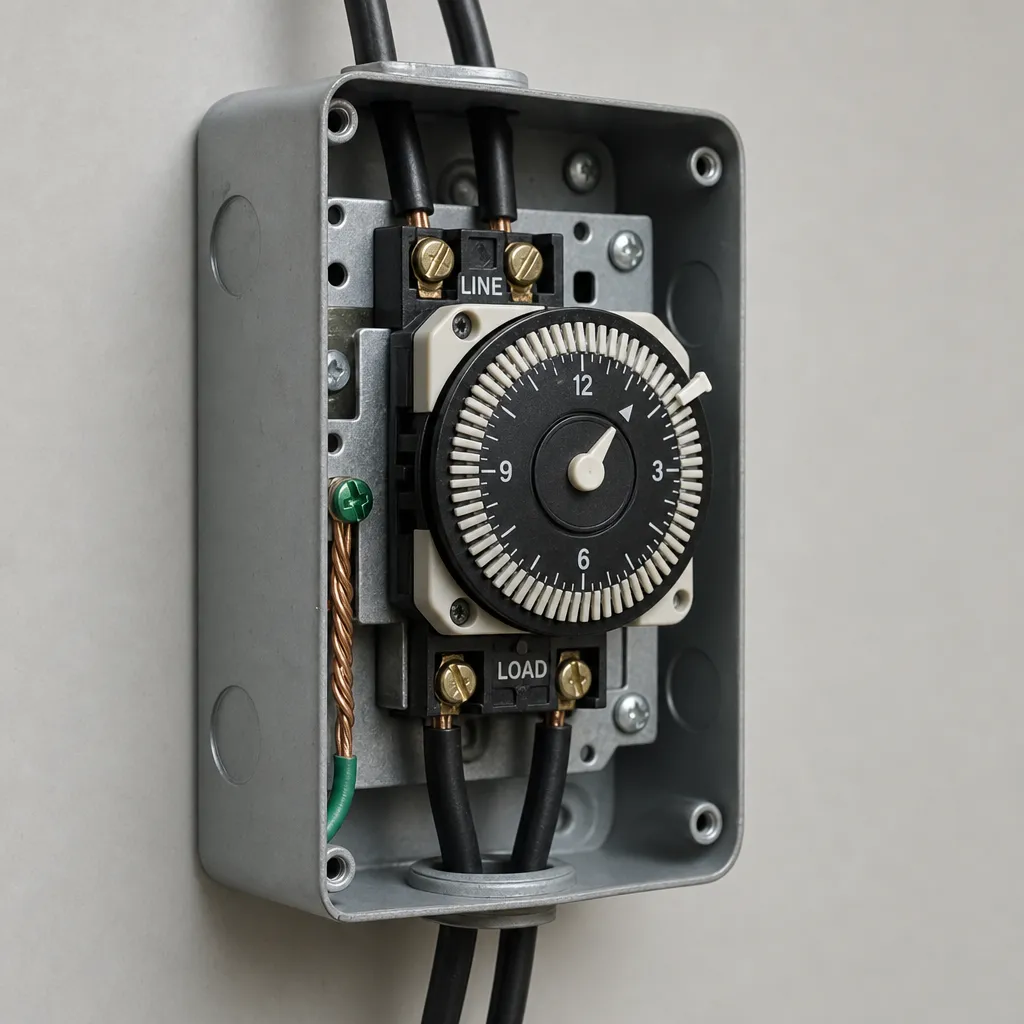
Remove the water heater's access panel cover. Take multiple phone photos of the existing wire connections before touching anything. Note which wires connect to L1 (hot), L2 (hot), ground (green/bare), and the heater terminals. Label each wire with a masking tape marker before you disconnect it.
⚠️ Warning: Never assume wire colors match standard coding - old installations often have surprises.
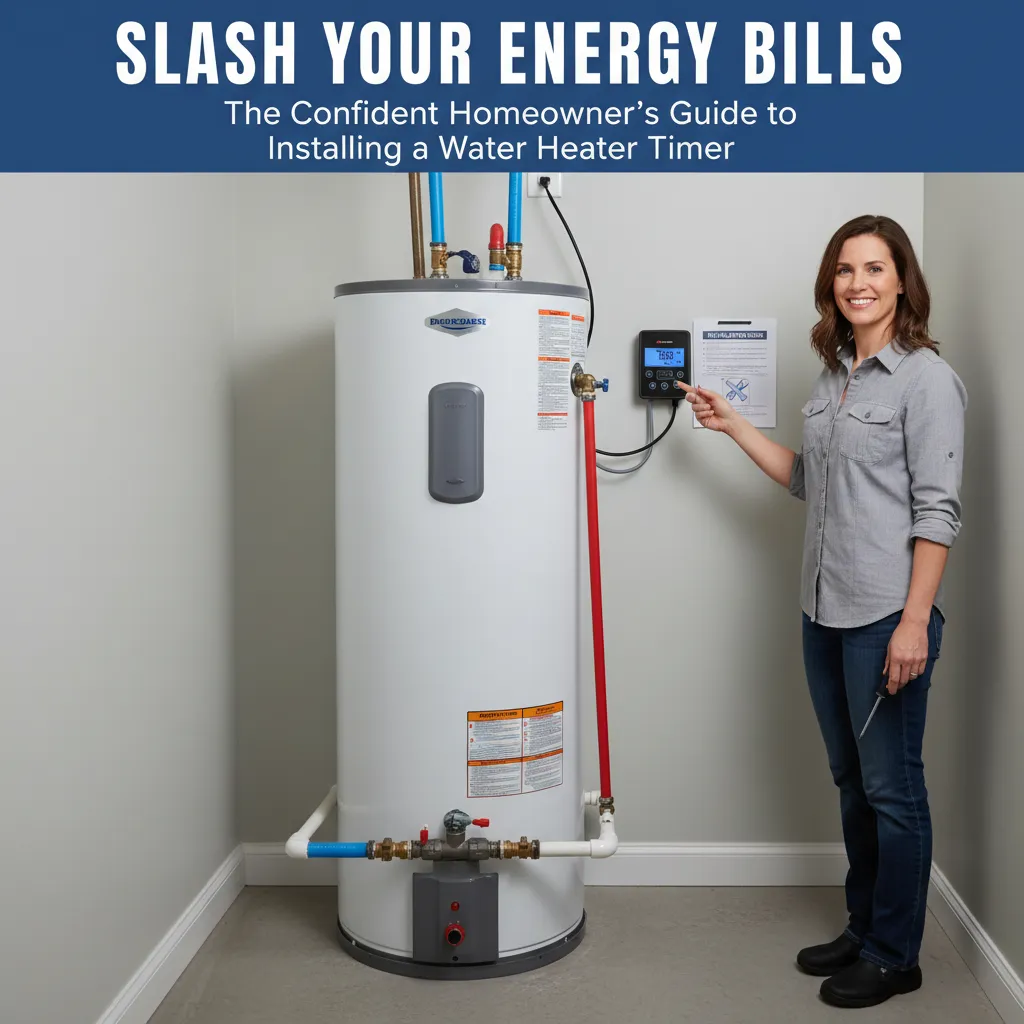
Step 3: Mount the Timer Strategically
Mount the timer box near the water heater (within 3-4 feet) at eye level. Avoid damp areas unless using a weatherproof box. Drill pilot holes for secure mounting. You'll want easy access to adjust the schedule seasonally.
⚠️ Warning: Keep timer away from water pipes - condensation can cause malfunctions.
Step 4: Run Wires Safely
Route wires from heater to timer through conduit for protection. Leave 6-8 inches of slack at both ends. Match wire gauge to your heater's requirements (usually 10-12 AWG). Use cable clamps where wires enter boxes. Consider running an extra wire now — it makes retrofitting a smart timer later much easier.
⚠️ Warning: Exposed NM cable (Romex) is code violation - always use conduit in visible areas.
Step 5: Connect Wires Correctly
Match your photos: Connect the two hot wires from the breaker to the timer's LINE terminals. Connect the wires going to the water heater to the timer's LOAD terminals. Join all ground wires together with a pigtail to the box. Double-check: Timer should interrupt ONLY the hot wires, not the ground.
⚠️ Warning: Over-tightening terminal screws can crack connections - snug plus 1/4 turn is perfect.
Step 6: Test Before Finalizing
Restore power at the breaker. Set timer to 'ON' and verify hot water production. Test multiple on/off cycles. Check for warm wires or buzzing sounds. Only reinstall covers after successful testing. A clamp meter lets you confirm current is flowing during 'ON' cycles.
⚠️ Warning: If anything behaves unexpectedly, cut power immediately and recheck connections.
Pro Tips
- Buy a timer with a battery backup - no reprogramming during power outages
- Set 'ON' periods 30 mins before peak usage (e.g., 5:30 AM for 6 AM showers)
- Use 'vacation mode' for trips - saves energy without losing all settings
- Wrap wire nuts with electrical tape for extra vibration resistance
- Snap photos of your final wiring for future reference or buyer handover
When to Call a Professional
Call an electrician if: your breaker panel looks outdated, you see aluminum wiring, your heater requires 3-phase power, or you smell burning during testing. If any step feels beyond your comfort zone, investing $150-$300 in professional installation beats a $5,000 disaster.
Understanding the Problem in Detail
Your water heater is the second-biggest energy hog in your home, gobbling up about 18% of your total energy use 1. It’s constantly losing heat to the surrounding air—a sneaky drain called standby loss—so it cycles on and off all day and night just to keep the water hot. For an electric tank, you’re bleeding roughly 1.4 kWh every day; a gas unit with its pilot light wastes a staggering 8.3 kWh daily 1. Think of it like leaving a space heater running in an empty room. A timer lets you shut it down during the 8–16 hours you’re asleep or at work, so you’re not paying to heat water you’ll never use. It’s the same common sense as flipping off the lights when you leave—but for your biggest energy leak.
Tools and Materials Guide
Pick a 240V timer that matches your heater's amperage — you'll find that on the nameplate. Mechanical timers ($25–$50) are simple and reliable. Smart timers ($70–$150) let you control things from your phone, but they need Wi-Fi. Stick with copper wire; aluminum takes special handling. Big-box stores sell kits with everything you need.
If you learn better by watching, you'll find a complete step-by-step video guide helpful 2. And if you've got a gas water heater, you're in luck — some gas models let you swap in a timer in as little as 10 minutes with no tools at all 3.
Safety Considerations
Water and electricity don't mix, so you'll need to take every precaution. Work with dry hands, stand on dry boards, and use insulated tools. Before you touch any wire, verify the power is off with two different testers. Never work on live circuits. Wear safety glasses when drilling.
Your installation must meet the National Electrical Code (NFPA 70), enforced in all 50 states as the benchmark for safe electrical design and installation 4. Local codes often add their own requirements—for example, New York Plumbing Code Section 502.1 explicitly requires electric water heaters to conform to NFPA 70 5. In some areas, like Group R buildings, electric resistance water heaters must be installed with a preprogrammed timer per code 6. If you're installing a heat pump water heater, you'll also need to comply with NEC Articles 422 and 440—Article 422 covers general appliance installation standards, while Article 440 focuses on circuit design rules specific to heat pump systems 7.
Check your local codes for conduit types, GFCI protection, and any timer requirements before you start. When in doubt, call a licensed electrician.
Troubleshooting Common Issues
No hot water? Start with the basics: check that the timer clock is set correctly and the breaker hasn't tripped. Loose wires or a failed timer motor can also leave you in the cold. If your hot water comes and goes, a loose connection at the terminals is the usual suspect. Timer keeps resetting? Swap out the backup battery. Hear a buzzing sound? That's often an overloaded timer or arcing contacts — disconnect power immediately.
⚠️ Warning: Arcing contacts can cause a fire. Shut off the breaker before investigating any buzzing or burning smell.
Beyond these quick fixes, wiring mistakes can create hidden dangers. Experienced plumbers point out that improper disconnect switches and unprotected wiring near water heaters are common code violations 8. If you're troubleshooting and spot flexible ducting or exposed wires that don't look right, stop and call a licensed electrician. A failed inspection can be costly, and safety comes first.
Maintenance and Prevention
Test the timer monthly by manually advancing the clock. Tighten terminal screws once a year — with the power off. Update schedules seasonally; you'll need less heating in summer. Keep the area ventilated and dust-free.
Cost Analysis: DIY vs Professional
You're probably eyeing those savings numbers and wondering if a timer really pays off. The DIY route runs $50–$150 for the timer and materials, while hiring a pro typically lands between $200 and $400. If the timer cuts your water heating bill by 10–30%, you could save $80–$250 a year—meaning you'd recoup your costs in as little as 3 to 12 months. Some utilities even offer rebates for timer installations, sweetening the deal.
But not every experienced plumber is sold on the savings. One pointed out, "It costs more money to heat water than to keep it hot. You're not going to save any appreciable amount of money doing this, you might actually spend more" 9. Another added, "A well-insulated electric water heater has very little parasitic heat loss" 9. So if your tank is already well-insulated, the timer might not move the needle much—or could even backfire if the tank has to reheat from cold every day. Weigh your tank's insulation quality and your usage patterns before you commit.
Related Plumbing Problems
High bills might also point to sediment buildup — drain the tank once a year — a faulty thermostat you can test with a multimeter, an undersized heater, or leaky pipes. Timer installation often reveals pre-existing wiring issues.
Frequently Asked Questions
Will I run out of hot water with a timer?
Not if you program it right. Modern tanks hold heat for hours. Set the timer to turn on 30–60 minutes before your morning shower. The tank stays warm during off periods—just like a thermos.
Can I install a timer on a gas water heater?
Yes, but you'll interrupt the 120V power to the control valve instead of 240V heating elements. The process is similar but lower risk. Always confirm power requirements first.
What's the biggest mistake DIYers make?
Rushing the power verification. One live wire can cause catastrophic failure. I triple-check with two different testers—your safety is worth those extra 2 minutes.
How do I set the timer dials correctly?
It's easy to mix them up. The top dial sets the time scale—say, 20 minutes. The bottom dial acts as a multiplier: setting 1 gives you 20 minutes, setting 2 gives 40 minutes, and so on 10. So if you need an hour of heating, set the top to 20 minutes and the bottom to 3. Double-check your manual, but this two-dial logic is common across many mechanical timers.