
Your water heater has finally given up. Maybe the tank itself is leaking (that can't be repaired), it barely warms the water, it rumbles, or it's simply past the typical 12–15 year lifespan. Replacing a water heater yourself is a realistic DIY job for many homeowners and typically saves $600–$1,500 against a pro install, but it involves water, electricity and often gas, so this guide puts safety first at every step.
First, make sure it's really dead. If the tank isn't leaking, no hot water is often a thermostat, heating element or thermocouple, parts that cost $15–$40. The Related Plumbing Problems section near the end covers what's worth repairing.
Can You Replace a Water Heater Yourself?
Usually, yes, if you're swapping like for like. How hard it gets depends less on your skill than on what you're changing. Working plumbers draw the line in roughly the same place: an electric tank is an easy DIY job if you have the right tools, and gas is better left to a pro.1 One homeowner who has done it eight times in different houses, six electric and two gas, summed it up as "not that hard."2
| Your job | How hard | Typical time | Permit |
|---|---|---|---|
| Electric tank to same-size electric tank, same spot | Moderate. Heavy lifting, two water connections, three wires | 3–5 hours | Usually required |
| Gas tank to same-size gas tank, same vent | Harder. Adds a gas joint, a sediment trap and the vent | 4–6 hours | Usually required; some areas only let licensed fitters touch gas |
| Bigger tank, new location or new vent route | Pro territory for most homeowners | 1–2 days | Yes |
| Gas to electric, electric to gas, or tank to tankless | Hire it out. New circuit or gas line, new venting | 1–3 days | Yes, often plumbing plus mechanical or electrical |
Three things decide which row you're really in:
- What's already there. A 12-year-old install often hides a cold shutoff that won't close fully, a rusted union or galvanized nipples that snap. If the shutoff valve or the pipes themselves need replacing, that's soldering or crimping work. If the old valves or pipes need replacing, call a plumber.
- Gas and venting. Reconnecting a flex connector is simple. A vent that doesn't draw is not, and you can't see the problem. Read the venting section below before you buy a gas heater.
- Getting it out. A 50-gallon tank weighs about 120–150 lbs empty, more with a few inches of sediment in the bottom. Stairs or a tight closet can turn a 4-hour job into a two-person day.
Do you need a permit to replace a water heater? In most places, yes, even for a straight swap.3 The inspection checks exactly the parts that hurt people: the T&P discharge, the vent, the gas joints and the expansion tank. If the honest answer to "can I do this?" is no, the big-box stores sell installed heaters through local contractors, which one experienced DIYer pointed to as a cheaper middle route.4
How to Replace a Hot Water Heater, Step by Step
Before you buy: Read four things off the old heater's label: gallons, gas or electric (and the voltage, usually 240V), height, and for gas, the vent size on top. Then measure the space, door frames included. Tanks made since 2015 carry thicker insulation and are often an inch or two taller and wider than the one they replace, which is the most common reason a new heater won't fit a closet.
Tools Needed
Show all tools (11)
- Pipe Wrenches (2 - 12" or 14" for gripping fittings)
- Adjustable Wrenches (Various sizes for nuts/bolts)
- Hacksaw or Tubing Cutter (For cutting copper pipes if needed)
- Screwdrivers (Flathead & Phillips)
- Voltage Tester (Non-contact - critical for safety)
- Garden Hose (Long enough to reach drain point outside/basin)
- Bucket & Towels (For spills and draining remnants)
- Level (To ensure new unit is perfectly vertical)
- Gloves & Safety Glasses (Essential protection)
- Tape Measure (For sizing and placement)
- Channel Locks (Alternative/additional gripping)
Materials Needed
Show all materials (9)
- New Water Heater (Correct size/type: gas/electric, matching BTUs/voltage)
- Flexible Water Connectors (Stainless steel braided, correct length & size - usually 3/4" NPT x 3/4" compression)
- Gas Line Connector (Flexible corrugated stainless steel tubing - IF gas, correct length/fittings, check local code)
- Pipe Dope or Teflon Tape (Approved for potable water AND gas if applicable)
- Dielectric Unions or Nipples (IF connecting dissimilar metals like copper to steel tank nipples - CHECK if included with new heater)
- Sediment Trap Kit (For gas heaters - usually required by code, may come with heater)
- Drain Pan (Required by code if installed inside, sized for new heater)
- T&P Valve Discharge Tube (Copper or CPVC, sized correctly, routed to within 6" of floor/drain)
- Gas Vent Connector and Fittings (only if the vent needs replacing: galvanized single-wall or Type B, elbows, sheet-metal screws)
The Steps (3–6 hours, a full day for first-timers)
Step 1: Safety First & Prep Your Workspace
Turn off the cold water supply valve feeding the heater. Turn off the power: For electric - flip the dedicated breaker in your main panel. For gas - turn the gas control knob to OFF, then close the gas shutoff valve on the supply line (handle crosswise to the pipe). Test with your non-contact voltage tester near wires to confirm the power is off. Open a nearby hot water faucet to relieve pressure. Connect the garden hose to the drain valve at the bottom of the old heater, run it to a floor drain, utility sink, or outside. Clear the area around the heater completely. Gather all tools & materials within reach. Put on gloves and safety glasses.
⚠️ Warning: Confirm the power is off with your tester before you touch any wire. If you smell gas at any point, stop, get everyone out of the house and call the gas company from outside. Don't go back in.
Step 2: Drain the Old Heater & Disconnect Everything
Open the drain valve fully. The first water out is scalding and full of smelly sediment, so keep the hose end where it can't splash anyone. Open the T&P (Temperature & Pressure) relief valve on the side/top (usually has a lever) to let air in and help it drain faster. Be patient – draining can take 20-45 minutes. If it slows to a trickle or stops, sediment has clogged the valve: with the drain still open, turn the cold supply on for a few seconds to push the clog through, then off again. If it still won't drain, call a plumber rather than forcing the valve, which on many tanks is plastic and snaps. Once drained, disconnect the hot and cold water lines using your pipe wrenches (hold the tank nipple with one wrench, turn the fitting nut with the other). For electric: Disconnect the wiring from the junction box on top – take a clear photo first for reconnection reference. For gas: Check the gas shutoff is closed, then disconnect the gas line union using two wrenches (one to hold, one to turn). Disconnect the vent connector from the draft hood on top of the heater.
Step 3: Remove the Old Unit & Prep the New Location
Even drained, the old tank is heavy and often still holds sediment. Get a second person and a dolly, and lift with your legs, not your back. Place the new drain pan if required/not already present. Sweep/vacuum the area thoroughly. Position the new heater near its final spot. Check the manufacturer's label for required clearances (space around it).
Step 4: Position & Connect the New Water Lines
Carefully move the new heater into its final position, centered on the drain pan. Use the level to ensure it's perfectly vertical (front-to-back and side-to-side) – this is crucial for efficiency and lifespan. Shim under the base if the floor is uneven. In earthquake zones (California, Washington and other seismic design category C–F areas), strap the tank within its upper and lower thirds, with the lower strap at least 4 inches above the controls.5 Connect the flexible supply hoses: Apply pipe dope or Teflon tape (clockwise) only to the threads (not the sealing faces) of the tank nipples. Hand-tighten the flex connectors onto the tank's cold (marked) and hot (marked) nipples. Connect the other ends to your home's supply lines, hand-tighten plus 1/4 to 1/2 turn with wrenches. Don't overtighten: brass fittings crack. Hold the tank nipple with one wrench while you turn the nut with the other, so you don't twist the tank fittings. If your house has rigid copper with no threaded end, a 3/4" push-fit or compression adapter gives the connector something to thread onto. If the copper needs cutting back to sound pipe and soldering, call a plumber.
Step 5: Connect Gas or Electric & Venting
For Gas: Install the new sediment trap onto the gas inlet if not pre-installed (follow kit instructions). Apply gas-rated pipe dope to the pipe threads of the connector's adapter fittings only. The flex connector's flare nuts seal metal to metal, so keep dope off the flare. Connect one end to the gas control valve inlet, the other end to your gas supply line. Use two wrenches. Every gas joint gets a leak test in Step 7. Reconnect the vent connector to the draft hood securely – make sure it slopes up toward the chimney, with every joint screwed, never taped, because a loose vent leaks carbon monoxide. Check it against the rules in the Gas Water Heater Venting section below before you light anything. For Electric: Feed the wires from the junction box into the top of the new heater's junction box. Reconnect the wires exactly as they were on the old heater (match colors: Black to Black, White to White, Green/Bare to Green Screw). Double-check them against your photo and the heater's wiring diagram, then secure the junction box cover.
Step 6: Install T&P Valve & Final Prep
The new heater comes with a T&P valve installed. Connect the discharge tube to the valve outlet, ensuring it runs straight down to within 6" of the floor, terminates in a visible location, and is secured. If your main has a check valve, backflow device or pressure-reducing valve, the code requires a thermal expansion tank on the cold line.6 To check, look at the main where it enters the house for a bell-shaped pressure-reducing valve, or ask your water utility whether the meter has a check valve. Support it with a strap or bracket; one plumber reviewing a DIY install called the unsupported tank "your failure point."7 Our expansion tank guide covers sizing and pre-charge. Close the drain valve on the new heater. Slowly turn on the cold water supply valve. Listen/check for leaks at all new connections (water lines, T&P valve, drain valve). Open a nearby hot water faucet fully to purge air from the tank and lines – let it run until a steady stream flows (no sputtering).
Why the expansion tank matters: heating 50 gallons of water from 50°F to 120°F swells it by roughly 0.6 gallons. In a closed system that water has nowhere to go, so pressure climbs every heating cycle until the T&P valve weeps.
⚠️ Warning: The T&P discharge pipe is a safety device, not trim. It has to be full size (no smaller than the valve outlet), run downhill with no valves, tees or trap, have no threads on the open end, and stop no more than 6 inches above the floor, pan or drain. It can't connect straight into a drain, but it can discharge through an air gap into a floor drain or the pan, as long as you'd see the water.8 Copper and CPVC are the usual choices.
Step 7: Fire It Up & Test Thoroughly
⚠️ Electric heaters: Don't turn the breaker on until the tank is completely full. Power on an empty tank burns out the elements in seconds.
For Gas: Turn the gas control knob to 'Pilot', press down, and ignite the pilot light following the label instructions precisely. Once pilot is lit, hold down for 30-60 secs, then release and turn the knob to ON. Listen for the main burner to ignite. Then test for gas leaks right away: brush soapy water onto every gas connection (supply line, flex connector, control valve inlet, sediment trap). Look for bubbles indicating a leak. Tighten slightly if needed (don't overdo it). For Electric: once hot taps run a steady stream with no air, turn the breaker back on. Check the unit for power (listen for elements heating, indicator lights if present). Set the thermostat(s) to around 120°F (safer and more efficient). Let the tank heat for 1-2 hours. Check all connections again for leaks (water and gas). Feel the hot and cold pipes – the hot should get warm. Test hot water at multiple faucets.
⚠️ Warning: The gas leak test isn't optional. Bubbles mean a leak. If a slight tightening doesn't stop it, turn the gas off and call a pro. Never use a flame to look for leaks.
Pro Tips
- Teflon Tape Direction: Wrap Teflon tape clockwise (as you look at the end of the male thread) – 2-3 wraps max. Avoid getting it in the pipe opening.
- Element Check (Electric): If the new heater doesn't heat, check if the breakers tripped immediately. If yes, there's likely a wiring error.
- One Trip to the Store: For a tank with threaded connections and PEX in the house, one plumber's shopping list was two 3/4" female-to-PEX adapters (female push-fit fittings if you don't own a crimper), a 3/4" male adapter for the T&P valve, a length of 3/4" copper and a 90° to bring the discharge down to 6" above the floor.9
When to Call a Professional
Call a licensed plumber if you smell gas (get out of the house first), the leak test fails and you can't fix it, or you find badly corroded pipes and valves. Anything beyond a like-for-like swap, such as a new location, new venting or a different fuel, belongs with a pro too. The table at the top of this guide shows where that line sits.
Gas Water Heater Venting: Diagram and Clearances
This applies to a standard atmospheric gas heater, the kind with a metal draft hood on top and a pipe running to a chimney or B-vent. Power-vent and direct-vent units use plastic or special pipe and follow their own manual. Venting is where a "simple swap" goes wrong, because a bad vent doesn't leak water. It leaks carbon monoxide.
From the tank up, the vent path has three parts:
- Draft hood. The factory hood on top of the heater. It must stay in place and can't be modified.
- Vent connector. The pipe from the draft hood to the vent or chimney, single-wall metal or Type B double-wall.
- Vent or chimney. A B-vent through the roof, or a lined masonry chimney.
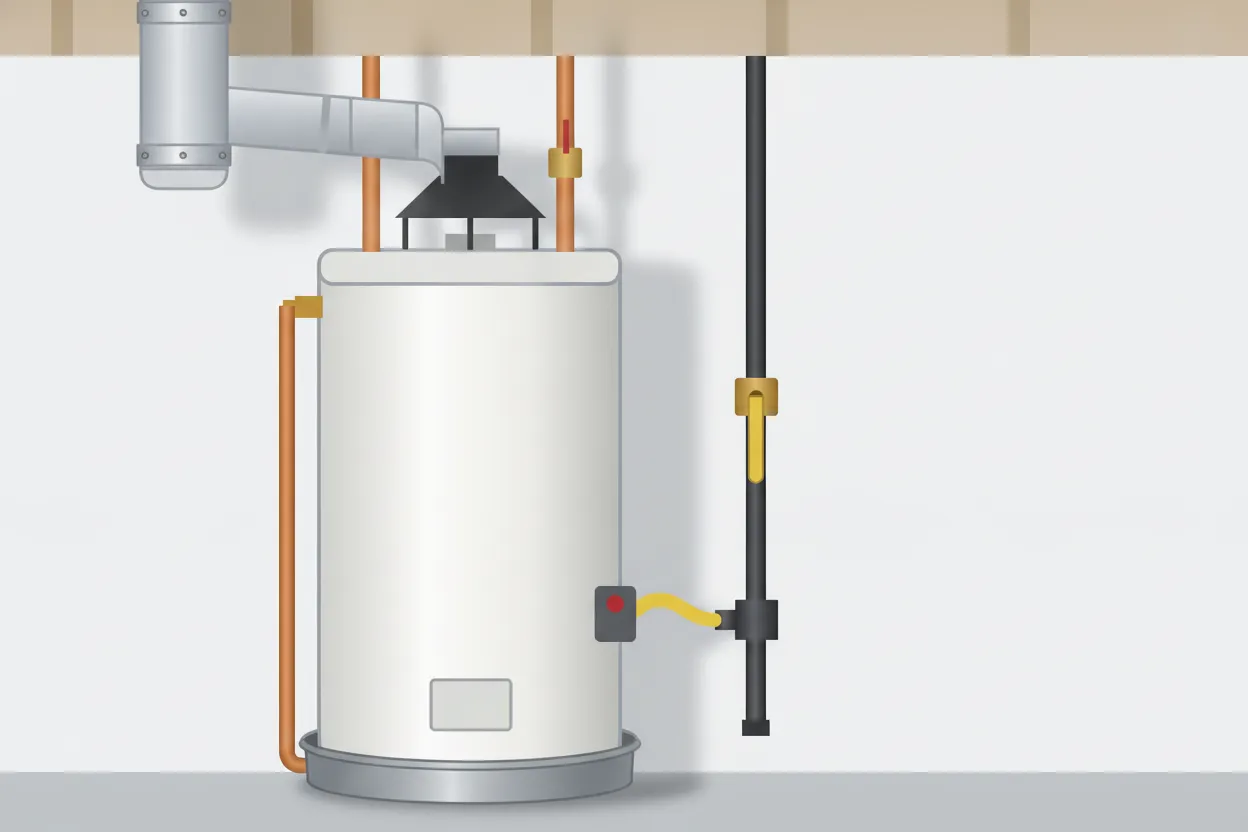
| What to check | The rule |
|---|---|
| Connector size | At least the draft hood outlet size, usually 3" on 40–50 gallon heaters and 4" on many larger ones. Never reduce it. Any size increase is made right at the draft hood |
| Slope | Rises at least 1/4" per foot toward the vent, with no dips or sags |
| Horizontal length | The sideways run can't be longer than 75% of the chimney or vent's vertical height for single-wall pipe, or 100% for Type B. A 10-foot-tall vent allows 7.5 feet sideways in single-wall |
| Joints | Fastened with sheet-metal screws |
| Clearance to wood and drywall | Single-wall: 6". Type B: whatever its listing says, typically 1" |
| Shared with a furnace | The smaller connector enters the common vent higher up |
All of these come from IFGC 503.10, which most US jurisdictions adopt for gas venting.10
The test most DIY guides skip: check for spillage. With doors and windows closed and the bath and kitchen exhaust fans running, let the main burner run for 5 minutes. Then hold a lit match or a smoking incense stick at the draft hood's relief opening, the gap around the bottom of the hood. The flame or smoke should be pulled in. If it blows out, flue gas is spilling into the room. Shut the burner off and don't use the heater until it's fixed.11
Why it fails even when every joint looks right: draft depends on a column of hot gas rising faster than room air. A water heater makes much less flue gas than a furnace. When a furnace that shared the chimney is swapped for a high-efficiency unit with its own plastic vent, the water heater is left alone in a flue sized for both. Its small gas flow cools in the oversized chimney, rises slowly and can spill back. If the spillage test fails, or your vent needs rerouting, resizing or a chimney liner, call a plumber or gas fitter.
Understanding the Problem in Detail
Most water heaters die from age and sediment. Sediment insulates the bottom of the tank from the burner or element, so it runs hotter and longer, gets noisy and corrodes faster. The anode rod, a sacrificial metal rod inside, corrodes first to protect the steel; once it's gone, the tank rusts. A faulty thermostat or element can be repaired, but a leak from the tank itself means the steel liner has failed, and replacement is the only fix.
Tools and Materials Guide
Flexible Connectors: Braided stainless allows minor misalignment; 18" or 24" lengths are easiest to work with. Dielectric Unions: Prevent galvanic corrosion between copper pipe and the steel tank nipples. Many new heaters include them, so check the box first. Tape and Dope: Yellow gas-rated tape or dope on gas threads only; white potable-water tape on water lines. Sediment Trap: Required on gas heaters to catch debris before the gas valve. Drain Pan: Required wherever a leak would cause damage. It has to be at least 1-1/2" deep and drain through a 3/4" indirect waste pipe, and a plastic pan can't go under a gas heater. If the old heater had no pan drain, a replacement doesn't have to add one.8 Venting: Matching the existing vent type is usually easiest; the venting section above has the rules.
Safety Considerations
The step warnings cover power, gas and hot water. Two things they don't: Weight. A 40–50 gallon tank weighs about 100–150 lbs empty and roughly 450–550 lbs full, so drain it completely and use a dolly and a second person. Carbon monoxide. A bad vent leaks CO you can't see or smell, so put a CO detector near the bedrooms if you don't already have one.
Troubleshooting Common Issues
Leak at New Connection: Tighten slightly (1/8 turn max). Still leaks? Check for crossed threads or damaged sealing surface. May need to re-make connection. No Hot Water (Gas): Pilot light out? Relight per instructions. Gas valve on? Gas supply valve on? Thermostat set correctly? No Hot Water (Electric): Breaker tripped? Reset. If trips again immediately, wiring error likely (check connections against photo/manual). Thermostat set correctly? Rumbling/Gurgling: Severe sediment buildup in new tank? Unlikely immediately, but could indicate need for future flush. T&P Valve Leaking: Excess pressure? Faulty valve? Ensure discharge tube is unobstructed. If leaking persistently after initial fill, valve may be faulty or pressure too high (may need expansion tank). Low Hot Water Pressure: Air lock? Open ALL hot faucets briefly. Debris in line? Flush lines.
Maintenance and Prevention
Annual Flush: Drain 2-5 gallons from the tank annually to remove sediment (attach hose to drain valve, open briefly into bucket). Do this when tank is cool/slightly warm. Anode Rod Check: Inspect/replace the anode rod every 3-5 years (sooner in hard water areas). This is THE best way to extend tank life. Temp Setting: Keep thermostat at 120°F. Saves energy, reduces scalding risk, slows mineral buildup. Pressure Check: If T&P valve leaks or you have high water pressure, install an expansion tank and/or pressure reducing valve (PRV). Vent Inspection: Visually check gas venting annually for obstructions or damage.
Cost Analysis: DIY vs Professional
DIY Cost: New Heater ($500-$1500), Supplies/Fittings ($50-$150), Permit ($50-$150 - if required/obtained). Total DIY: ~$600 - $1800. Pro Installation: $1200 - $3000+ (includes heater, labor, parts, markup, permit). Savings: DIY can save $600 - $1500+. Money Savers: Shop heater sales, get exact size needed (don't oversize), compare supply house vs. big box prices, reuse compatible fittings if in good shape. Hidden Costs: Unexpected parts (bad valves, rotten pipes), permit fees, tool rental/purchase if needed, disposal fee for old heater ($20-$50).
Within that pro range, one 2026 estimate puts the typical installed replacement at about $1,630–$1,900 per heater.12 By type, that's roughly $1,500 for an electric tank, $2,000 for a gas tank, $3,000 for a heat pump and $4,250 for gas tankless.13
Related Plumbing Problems
Not every failing heater needs replacing. A leaking T&P valve or drain valve can be replaced on its own if the tank is sound. No hot water with a good tank usually points to a thermostat, heating element, gas valve, thermocouple, tripped breaker or high-limit switch. Rumbling often clears with a flush if caught early. Smelly hot water is usually bacteria: raise the temperature to 140°F for a few hours, then back to 120°F. Running out too fast can mean an undersized tank, a broken dip tube or sediment taking up capacity.
Frequently Asked Questions
How do I know what size water heater I need?
Use your old heater's gallon capacity as a starting point (found on its label). Consider your household size: 40-50 gal for 1-3 people, 50+ gal for 4+. Factor in simultaneous usage (showers + laundry + dishwasher). 'First Hour Rating' (FHR) on the new heater's EnergyGuide label is more important than just tank size – it tells you how much hot water it can deliver in the first hour of recovery. Match or exceed your old heater's FHR if it met your needs. Our water heater sizing guide walks through the peak-hour calculation.
Can I install a larger tank than what I had?
Physically? Measure your space (height, width, depth) including clearances before buying. Capacity-wise? Yes, but ensure your floor can support the extra weight (water is ~8.3 lbs/gallon) and your gas line/electrical circuit can handle the potentially higher demand (check new heater specs vs. old). A larger tank might require venting upgrades too.
Is it safe to do this myself if I've never done plumbing before?
If you're careful with tools and follow each step exactly, an electric like-for-like swap is a reasonable first big plumbing job. Gas work, new venting or a new location is where first-timers should hire out; the table at the top of this guide breaks it down.
Do I need a permit to replace my own water heater?
Usually, yes, even for a straight swap. A few building departments exempt identical replacements, so call yours before you start rather than assuming either way. The inspection is also what insurers and buyers look for if anything goes wrong later.
My old heater lasted 20 years. Will a new one last that long?
Modern heaters are often built with thinner steel tanks to meet efficiency standards, so 10-15 years is a more realistic expectation today. However, proactively replacing the anode rod every few years (a $20-$50 part and 30-minute job) is THE single best thing you can do to maximize your new heater's lifespan, potentially getting it closer to that 20-year mark.