Frozen Pipe Crisis? How to Safely Thaw Pipes and Prevent Costly Damage
Panicked about frozen pipes? Learn step-by-step thawing methods, avoid dangerous mistakes, and prevent burst pipes. DIY solutions for homeowners - no plumbing experience needed!
Waking up to no water on a freezing morning is more than inconvenient – it's a race against the clock. That icy blockage puts dangerous pressure on your pipes, threatening bursts that cause thousands in water damage. We've all been there: standing in a chilly basement, frustrated and unsure where to start. Let's fix this together.
That dreaded moment when you turn the faucet and... nothing. Frozen pipes can leave you feeling helpless as temperatures plummet. But take a deep breath – with the right approach, you can safely thaw pipes yourself and avoid a plumbing disaster. This guide walks you through every step with confidence.
Tools Needed
- Hair dryer (standard household model)
- Heat lamp or space heater (UL-approved, with automatic shutoff)
- Infrared thermometer (to pinpoint frozen spots)
- Pipe insulation sleeves (foam tubes, slit lengthwise)
- Towels/rags (for water absorption)
Materials Needed
- Electrical tape (vinyl, for temporary insulation fixes)
- Pipe wrap heating cable (thermostat-controlled, UL-listed)
- Foam pipe insulation (1/2"-1" wall thickness, sized to pipe diameter)
- Bucket (for potential leaks during thawing)
Solution (Beginner - 30 min - 2 hours (depending on pipe location/severity))
Step 1: Shut Off Water & Find the Freeze
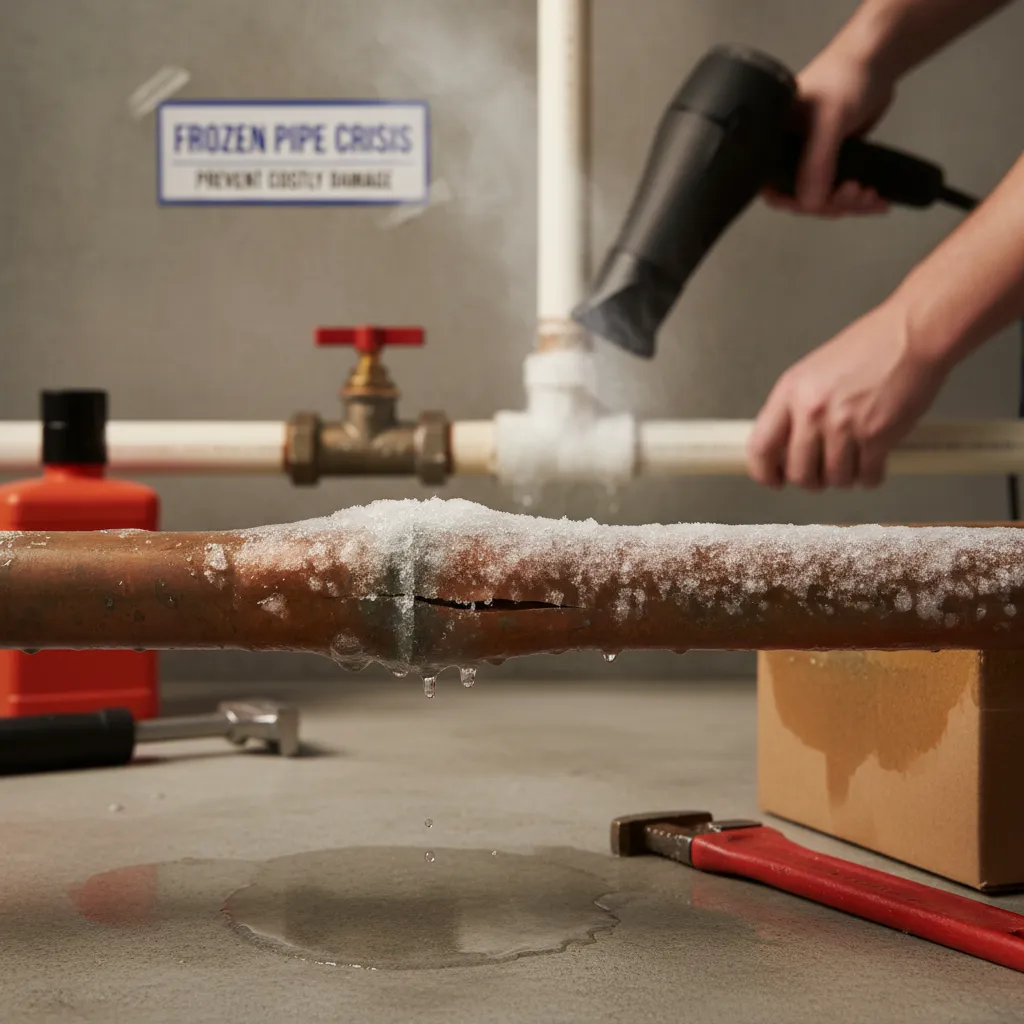
Locate your main water shutoff valve (usually near water meter or where pipes enter the house) and turn it clockwise. Open faucets to relieve pressure. Follow pipes from affected faucets, feeling for extra-cold sections or using an infrared thermometer. Common freeze spots: under sinks, crawl spaces, attics, and exterior walls.
⚠️ Warning: NEVER skip shutting off the water! Thawing without this risks explosive bursts.
Step 2: Gentle Heat Application
Start warming the pipe closest to the faucet, moving toward the frozen area. Use a hair dryer on medium heat, waving it steadily along the pipe. For hard-to-reach spots, use a heat lamp/heater from 12+ inches away. Wrap towels around the pipe to retain heat. Patience is key – rushing can crack pipes!
⚠️ Warning: ABSOLUTELY NO open flames (torches, propane heaters). This risks fire and can superheat pipes dangerously.
Step 3: Thaw Verification & Slow Water Return
When water starts trickling from faucets, you're winning! Keep applying heat until full flow returns. Once thawed, close faucets and SLOWLY reopen the main valve. Check joints and valves for leaks – ice expands and can weaken connections.
⚠️ Warning: If you see bulging pipes or major leaks, shut off water immediately and call a pro.
Step 4: Emergency Insulation Wrap
Temporarily wrap thawed pipes with foam sleeves or even towels secured with electrical tape. This prevents re-freezing while you plan permanent fixes. Focus on vulnerable areas identified during thawing.
⚠️ Warning: Electrical tape should never touch heat sources or cover leaks.
Pro Tips
- Leave cabinet doors open overnight to let warm air reach pipes under sinks
- During extreme cold, let faucets drip slowly – moving water resists freezing
- Use a mirror to check pipe backsides in tight spaces
- Thaw metal pipes before plastic – they conduct heat better but burst more violently
When to Call a Professional
Call a licensed plumber immediately if: 1) You see a burst pipe or major leak, 2) The frozen section is inaccessible (inside walls/floors), 3) No water returns after 2 hours of proper thawing, or 4) You smell sewage (possible frozen drain line).
Understanding the Problem in Detail
Water expands by 9% when freezing. This expansion creates immense pressure inside pipes – up to 40,000 PSI! Plastic pipes may bulge before bursting, but copper often fails explosively. Pipes freeze fastest where cold air penetrates (uninsulated areas, drafty walls) or where water sits stagnant (infrequently used faucets).
Tools and Materials Guide
Hair dryers work best for small sections. Heat lamps (250W) are safer than space heaters for confined spaces. Infrared thermometers ($20-$50) prevent guessing. Pipe insulation: Closed-cell foam is most effective. Heating cables must be thermostat-controlled to prevent overheating. Find these at hardware stores – ask for 'frost-proof' supplies.
Safety Considerations
- Electrocution risk: Keep all electrical tools away from standing water. Use GFCI outlets. 2) Fire hazard: Maintain 3ft clearance between heaters and flammables. 3) Water damage: Place buckets under pipes during thawing. 4) Structural risk: Never cut into walls to access pipes without professional guidance.
Troubleshooting Common Issues
Problem: Pipe won't thaw? Try warm towels soaked in hot water wrapped around the pipe (replace often). Problem: Water flow stops again? Check for new freezes downstream. Problem: Minor leak at a joint? Tighten gently with a wrench – overtightening cracks fittings. Problem: Low water pressure post-thaw? Sediment may be trapped in aerators – clean faucet screens.
Maintenance and Prevention
Permanent fixes: 1) Insulate ALL pipes in unheated areas with foam sleeves. 2) Seal air leaks near pipes with spray foam or caulk. 3) Install pipe heating cables before winter. 4) Keep thermostat consistent day/night during freezes. 5) Drain outdoor faucets before winter.
Cost Analysis: DIY vs Professional
DIY: Insulation sleeves ($0.50-$2/ft), heating cables ($30-$80). Pro thawing: $150-$500. Burst pipe repair: $500-$4,000+ (plus water damage costs). Prevention spends save thousands!
Related Plumbing Problems
- Burst pipes: Shut off water immediately and call a pro. 2) Frozen outdoor faucets: Use insulated covers. 3) Frozen drain lines: Pour hot water down drains. 4) Condensation/mold: Dry areas thoroughly post-thaw.
Frequently Asked Questions
Can I use a blowtorch to thaw pipes faster?
Absolutely not! Open flames create fire hazards and can superheat copper pipes, causing dangerous steam explosions. Always use controlled, indirect heat like hair dryers.
What if I can't find the frozen section?
Start at the most vulnerable spots (exterior walls, unheated spaces). If inaccessible, call a plumber – thermal cameras can detect freezes inside walls without damage.
Will pipes automatically burst when frozen?
Not always – but it's a ticking clock. The longer pipes stay frozen, the higher the burst risk. Immediate, careful thawing greatly reduces damage chances.