Fix Shower Grout Like a Pro: Stop Leaks & Mold for Good!
Frustrated by cracked, moldy shower grout? Learn the simple, step-by-step DIY fix to repair it properly, prevent water damage, and restore your bathroom's look. Save money & gain confidence!
Shower grout takes a beating! Constant water, soap scum, temperature changes, and even slight shifts in your house can cause it to crack, crumble, or stain. Beyond looking ugly, damaged grout is like an open door for water to seep behind your tiles. This hidden moisture is the real enemy – it can lead to mold, mildew, rotten wall studs, and damaged subfloors. That discoloration or soft spot near the base? Likely a sign water is getting where it shouldn't. It's frustrating, but addressing it promptly saves major headaches (and expensive repairs) down the line.
Staring at crumbling, discolored, or moldy grout in your shower? That sinking feeling that water might be sneaking behind your tiles? You're not alone, and it's totally fixable! Don't let a little grout ruin your bathroom peace of mind. This guide will walk you through repairing it safely and effectively, turning frustration into DIY triumph.
Tools Needed
- Utility knife or grout saw: For removing old grout.
- Grout removal tool (manual or oscillating tool attachment): Makes removal faster and easier.
- Stiff-bristled brush (nylon or brass): For scrubbing joints clean.
- Shop vacuum: Essential for removing dust and debris.
- Bucket & sponges: For cleaning and rinsing.
- Rubber grout float: For applying new grout smoothly.
- Grout sponge (large cellulose): For wiping away excess grout.
- Microfiber cloths: For final polishing.
- Painter's tape: Optional for protecting fixtures.
- Safety glasses & N95 mask: CRITICAL for eye and lung protection from silica dust.
- Knee pads: Your knees will thank you.
Materials Needed
- Sanded Grout (for joints 1/8" or wider) OR Unsanded Grout (for joints less than 1/8"): Choose color-matched to existing or update. Pre-mixed is easier for beginners; powder offers more color control.
- Grout Sealer (Penetrating type): Crucial for preventing future stains and water absorption. Look for 'shower safe' or 'impregnating' sealer.
- Clean water: For mixing (if using powder grout) and rinsing.
- Latex or nitrile gloves: Protect your hands.
Solution (Beginner (Patience is key!) - 2-4 hours (plus 24-72 hours curing time))
Step 1: Clear the Battlefield & Gear Up
Remove everything from the shower (bottles, mats). Ventilate the area well – open windows, run a fan. TAPE OFF fixtures (faucets, drains) if desired. PUT ON SAFETY GLASSES AND YOUR N95 MASK – silica dust from old grout is no joke! Knee pads on.
⚠️ Warning: DO NOT SKIP SAFETY GEAR! Silica dust is a serious respiratory hazard. Ensure good ventilation.
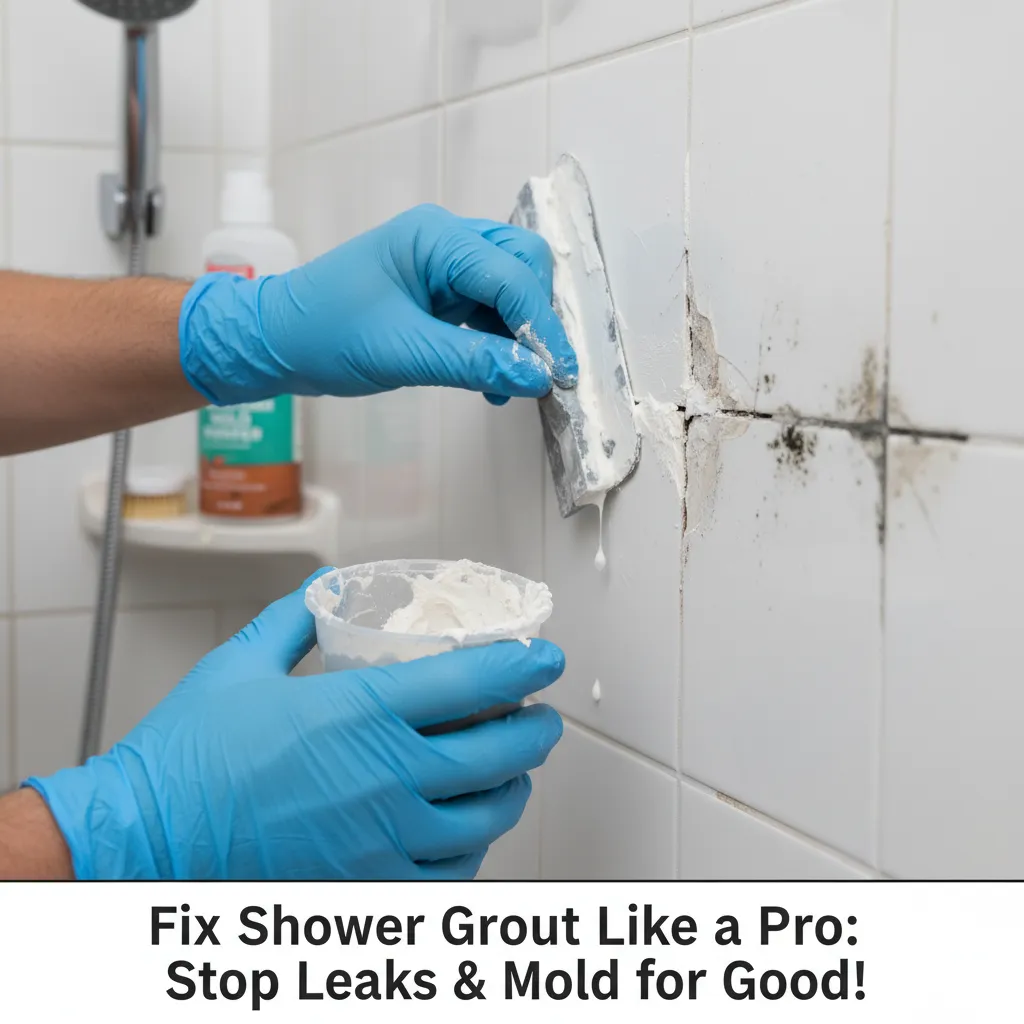
Step 2: Remove the Old, Damaged Grout
Using your utility knife, grout saw, or oscillating tool with grout removal bit, carefully scrape out the old grout. Aim to remove grout to a depth of about 1/8" to 1/4" – deep enough for the new grout to grip, but don't gouge the tile edges or damage the waterproofing behind. Focus on damaged areas, but consistency in joint depth looks best. Work methodically section by section. The oscillating tool is MUCH faster but requires a lighter touch.
⚠️ Warning: Be gentle! Avoid scratching tiles or digging into the substrate. Stop immediately if you hit mesh or a soft, damp area behind the tile – this indicates potential water damage needing professional assessment.
Step 3: Deep Clean & Dry the Joints
Thoroughly vacuum EVERY BIT of dust and debris from the joints and tile surface. Follow up by scrubbing the joints vigorously with your stiff brush and clean water. Rinse multiple times until the water runs clear and no dust remains. Wipe tiles with a damp sponge. CRITICAL STEP: Let the area dry COMPLETELY – overnight is best. New grout won't bond to damp surfaces.
⚠️ Warning: Incomplete cleaning or moisture is the #1 reason new grout fails or discolors. Patience here pays off!
Step 4: Mix & Apply the New Grout
If using powder grout, mix small batches with clean water according to package directions – aim for a thick peanut butter consistency. Let it 'slake' (rest) for 10 mins, then remix briefly. Using your rubber float held at a 45-degree angle, forcefully press the grout into the joints, working diagonally across the tiles. Overfill the joints slightly. Work in manageable sections (e.g., 3ft x 3ft).
⚠️ Warning: Mixing too much grout at once leads to waste as it hardens. Work efficiently once applied.
Step 5: Clean Off the Excess Grout
Wait 10-20 minutes (check grout instructions!) until the grout is firm to the touch but not fully set. Dampen your grout sponge (WRING IT OUT COMPLETELY – it should be barely damp) and gently wipe diagonally across the tiles to remove the bulk of the grout haze. Rinse the sponge OFTEN in clean water, wringing thoroughly each time. Avoid digging into the fresh grout joints. Repeat 2-3 times with lighter passes as the haze diminishes.
⚠️ Warning: A soaking wet sponge will pull grout out of the joints! Wring, wring, wring! Rushing this step ruins the finish.
Step 6: Final Polish & Initial Cure
After another 1-2 hours (when haze is dry but not rock-hard), use a soft, clean microfiber cloth to gently buff away any remaining fine haze from the tile surfaces. Let the grout cure undisturbed for the time specified by the manufacturer (usually 24-72 hours). Keep the shower dry!
⚠️ Warning: Do NOT use the shower during this initial cure time! Water will ruin the grout.
Step 7: Seal for Long-Lasting Protection
Once fully cured (check package times, often 3-7 days), apply a penetrating grout sealer. Follow the product instructions carefully! Typically, apply sparingly with a small brush or applicator bottle directly onto the grout lines, avoiding excessive amounts on the tile. Wipe any excess sealer off the tiles immediately with a clean cloth. Allow the sealer to dry completely (usually 24 hours) before using the shower normally.
⚠️ Warning: Sealing is non-negotiable for shower grout! It repels water and stains. Reapply as recommended (usually annually).
Pro Tips
- Pre-wet porous tiles (like natural stone) before grouting to prevent them from sucking moisture out of the grout too fast.
- Use a margin trowel to 'butter' grout into vertical joints or tight spots the float misses.
- For consistent color, mix all your grout powder together first before adding water, especially if using multiple bags.
- If grout starts to dry too fast while wiping haze, lightly mist the area with water from a spray bottle (avoid soaking!).
- Use a bright work light angled across the tiles – it makes seeing grout haze and missed spots much easier.
- Keep a bucket of clean water and a dedicated 'grout only' sponge for the final haze cleanup.
When to Call a Professional
Call a pro if: 1) You discover soft, rotted wallboard or framing behind the tiles. 2) There's significant mold growth extending behind the tiles. 3) Tiles are loose or shifting. 4) You suspect the waterproofing membrane (behind the tile) is compromised. 5) You're dealing with expensive or intricate tile (like mosaic) and lack confidence. It's cheaper to call someone than to fix water damage later!
Understanding the Problem in Detail
Grout isn't waterproof; it's porous cement. Water constantly wicks into it. Over time, this, combined with movement (house settling, temperature changes) and cleaning chemicals, causes it to crack or crumble. Poor initial installation (wrong mix, insufficient depth, skipped sealing) speeds this up. Damaged grout lets water reach the vulnerable substrate behind, leading to mold, rot, and structural damage.
Tools and Materials Guide
Grout Removal: Manual tools (saw/knife) are cheap but slow; oscillating tools are faster but require investment. Grout Choice: Sanded (wider joints, more durable), Unsanded (narrow joints, smoother finish). Pre-mixed is convenient; powder offers wider color range. Sealer: MUST be penetrating/impregnating type for showers. Avoid topical sealers. Find these at home centers (HD, Lowe's) or tile specialty stores. Rent oscillating tools if needed.
Safety Considerations
Silica Dust is Hazardous: N95 mask (properly fitted) and safety glasses are MANDATORY during removal and cleanup. Ventilate! Knee Protection: Use pads or a cushion. Hand Protection: Gloves prevent skin irritation from grout and cleaners. Electric Tools: Use GFCI outlets if available, keep cords dry. Ladders: Ensure stability if reaching high areas.
Troubleshooting Common Issues
Grout Cracking Again: Caused by insufficient removal depth, movement in substrate (needs pro), joints too wide for unsanded grout, or grout mixed too wet. Grout Discoloration: Often from incomplete cleaning before application, inconsistent mixing, or water seeping from behind (indicating bigger problem). Grout Won't Stick: Surface was damp or dusty. Haze Won't Come Off: Waited too long to wipe; may require special grout haze remover (test on tile first!).
Maintenance and Prevention
- Squeegee After EVERY Shower: Removes 90% of standing water. 2) Run the Bathroom Fan: For 20-30 mins post-shower to reduce humidity. 3) Regular Gentle Cleaning: Use pH-neutral cleaners; avoid harsh acids or abrasives. 4) Reseal Annually: Test by splashing water on grout – if it darkens quickly (absorbs), it's time to reseal. 5) Fix Small Cracks Promptly: Don't let water in!
Cost Analysis: DIY vs Professional
DIY: $20-$80 (Grout $10-$30, Sealer $10-$20, Tools $0-$50 if borrowing/buying basics). Professional: $300-$800+ (Labor + materials, depends on shower size and damage). Savings: DIY saves significant money. Invest in a good sealer and squeegee for long-term savings.
Related Plumbing Problems
Leaky Shower Valve, Damaged Shower Pan, Cracked/Chiped Tiles, Mold on Silicone Caulk, Clogged Shower Drain, Failing Shower Waterproofing.
Frequently Asked Questions
Can I just put new grout over old grout?
Strongly discouraged! It won't bond properly, will likely crack quickly, and traps moisture behind, worsening any hidden damage. Proper removal is essential for a lasting repair.
How do I know if it's mold or just dirt/discoloration?
Mold often appears as black, green, or pink speckles or streaks that might feel slimy and have a musty odor. Bleach test (carefully apply a drop): Mold usually lightens significantly; dirt doesn't. If it's widespread or behind grout, assume mold and clean thoroughly or replace grout, addressing moisture sources.
Sanded vs. Unsanded grout - which do I need?
Use Sanded Grout for joints 1/8 inch or wider. The sand adds strength and reduces shrinkage. Use Unsanded Grout for joints less than 1/8 inch wide (like many wall tiles or mosaics) as it's smoother and packs tighter into narrow spaces. Using sanded in narrow joints can make it gritty and difficult to apply.
How soon can I shower after regrouting?
Patience! Wait at least 24-72 hours for the grout to cure initially (check product instructions!). More importantly, wait the full recommended time (often 3-7 days) before applying sealer. Only resume normal showering after the sealer has fully dried (usually another 24 hours). Keep it dry until then!
My grout is stained but not cracked. Do I need to replace it?
Not necessarily! Try deep cleaning first. Use a dedicated grout cleaner or paste (baking soda + water/vinegar paste, but test on inconspicuous area first, especially on colored grout). Scrub vigorously with a stiff brush. If stains persist, or if sealing doesn't help, replacement is the best option for both looks and protection.