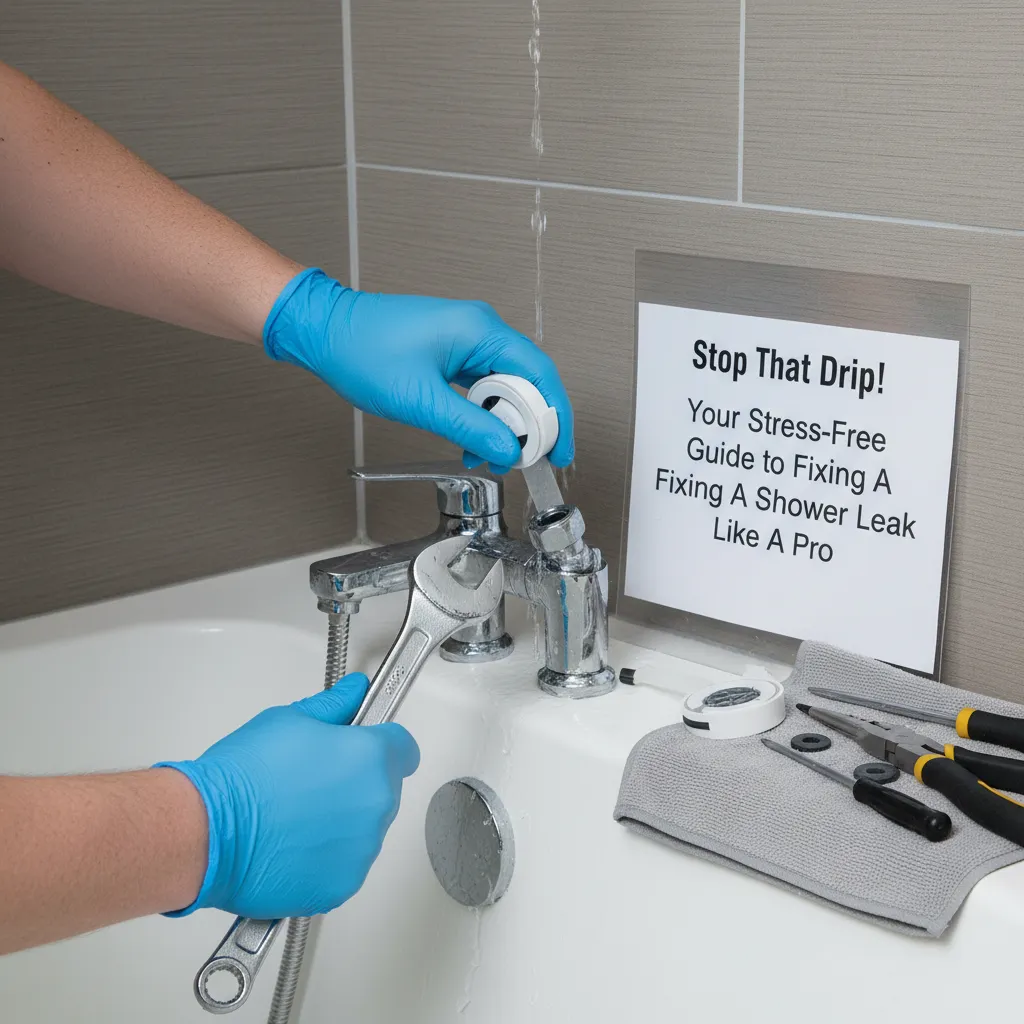
Stop That Drip! Your Stress-Free Guide to Fixing a Shower Leak Like a Pro
Frustrated by a leaking shower? Save money & water damage! Learn easy DIY fixes for faucets, showerheads & tiles with step-by-step guides, safety tips, and when to call a plumber.
You see the drip from the showerhead, feel water around the handle, spot damp walls, or notice a puddle forming near the base. It starts small but nags at you, hinting at wasted water, higher bills, and the scary potential for hidden mold or rot. That feeling of 'Where do I even start?' is totally normal – we've all been there.
That persistent drip-drip-drip isn't just annoying – it's money down the drain and a potential water damage nightmare. We get it, standing in a puddle before your coffee is zero fun. Take a deep breath! Most shower leaks are surprisingly fixable, even if you've never held a wrench. This guide will walk you through finding the leak, simple repairs, and give you the confidence to tackle it safely.
Tools Needed
- Adjustable Wrench: For gripping nuts (avoid pliers, they slip!).
- Channel-Lock Pliers (Groove Joint Pliers): Essential for tricky fittings.
- Screwdrivers (Flathead & Phillips): For handle screws and cover plates.
- Allen Wrench Set: Often needed for modern handle sets.
- Rag/Towel: Protect surfaces and wipe up water.
- Bucket: Catch water when disconnecting lines.
- Flashlight: See into dark shower valve areas.
Materials Needed
- Replacement Washers (Assorted Kit: 3/8", 1/2"): Cheap fix for many leaks. Get rubber or neoprene.
- Replacement O-Rings (Assorted Kit): Crucial for cartridge seals and showerheads.
- Plumber's Grease (Silicone-Based): Lubricates seals, prevents sticking. NOT regular grease
- Teflon Tape (PTFE Tape): Seals threaded connections. Get the pink or yellow 'thicker' kind for water.
- Replacement Cartridge (Specific to your faucet brand/model): Only if needed. Identify first!
- Tile Grout/Caulk (100% Silicone or Siliconeized Acrylic): For leaks around tile or base.
Solution (Beginner to Intermediate - 30 mins to 2 hours (depending on leak source & experience))
Step 1: Find the Source (Play Detective!)
Dry everything completely with a towel. Run the shower briefly. Carefully feel around handles, the tub spout connection, showerhead arm, hose connections (if applicable), tile edges, and the shower base. Look for drips, seepage, or spray. Mark the spot with tape or a mental note. Pro Tip: Stuff a dry paper towel around suspected areas – water stains reveal the culprit!
⚠️ Warning: Be cautious of hot water! Feel gently. Turn off power to the bathroom if water is near electrical fixtures (GFCI outlets, lights).
Step 2: Shut Off the Water (Non-Negotiable!)
Locate your shower's shut-off valves. They're usually behind an access panel (opposite wall or adjacent closet) or under the sink. Turn handles clockwise until tight. No valves? Find your home's MAIN water shut-off and turn it off. Pro Tip: Test shut-off by turning the shower on briefly after closing valves – only a trickle should come out.
⚠️ Warning: NEVER work on plumbing with water pressure on! You risk flooding and injury.
Step 3: Fix a Leaky Showerhead or Hose
Unscrew the showerhead/hose from the wall arm by hand or gently with channel-locks (protect finish with a rag). Check the washer inside the hose end or showerhead inlet – replace if cracked/flat. Check the O-ring on the shower arm nipple – replace if damaged (use plumber's grease on the new one). Wrap Teflon tape (2-3 wraps clockwise) on the shower arm threads. Screw the showerhead/hose back on hand-tight, plus a quarter turn with tools. Pro Tip: Soak a crusty showerhead in vinegar first to loosen mineral deposits causing leaks.
⚠️ Warning: Don't overtighten! It cracks fittings. Hand-tight plus a snug quarter-turn is enough.
Step 4: Fix a Leaky Handle (Cartridge/Washer Focus)
Remove the handle screw (often hidden under a decorative cap). Pull the handle off. Remove the trim/escutcheon plate. Underneath, you'll find the cartridge or stem assembly. For cartridge types (common in single/two-handle): Note its orientation, then gently pull it straight out (may need cartridge puller tool if stuck). Inspect O-rings/seats for wear – replace cartridge or O-rings. Lubricate new O-rings with plumber's grease. Reinsert cartridge exactly as it came out. For older stem/washer types: Unscrew the packing nut. Pull out the stem. Replace the rubber washer on the end and the packing O-ring near the nut. Reassemble. Pro Tip: Take a photo before disassembly! Match cartridge brand/model exactly.
⚠️ Warning: Handle sets under tension (like some Moen) need special tools. If unsure, stop after removing trim plate and identify the type before proceeding.
Step 5: Fix a Leaky Tub Spout
Unscrew the tub spout. Some twist off (lefty-loosey), others have a set-screw underneath (loosen screw first). Check the O-ring(s) on the spout nipple – replace if damaged (grease new ones). Wrap Teflon tape (2-3 wraps) on the nipple threads. Screw the spout back on hand-tight plus a quarter turn. Ensure set-screw is tightened if applicable. Pro Tip: A leaky spout can sometimes indicate a problem with the shower diverter (inside the wall) – if replacing O-rings doesn't work, deeper investigation is needed.
⚠️ Warning: Don't force a stuck spout. Excessive force can break the pipe inside the wall.
Step 6: Fix Leaks Around Tile or Base
For grout lines: Chip out cracked/loose grout with a grout saw or screwdriver. Clean thoroughly. Apply new sanded grout, forcing it deep into the joint. Wipe clean. For corners/base joints: Completely remove old, failing caulk with a utility knife and scraper. Clean and dry completely (rubbing alcohol helps). Apply 100% silicone caulk (or high-quality siliconeized acrylic) in a smooth, continuous bead. Smooth with a wet finger or tool immediately. Pro Tip: Use painter's tape on both sides of the joint for super clean caulk lines.
⚠️ Warning: Ensure surfaces are bone dry for caulk to adhere. Mold grows behind failed caulk.
Step 7: Turn Water On & Test (The Moment of Truth!)
Slowly turn the water shut-off valves back on (counter-clockwise). Check all your connections for drips before turning the shower on. Turn the shower on. Check your repair area meticulously. Run through hot and cold settings. Check for leaks again after 5 minutes. Pro Tip: Place dry paper towels under connections during testing – even tiny leaks show up clearly.
⚠️ Warning: Open valves SLOWLY to avoid water hammer (loud banging pipes).
Pro Tips
- Take pictures/video during disassembly – your future self will thank you!
- Wrap wrenches/channel-locks with masking tape to protect shiny chrome finishes.
- Keep old parts until the repair is successful and leak-free for 24 hours.
- Use white vinegar to dissolve mineral buildup inside showerheads or cartridges before replacing parts.
- If a cartridge is stuck, penetrating oil (like PB Blaster) and gentle rocking can help – avoid brute force.
- Buy a 'universal' cartridge puller tool – it's cheap insurance against frustration.
When to Call a Professional
Call a licensed plumber if: 1) The leak is behind the wall/tile with no access panel. 2) You suspect a cracked pipe or valve body. 3) Replacing the cartridge/stem doesn't stop the leak (indicates worn valve seats or deeper issues). 4) You don't feel confident identifying parts or shutting off water safely. 5) There are signs of significant water damage (soft walls, mold, ceiling stains). It's smarter (and cheaper long-term) to call a pro than risk major water damage.
Understanding the Problem in Detail
Leaks happen because seals wear out. Rubber washers and O-rings dry out, crack, or get flattened by mineral deposits over years of use. Cartridges have intricate internal seals that fail. Threads without Teflon tape or with damaged washers don't seal tightly. Grout cracks, and caulk shrinks/pulls away, letting water sneak behind tiles or under the base. Understanding it's usually just a worn $1 washer, not the whole shower, makes it less scary!
Tools and Materials Guide
Wrenches: Adjustable is versatile; Channel-locks provide superior grip on rounded nuts (wrap jaws in tape!). Washers/O-Rings: Kits are cheap ($5-$10) – get assorted sizes. Neoprene lasts longer than rubber. Plumber's Grease: Silicone-based ONLY ($5). Regular grease damages rubber. Teflon Tape: Use thicker 'pink' or 'yellow' tape for water lines ($3). Wrap clockwise 2-3 times. Cartridges: MUST match brand/model (Delta, Moen, Kohler, Pfister, etc.). Take the old one to the hardware store or find your shower model online ($10-$50). Caulk/Grout: 100% Silicone is best for wet areas but messy; Siliconeized Acrylic is easier ($5-$10). Buy at any hardware/big-box store.
Safety Considerations
Water Off is #1: Double-check water is OFF before disassembly. Slip Hazard: Work on dry surfaces; wipe up spills immediately. Hot Water: Be cautious testing hot water lines. Electrical: If water is near ANY electrical (lights, fan, outlets), turn off the circuit breaker. Eye Protection: Wear safety glasses when chipping grout or working under fixtures. Chemical Safety: Use vinegar or penetrating oil in well-ventilated areas. Don't Force It: If something won't budge, reassess – forcing breaks pipes. Mold: Wear a mask if dealing with significant existing mold.
Troubleshooting Common Issues
Leak returns immediately? Wrong cartridge installed, missed an O-ring, or valve seat is damaged (needs pro). Dripping after shut-off? Worn cartridge seals letting water seep through even when 'off'. Leak only when shower is on? Likely the cartridge, diverter, or connection points under pressure. Water behind handle/trim? Bad cartridge seals or O-rings on the trim. Leak persists after new cartridge? Valve body might be cracked or seats eroded – call a pro. Showerhead drips long after turning off? Normal 'weeping' for a minute or two is okay; constant drip is a leak.
Maintenance and Prevention
Annual Check: Feel around handles/spout for moisture when dry. Re-caulk: Refresh caulk around the base and corners every 1-2 years before it fails. Clean Showerhead: Soak in vinegar every 6 months to prevent mineral-clog related leaks. Lubricate: When changing cartridges (every 5-10+ years), grease new O-rings. Don't Overtighten Handles: This strains internal parts. Turn just enough to stop water flow. Address Grout Cracks: Repair small cracks promptly.
Cost Analysis: DIY vs Professional
DIY Fix: Washers/O-Rings: $1-$5. Teflon Tape/Grease: $5. Cartridge: $15-$50. Caulk/Grout: $5-$10. Total DIY: Typically $5-$70. Professional Fix: Service call ($75-$150) + Parts ($20-$100) + Labor (1-2 hours @ $80-$150/hr). Total Pro: $150-$500+. Savings: DIY saves $100-$450+ on common leaks. Money-Saving Tip: Diagnose accurately first – buying the wrong $40 cartridge wastes money.
Related Plumbing Problems
Low Water Pressure: Often caused by clogged showerhead (vinegar soak) or failing cartridge. Shower Diverter Not Working: Water doesn't switch fully to showerhead – usually a bad diverter washer in the tub spout or a failing cartridge. Running Toilet: Worn flapper valve (similar washer concept). Sink Faucet Leak: Uses similar washers/cartridges as showers. Water Hammer: Loud banging pipes when valves shut off – often needs air chambers checked or water hammer arrestors installed.
Frequently Asked Questions
Can I just ignore a small drip?
Please don't! A single drip per second wastes over 3,000 gallons a year – that's $$$ on your water bill. Worse, constant moisture breeds mold and can cause hidden structural damage, leading to very expensive repairs later. Fix it ASAP!
How do I know what brand my shower faucet is?
Check the handle face or trim plate for a logo (Delta, Moen, Kohler, Pfister are common). Look inside the handle if you remove it. No logo? Take photos of the handle, trim, and any exposed parts to a plumbing supply store – they can often ID it. The cartridge itself (once removed) is the best identifier.
I turned off the valves, but water still drips from the showerhead. Is that normal?
A few drips immediately after shutting off is normal as water drains from the pipe above. However, if it drips constantly for more than a minute or two after shutting off the valves, it indicates the cartridge seals are worn and letting water seep through even when 'off' – you likely need to replace the cartridge.
Can I reuse the old washer or O-ring?
Almost never. Once compressed, they lose their sealing ability. Reusing them is the #1 reason a 'fixed' leak comes back immediately. Always replace washers and O-rings – they cost pennies!
What's the difference between grout and caulk?
Grout is a cement-based material for filling joints between tiles on flat surfaces. Caulk is a flexible sealant (like silicone) used where planes meet or move (corners, base of shower to floor, around the tub). Caulk flexes, grout cracks. Never use grout in corners!