Stop That Running Toilet! How to Fix a Toilet Float Like a Pro
Annoyed by a constantly running toilet or weak flush? Learn how to diagnose & fix toilet float problems yourself with easy steps, essential tools, and pro tips. Save water & money!
That maddening sound of water constantly running into your toilet tank isn't just annoying – it's literally money down the drain. You might also notice weak flushes or the tank taking forever to refill. It feels like your toilet is conspiring against you, but 90% of the time, the issue is a simple float that's either stuck, set wrong, or worn out. You're not alone, and fixing it is well within your reach!
Hear that constant trickle? See your water bill creeping up? A malfunctioning toilet float is the likely culprit, turning your peaceful bathroom into a source of frustration. Don't panic! Fixing it is simpler than you think. This guide walks you through everything, from quick adjustments to full replacements, turning you from annoyed homeowner into confident DIY plumber.
Tools Needed
- Adjustable Wrench: For tightening nuts.
- Slip-Joint Pliers: Gripping and turning stubborn parts.
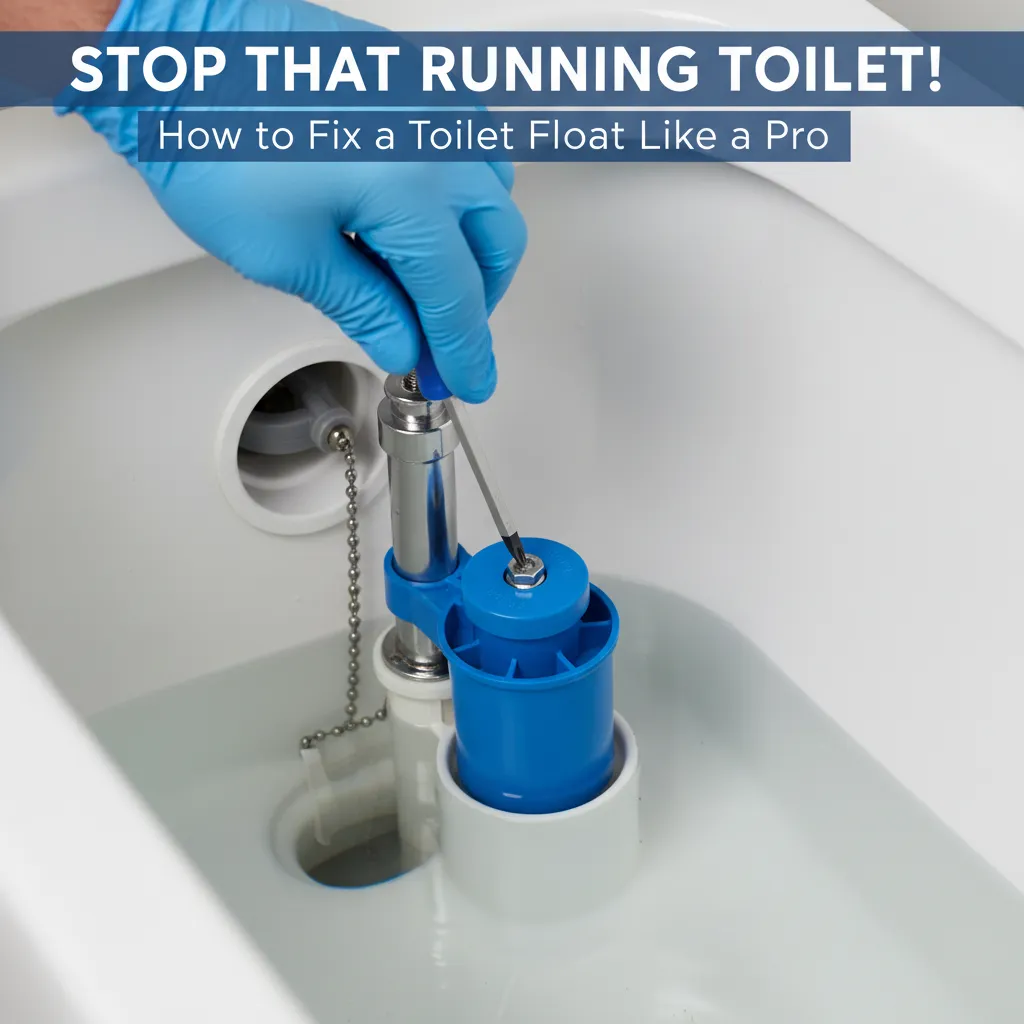
- Screwdriver (Phillips/Flathead): For float arm screws or valve connections.
- Sponge & Bucket: For soaking up water in the tank.
- Vinegar (Optional): For cleaning mineral deposits.
Materials Needed
- Replacement Fill Valve Assembly (if needed - e.g., Fluidmaster 400A Universal): Ensure it fits your toilet model.
- Replacement Flapper (if needed - match tank drain size): Often sold in multi-packs for future use.
- Clean Rags or Towels: For drying hands and spills.
Solution (Beginner - 15-45 minutes (Adjustment) / 30-60 minutes (Replacement))
Step 1: Shut Off the Water & Empty the Tank
Locate the water supply valve (usually on the wall pipe behind the toilet). Turn it clockwise (righty-tighty!) until it stops. Flush the toilet and hold the handle down to drain as much water as possible. Use your sponge and bucket to soak up the remaining water in the tank bottom. Pro Tip: Place the sponge in the bucket after wringing to avoid messy drips!
⚠️ Warning: Ensure the water is fully off before proceeding. Double-check no water is flowing into the tank after flushing.
Step 2: Identify Your Float Type & Problem
Look inside the empty tank. Do you see a big plastic ball on an arm (Ball Float) or a small cylinder that slides up/down a vertical tube (Cup Float)? Gently move the float up and down. Does it move freely or stick? Is it cracked or full of water (sinks)? Is the water level mark way above/below the overflow tube? Diagnose: Sticking? Misadjusted? Physically damaged?
⚠️ Warning: Be gentle! Don't force anything that feels stuck. Avoid bending metal arms excessively.
Step 3: Fix a Sticking or Misadjusted Float
Sticking Ball Float: Gently bend the brass arm slightly downwards near the ball (if metal) or clean the pivot point. Sticking Cup Float: Pinch the clip securing it to the fill valve shaft and slide it up/down. Clean the shaft with vinegar if crusty. Adjustment: For a ball float, turn the screw where the arm meets the fill valve (clockwise lowers water, counterclockwise raises it). For a cup float, squeeze the clip and slide it up (lowers water) or down (raises water). Aim for water level 1/2" - 1" below the top of the overflow tube. Pro Tip: Mark the ideal water level on the overflow tube with a pencil for easy reference!
⚠️ Warning: Turn adjustment screws gently. Over-tightening can strip plastic threads.
Step 4: Replace a Faulty Float or Entire Fill Valve (If Needed)
If the float is cracked, full of water, or adjustments fail, replacement is needed. For cup floats: Unclip the old one and clip the new one onto the shaft at the correct height. For ball floats or if the fill valve is old: Use your wrench/pliers to disconnect the water supply line from the bottom of the fill valve. Unscrew the large plastic locknut securing the valve to the tank bottom. Lift out the old assembly. Insert the new fill valve, thread the locknut on finger-tight underneath, then snug with pliers (don't over-tighten!). Reconnect the supply line. Attach the refill tube to the overflow pipe. Pro Tip: Most modern fill valves are universal – the Fluidmaster 400A is a reliable, easy-to-install choice.
⚠️ Warning: When tightening the locknut under the tank, support the fill valve body inside the tank to prevent twisting and cracking the porcelain. Use gentle pressure.
Step undefined: Test Your Fix & Tweak
Slowly turn the water supply valve back on counterclockwise. Listen and watch carefully inside the tank as it fills. The water should stop filling at your adjusted level (just below the overflow tube). Flush the toilet 2-3 times. Does the tank fill to the correct level and shut off completely? No leaks around the base of the fill valve or supply line? If not, re-check float adjustment or connections for tightness. Pro Tip: Add a few drops of food coloring to the tank. If color appears in the bowl without flushing after 15 mins, your flapper is likely leaking too!
⚠️ Warning: Watch for leaks diligently when turning water back on. Have towels ready!
Pro Tips
- Clean Mineral Buildup: Soak crusty parts in vinegar overnight before adjusting/replacing – it often fixes sticking issues!
- Check the Flapper Too: A worn flapper (the rubber seal at the tank bottom) is the other major cause of running toilets. Replace it if it's old, cracked, or doesn't seal tightly – it's cheap and easy!
- Listen for Hissing: After the tank fills and shuts off, put your ear near the fill valve. A slight hiss often means debris is stuck in the valve seal. Try turning the water off/on quickly a few times to flush it out before replacing.
- Take a Phone Pic First: Snap a picture of your tank's setup before disassembly – it's a great reference for reconnecting hoses correctly.
When to Call a Professional
Call a plumber if: 1) You see water leaking under the toilet tank or onto the floor (cracked tank or bowl). 2) The water supply valve won't turn off completely or leaks when manipulated. 3) You're uncomfortable working with water connections or feel unsafe. 4) After replacing the fill valve and flapper, the toilet still runs constantly. This could indicate a hidden crack or more complex valve issue.
Understanding the Problem in Detail
Think of the float like a pool float. As water fills the tank, the float rises. When it reaches the set height, it triggers a mechanism inside the fill valve to shut off the water. If it's set too high, water spills into the overflow tube, causing constant running. If too low, you get weak flushes. If it's stuck down, water never stops. If cracked/full of water, it sinks and can't rise high enough to shut off the water.
Tools and Materials Guide
Adjustable Wrench: 6-10 inch size is ideal. Slip-Joint Pliers: Standard 8-10 inch. Screwdriver: A multi-bit driver covers most needs. Fill Valve: Fluidmaster 400A is highly recommended (~$15-$20). Universally compatible and easy to install. Flapper: Measure the size of your tank's drain opening (usually 2" or 3") or take the old one to the store. Korky or Fluidmaster brands are reliable (~$5-$10). Buy these at hardware stores (Home Depot, Lowe's) or plumbing supply shops. Alternatives: For minor adjustments, you might only need the wrench/screwdriver you already have.
Safety Considerations
- Water Off is #1: Never work inside the tank with water on. Ensure the valve is fully closed and tank drained. 2. Mind the Porcelain: Toilet tanks are ceramic and can crack if you apply too much force, especially when tightening nuts underneath. Support the component inside the tank when tightening below. 3. Clean Hands, Clean Work: Wash hands before and after. Toilet tank water isn't potable. 4. Watch Your Back: Bend your knees, not your waist, when working low. 5. Leak Vigilance: Check connections carefully when turning water back on. Small drips can cause big damage over time.
Troubleshooting Common Issues
Water Still Running After Adjustment: Likely a worn flapper letting water leak into the bowl. Replace the flapper! Float Sticks Even After Cleaning: Mineral buildup might be severe or the float/arm could be warped. Replacement is best. Water Level Too Low/High After Adjustment: Re-check your adjustment point. Ensure the float isn't catching on anything (like the tank wall or refill tube). Hissing Sound After Shutoff: Debris in the fill valve seal. Try flushing it by quickly turning water off/on 5-6 times. If persists, replace fill valve. Leaking from Fill Valve Base: Ensure the rubber gasket is seated correctly and the locknut is snug (but not over-tightened).
Maintenance and Prevention
- Clean the Tank: Every 6-12 months, turn off water, flush, add 2 cups vinegar to the tank, let sit for an hour, then scrub gently (avoid bleach!). Flush several times. This prevents mineral buildup on the float, arm, and valve. 2. Check Flapper Annually: Lift it. Does it look worn or cracked? Does water seep around it when the tank is full? Replace preemptively every 3-5 years. 3. Listen: Get familiar with your toilet's normal fill sound and duration. Investigate any changes immediately.
Cost Analysis: DIY vs Professional
DIY Fix: Adjustment/Cleaning: $0 (uses existing tools/supplies). Replace Flapper: $5 - $10. Replace Fill Valve: $15 - $25. Total Potential DIY Cost: $0 - $25. Professional Fix: Plumber service call + labor + parts: Typically $100 - $250+. Savings: Fixing it yourself saves $75-$225+ on a very common issue. Preventative maintenance (cleaning, flapper replacement) costs pennies and saves gallons of water and future repair bills.
Related Plumbing Problems
- Worn Flapper: Causes water to leak from tank into bowl, leading to constant refilling/running. Often fixed simultaneously. 2. Faulty Fill Valve: Even if the float is okay, the internal valve mechanism can fail. Replacement is the solution. 3. Clogged Rim Jets/Holes: Causes weak flushes, sometimes mistaken for low water level. Clean with a stiff brush or wire. 4. Leaking Supply Line or Valve: Requires tightening or replacement of the line/valve. 5. Cracked Toilet Tank or Bowl: Major issue requiring toilet replacement.
Frequently Asked Questions
My toilet keeps running intermittently. Could it still be the float?
Absolutely! A float that's barely set too high, slightly sticking, or a flapper that doesn't seal perfectly can cause intermittent running. It might run for a few seconds every few minutes. Start with adjusting/cleaning the float and replacing the flapper – it's the most likely and cheapest fix.
I adjusted the float, but the water level is still too high/low. What now?
First, double-check your adjustment method (turning screw vs sliding clip). Ensure the float isn't catching on anything (tank wall, refill tube, chain). If it's a ball float, gently bend the arm slightly more. If it's stubborn or the float itself is damaged (cracked, waterlogged), replacement is the next step.
Is a running toilet an emergency?
While not usually an immediate 'flood your house' emergency, it IS a water-wasting emergency! A constantly running toilet can waste hundreds of gallons per day, skyrocketing your bill and straining resources. Fix it as soon as you reasonably can. Shut off the water to the toilet if you can't fix it immediately.
Should I replace the whole fill valve or just the float?
If you have a modern fill valve with a replaceable cup float and only the float is bad (cracked, waterlogged), just replace the float. If you have an old ballcock style, the float is often integrated, or the valve itself is likely near the end of its life. Replacing the entire fill valve assembly (around $20) is usually more reliable and efficient for older toilets. Modern fill valves are also much quieter.