Garbage Disposal Installation Made Easy: Your Step-by-Step DIY Guide
Frustrated with installing a garbage disposal? Learn how to DIY safely & correctly with our beginner-friendly guide. Save money & gain confidence! Tools, steps, tips & when to call a pro.
You're staring at an old, broken disposal, a leaky mess, or maybe just an empty space under your sink. The thought of plumbing, electrical work, and heavy metal appliances crammed into that dark cabinet feels overwhelming. You worry about leaks, shocks, or just doing it wrong and making things worse. That frustration is real! But with the right guidance and preparation, conquering this upgrade is within your reach.
That leaky, broken, or missing garbage disposal turning your kitchen sink into a hassle? Don't sweat it! Installing a new one yourself is totally doable and far less intimidating than you think. This guide walks you through every step clearly and safely, turning frustration into accomplishment. Grab your tools, and let's get your kitchen humming smoothly again!
Tools Needed
- Screwdrivers (Flathead & Phillips): For electrical connections and mounting screws.
- Adjustable Wrench or Basin Wrench: Essential for tightening plumbing connections under the sink.
- Channel-Lock Pliers: Gripping and turning nuts and fittings.
- Hammer & Screwdriver (or Punch): For knocking out the dishwasher drain plug.
- Wire Cutters/Strippers: Preparing electrical wires.
- Flashlight/Headlamp: Seeing clearly in the dark under-sink area.
- Putty Knife: Scraping old plumber's putty or sealant.
- Bucket & Towels: Catching water spills.
- Safety Glasses & Work Gloves: Protecting eyes and hands.
Materials Needed
- New Garbage Disposal Unit: Match horsepower (1/3 HP good for most homes) and connection type (Sink flange size, dishwasher inlet).
- Plumber's Putty: High-quality, non-hardening putty for sealing the sink flange.
- Dishwasher Drain Hose Connector Kit: If connecting a dishwasher (often included with disposal).
- Discharge Tube/Drain Pipe: Flexible corrugated or rigid PVC pipe (1-1/2" diameter, length depends on your setup).
- Wire Connectors (Wire Nuts): For securing electrical wires.
- Electrical Cord Kit: ONLY if your disposal isn't pre-corded AND you have an outlet. Otherwise, hardwire.
- Thread Seal Tape (Teflon Tape): For sealing drain pipe threads.
Solution (Intermediate - 2-3 hours (Allow extra time for surprises))
Step 1: Prep Zone: Power Down & Clear the Deck
Safety first! Locate the circuit breaker powering the disposal (and dishwasher if connected) and turn it OFF. Double-check with a non-contact voltage tester at the wires under the sink. Place your bucket under the P-trap. Disconnect the drain pipes and dishwasher hose (if present). Loosen the old disposal mounting assembly or remove the sink flange if starting fresh. Scrape away old putty/sealant. Clean the sink opening thoroughly. Tip: Take a photo of the old plumbing/wiring setup before disconnecting – it's a great reference!
⚠️ Warning: NEVER skip turning off the power at the breaker. Verify it's dead with a tester. Water and electricity are a deadly mix.
Step 2: Set the Stage: Install the Sink Flange
Roll a 1/4" rope of plumber's putty around the underside of the new sink flange's rim. Push the flange up firmly into the sink drain hole from above. From below, slide the fiber gasket, backup flange (mounting ring), and mounting ring bolts onto the flange stem. Hand-tighten the bolts evenly in a star pattern to squeeze out excess putty (wipe away excess above). Don't overtighten – just until snug and putty oozes slightly.
⚠️ Warning: Avoid silicone caulk here! Plumber's putty creates a better, removable seal for this application.
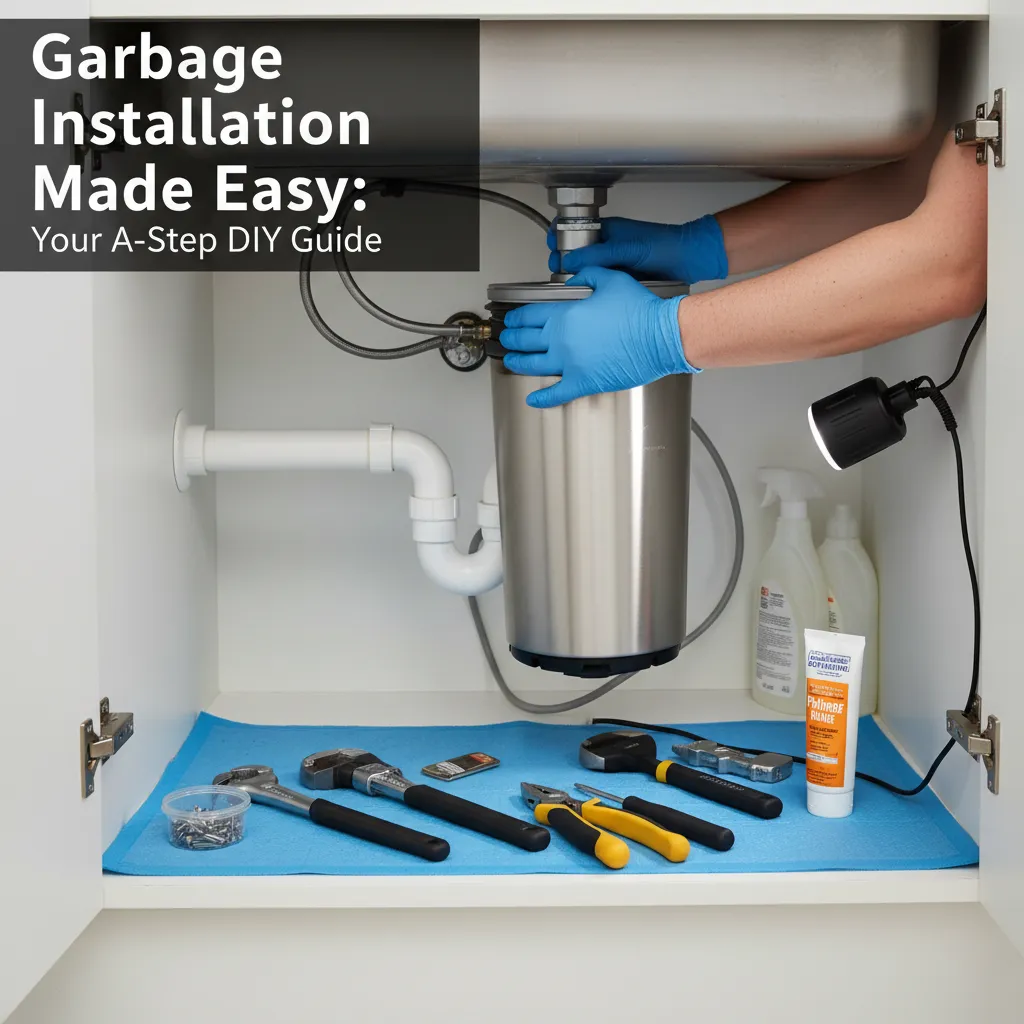
Step 3: Mount the Disposal: Lift & Lock
Position the disposal directly under the mounting assembly. Locate the mounting lugs on the disposal body. Align them with the mounting ring on the sink flange. Insert the end of the disposal mounting tube into the flange. Lift the disposal up, engaging the lugs with the mounting ring. Find the turning ring on the mounting assembly and rotate it clockwise until the disposal feels firmly seated and locked (you might hear clicks). Tip: Support the disposal's weight with one hand while turning the ring with the other or use a screwdriver in the provided slot.
⚠️ Warning: Disposals are heavy! Ensure you have a good grip. Don't force the turning ring – if it stops, the lugs are likely engaged.
Step 4: Knockout Punch: Prep for Dishwasher Drain
If connecting a dishwasher, locate the dishwasher inlet port on the disposal (usually a small, sealed hole). Insert a screwdriver into the port and tap firmly with a hammer to knock out the plastic plug. Remove the plug fragments. Install the dishwasher drain hose connector kit (included gasket, elbow, clamp) into this port. Tip: Do this before wiring to avoid dropping metal fragments into the motor.
⚠️ Warning: Wear safety glasses! Plastic fragments can fly. Ensure all plug pieces are removed.
Step 5: Connect the Drain: Route the Water Out
Attach the disposal's discharge outlet to your drain pipe. Use the provided gasket (if applicable). Connect your discharge tube (corrugated or PVC) to the outlet and the other end to the drain tee or wall stub-out. Ensure a downward slope. Secure connections with the provided clips or slip nuts. Wrap male threads with Teflon tape before connecting. Tip: Avoid sharp bends in corrugated pipe; use smooth curves to prevent clogs.
⚠️ Warning: Ensure all connections are tight to prevent leaks. Check for proper slope – no sags where water/gunk can pool.
Step 6: Wire It Up: Power Connection (Choose Your Path)
Option A (Pre-Corded/Outlet): Simply plug the disposal's cord into the GFCI-protected outlet under the sink. Option B (Hardwired): Remove the disposal's electrical cover plate. Feed the circuit wires (from the wall) into the wire compartment. Connect Black to Black (Hot), White to White (Neutral), and Green or Bare Copper to Green (Ground) using wire nuts. Secure the wires neatly, replace the cover. Option C (Adding a Cord Kit): Follow kit instructions – attach cord wires to disposal terminals (Black-Hot, White-Neutral, Green-Ground), secure strain relief.
⚠️ Warning: Double-check power is OFF! Match wire colors precisely. Ensure wire nuts are tight and no bare copper is exposed. Grounding is critical for safety.
Step 7: Hookup Helper: Connect the Dishwasher
Attach your dishwasher drain hose to the elbow connector installed in Step 4. Secure it tightly with the hose clamp provided in the kit. Ensure the hose forms a high loop (attached under the countertop or sink rim) before descending to the disposal to prevent sink water from backflowing into the dishwasher.
⚠️ Warning: The high loop is essential for proper drainage and preventing contamination. Don't skip it!
Step 8: The Grand Finale: Test & Tidy Up
Before reassembling everything underneath, do a quick leak test. Briefly turn the power back on at the breaker. Run cold water into the sink. Turn on the disposal (use the air switch or wall switch). Listen for smooth operation and check ALL connections (mounting flange, drain pipes, dishwasher inlet) for leaks. Turn power OFF again. Tighten any leaking connections slightly. Once leak-free, secure any loose wires/tubing with zip ties. Reinstall the sink strainer basket.
⚠️ Warning: Always run COLD water when using the disposal. Test for leaks thoroughly before closing up the cabinet.
Pro Tips
- Run cold water for 15-20 seconds BEFORE and AFTER grinding to flush debris and solidify grease.
- Avoid fibrous foods (celery, corn husks), grease/oil, coffee grounds, and eggshells for longer life.
- Drop a few citrus peels (lemon/orange) and ice cubes down a running disposal to clean and deodorize.
- Use a dedicated 15-amp or 20-amp circuit for the disposal if possible.
- Apply a thin coat of plumber's grease to rubber gaskets before assembly for easier future removal.
- Keep the disposal manual for model-specific details and warranty info.
When to Call a Professional
Call a licensed plumber or electrician if: Your sink drain configuration is complex or inaccessible; You discover significant corrosion or damaged pipes; You lack a dedicated circuit or GFCI outlet under the sink; You're uncomfortable with electrical wiring; The disposal motor hums but doesn't turn (jammed unit you can't free); You encounter persistent leaks you can't fix; Your home has aluminum wiring. Safety and complex system integrity are worth the pro fee.
Understanding the Problem in Detail
A garbage disposal mounts directly under your kitchen sink drain. It grinds food waste into small particles flushed down the drain. Problems requiring installation/replacement include: complete failure (motor burnout), loud noises/jamming (blades/grinding ring damage), persistent leaks (seals fail), or upgrading from no disposal. The key components are the sink flange (seals the unit to the sink), mounting assembly (holds the heavy unit securely), grinding chamber, motor, and drain connection.
Tools and Materials Guide
Tools: Basin wrenches excel in tight spots under sinks. A non-contact voltage tester is non-negotiable for safety. Headlamps are game-changers. Materials: Buy disposals from home centers (HD, Lowe's) or plumbing suppliers. 1/3 HP is sufficient for most families; 1/2 HP handles tougher jobs. Badger series (InSinkErator) is a reliable budget choice. Ensure the sink flange size matches your sink hole (usually standard). Use only non-hardening plumber's putty for the flange. Teflon tape is for pipe threads, not compression fittings. Dishwasher connector kits are usually disposal-specific.
Safety Considerations
- ELECTRICAL SAFETY IS PARAMOUNT: Always turn power OFF at the breaker. Verify it's off with a tester before touching any wires. Use GFCI protection (outlet or breaker). Ensure proper grounding. 2. Physical Safety: Wear safety glasses (especially knocking out plugs). Use gloves to protect hands from sharp edges. Support the disposal's weight during mounting. Be mindful of your back working under the sink. 3. Tool Safety: Use tools correctly. Keep the work area dry. 4. Post-Installation: Keep fingers/utensils out of the disposal. Always run cold water when operating. Never put non-food items down it.
Troubleshooting Common Issues
- Leak at Sink Flange: Overtightening can warp the flange. Disassemble, clean surfaces, apply new plumber's putty, reassemble, tighten evenly and gently until snug. * Leak at Drain Connection: Check gasket is present and seated correctly. Ensure slip nut is tight. Add Teflon tape to male threads if used. * Leak at Dishwasher Inlet: Verify knockout plug is fully removed. Ensure gasket is in the connector kit and hose clamp is tight. * Disposal Won't Turn On: Check breaker/reset button (red button on bottom of unit). Verify power at outlet/wires. Check wall switch/air switch connection. * Disposal Hums but Doesn't Grind: It's jammed. TURN POWER OFF. Use the included hex wrench in the bottom socket to manually turn the motor shaft back and forth to free it. Remove obstruction with pliers (power OFF!).
Maintenance and Prevention
Weekly/Monthly: Run cold water before, during, and after use. Grind small citrus peels for freshness. Occasionally grind a handful of ice cubes to help clean blades. As Needed: Avoid putting grease/oil, fibrous veggies (celery, artichokes), coffee grounds (they create sludge), eggshells (can stick), bones, pits, or non-food items down the disposal. Bi-Annually: Remove the splash guard/baffle and clean any debris trapped underneath.
Cost Analysis: DIY vs Professional
Disposal Unit: $75 (Budget) - $250+ (Premium). Materials (Putty, Tape, Connectors): $10-$20. Tools: $50-$150 (if buying basics). Professional Installation: $150-$400+ (labor + disposal markup). Total DIY Savings: Potentially $100-$300+. Money Saving Tips: Choose a reliable mid-range unit (1/3 HP Badger). Borrow specialized tools (basin wrench) if possible. Ensure you have the correct electrical setup before starting to avoid costly pro fixes later.
Related Plumbing Problems
- Clogged Sink Drain: Food particles or grease buildup past the disposal. 2. Dishwasher Not Draining: Often linked to a clogged disposal inlet or missing high loop. 3. Foul Odors from Disposal: Trapped food debris; needs cleaning. 4. Leaking Sink Faucet: Separate issue but common under-sink neighbor. 5. No Power to Disposal Outlet: Tripped GFCI, tripped breaker, or faulty wiring.
Frequently Asked Questions
Can I install a garbage disposal if I have a septic system?
Yes, but choose a septic-safe model (often labeled) and use it judiciously. Avoid excessive grinding of tough or fibrous materials and never pour grease down. Regular septic tank pumping is even more crucial. Consider adding a septic treatment enzyme monthly.
Do I need a special electrical outlet under my sink?
Absolutely. You need a dedicated 120-volt, 15-amp or 20-amp electrical outlet protected by a GFCI (Ground Fault Circuit Interrupter). This is a safety requirement. If you don't have one, hire an electrician to install it before proceeding. Never plug a disposal into an ungrounded outlet or an extension cord.
My old disposal leaked. How do I prevent leaks with the new one?
Key steps: 1) Clean the sink opening meticulously before installing the new flange. 2) Use fresh, high-quality plumber's putty in a continuous rope under the flange rim. 3) Hand-tighten mounting bolts evenly and gently – overtightening distorts the flange. 4) Ensure all gaskets are correctly positioned and undamaged on drain connections. 5) Perform a thorough leak test (Step 8) before finishing.
What's the red button on the bottom of my disposal?
That's the overload reset button. If the disposal overheats (e.g., gets jammed), it trips this internal breaker. FIRST, turn off power at the main breaker. SECOND, clear any jam using the hex wrench. THIRD, wait 10 minutes for the motor to cool. FOURTH, firmly press the red button in until it clicks. Restore power and test. If it trips again immediately, there's likely a motor problem.
Can I connect my dishwasher to any garbage disposal?
Most modern disposals have a dishwasher inlet port, but always check the specs. You MUST knock out the plastic plug inside that port (Step 4) before connecting the dishwasher hose. Ensure you use the correct connector kit (often included) and create the high loop in the drain hose.