Stop Basement Flooding Now: Your Stress-Free Guide to Installing a Sump Pump
Tired of a wet basement? Learn how to install a sump pump correctly and confidently with our step-by-step DIY guide. Save money, prevent water damage, and gain peace of mind.
Water in your basement isn't just messy; it damages belongings, breeds mold, weakens foundations, and causes constant anxiety. Whether it's seeping through cracks, rising from the floor, or weeping through walls, hydrostatic pressure pushes groundwater up. A sump pump is your basement's defender – it collects this water in a pit and pumps it safely away from your home before it floods your space. You're here because you're done with the mess and ready to take control.
That sinking feeling when you see water pooling in your basement? The musty smell, the ruined boxes, the panic before every heavy rain? We get it. Water in your basement is more than an inconvenience; it’s stressful and costly. But take a deep breath – installing a sump pump is a powerful DIY solution you can tackle. This guide will walk you through it step-by-step, clearly and calmly, turning that damp nightmare into a dry, protected space.
Tools Needed
- Shovel or Jackhammer: For digging the pit.
- Measuring Tape: For precise placement.
- Level: Essential for basin stability.
- Utility Knife: Cutting liner and pipe.
- Hacksaw or PVC Cutter: Cutting discharge pipe.
- Drill & Masonry Bits: Securing liner/cover.
- Screwdrivers/Wrenches: Connecting pump and fittings.
- Wire Strippers/Crimpers: For pump electrical.
- Shop Vac: Cleaning debris and water.
- Safety Glasses & Gloves: Non-negotiable protection.
Materials Needed
- Sump Pump: Submersible type, 1/3 to 1/2 HP for most homes (consider battery backup!).
- Sump Basin: 18-24 inch diameter plastic liner with pre-cut holes.
- Check Valve: Prevents water backflow (1-1/2 inch PVC typically).
- PVC Discharge Pipe: 1-1/2 inch Schedule 40 PVC pipe and fittings (elbows, couplings).
- PVC Primer & Cement: For watertight pipe joints.
- Gravel: Clean, washed gravel (approx. 50 lbs for basin surround).
- Landscape Fabric: To line pit bottom and sides (prevents silt clogging gravel).
- Sump Pump Cover: Sealed lid (prevents odors, radon, debris).
- Silicone Sealant: For sealing pipe penetrations through rim joist.
- Electrical Supplies: GFCI outlet (if not existing), waterproof wire connectors, conduit if needed.
Solution (Intermediate - 4-8 hours (depending on basin prep and piping complexity))
Step 1: Find the Perfect Pit Location
Identify the lowest point in your basement where water naturally pools, usually near the foundation wall or a floor drain. Avoid major utilities. Mark a circle 6-8 inches wider than your basin diameter. Pro Tip: Pour a small amount of water on the floor and see where it flows!
⚠️ Warning: Call 811 before you dig ANYWHERE! Hitting gas, water, or electrical lines is extremely dangerous.
Step 2: Dig the Sump Pit
Using your shovel/jackhammer, dig straight down to the depth recommended for your basin (usually 24-30 inches deep). Make the hole wider than the basin at the bottom for gravel. Keep the sides as straight as possible. Pro Tip: Line the hole sides and bottom with landscape fabric immediately to keep soil out of your gravel.
⚠️ Warning: Wear safety glasses and gloves! Concrete chips and dirt flying everywhere.
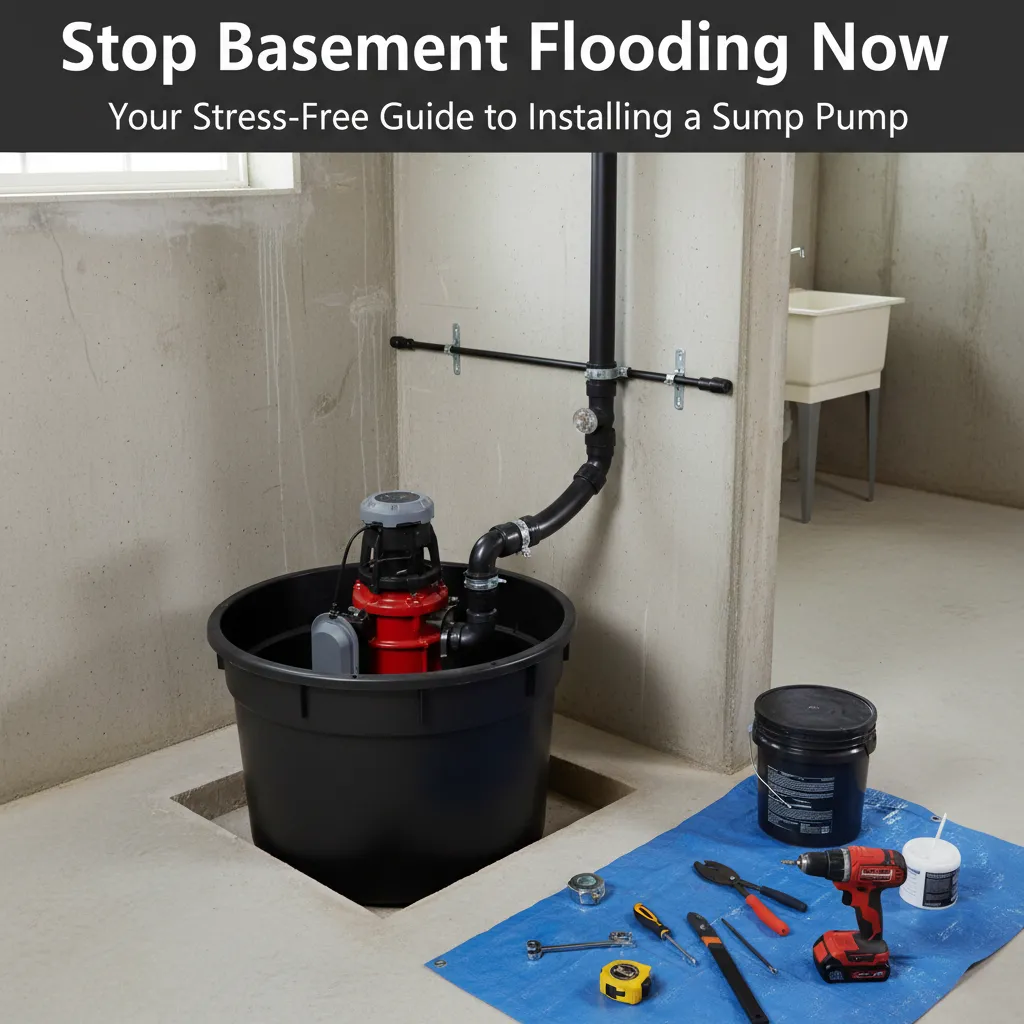
Step 3: Set the Basin & Add Gravel
Place the basin in the hole. Ensure it's level (critical!). Fill around the outside of the basin with 6-12 inches of clean gravel, stopping a few inches below the basement floor level. This gravel acts as a filter and inlet for water. Pro Tip: Drill extra 1/2-inch holes in the lower basin sides if needed for better water entry.
⚠️ Warning: Don't put gravel inside the basin! This can jam the pump.
Step 4: Assemble Pump & Discharge Pipe
Place the pump inside the basin on a flat brick or paver (prevents silt clogging the intake). Connect the pump discharge to a vertical section of PVC pipe. Install the check valve above the pump outlet, ensuring the arrow points UP (away from pump). Pro Tip: Use threaded adapters on the pump outlet for easier future removal.
⚠️ Warning: Ensure the check valve direction is correct! Backflow will flood your basin.
Step 5: Route Pipe to the Outside
Plan the most direct route for the PVC discharge pipe to exit your basement wall or rim joist (above the frost line!). Cut and dry-fit pipe sections using elbows. Aim the pipe downward slightly outside. Pro Tip: Use 45-degree elbows instead of 90s for better flow and fewer clogs.
⚠️ Warning: Avoid sharp bends! They reduce efficiency and increase clog risk.
Step 6: Seal the Exit Point & Glue Pipes
Drill a hole through the rim joist/wall slightly larger than the pipe. Feed the pipe through. Apply silicone sealant generously around the pipe inside and outside the hole. Disassemble dry-fit pipes one joint at a time, apply primer, then cement, and hold firmly for 15 seconds. Pro Tip: Work quickly and ensure full coverage with cement - it sets fast!
⚠️ Warning: Wear gloves and work in a ventilated area! PVC primer/cement fumes are strong.
Step 7: Install the Cover & Connect Power
Place the sealed cover securely on the basin. Run the pump power cord through the designated hole in the cover. Plug the pump into a nearby, dedicated GFCI outlet (test the GFCI button!). Pro Tip: Use a cord holder/clamp to prevent the cord from dangling into the basin water.
⚠️ Warning: NEVER plug the pump into a standard outlet! GFCI protection is mandatory to prevent electrocution. If no GFCI, hire an electrician.
Step 8: Test Your Work Thoroughly
Fill the basin with water using a hose or buckets. The pump should turn on automatically when water reaches the float switch level, pump the water out, and shut off when empty. Check for leaks at all joints and the basin seal. Pro Tip: Test the float switch manually by gently lifting it – pump should kick on.
⚠️ Warning: Keep hands clear of moving parts inside the basin during testing!
Pro Tips
- Buy a pump with a vertical float switch (less likely to get stuck than tethered).
- Install a battery backup pump now – power outages often happen during storms when you need the pump most.
- Extend the discharge pipe at least 6-10 feet away from your foundation, sloping it slightly downhill.
- Add a splash block under the discharge outlet to prevent erosion.
- Label your circuit breaker clearly as 'Sump Pump' for easy access.
When to Call a Professional
Call a licensed plumber or waterproofing pro if: You encounter major buried utilities, need complex concrete cutting, have significant foundation cracks needing repair, are uncomfortable with electrical work (installing a new GFCI circuit), or discover major water ingress issues beyond a simple sump pump solution (like chronic foundation leaks). Safety first!
Understanding the Problem in Detail
Groundwater constantly moves around your foundation. Soil becomes saturated during rain or snowmelt, creating hydrostatic pressure. This pressure pushes water through cracks, porous concrete, or even up through the floor slab. A sump pit acts as the lowest collection point; the pump actively removes this water, relieving the pressure and keeping your basement dry.
Tools and Materials Guide
Pump: Submersible is quieter and more common than pedestal. 1/3 HP handles moderate water, 1/2 HP for heavier flow or longer pipe runs. Look for cast iron/stainless steel components. Basin: Rigid plastic, perforated. 18" min diameter. Pipe: Schedule 40 PVC is standard. Check Valve: Essential! Prevents pumped water from flowing back down, burning out the pump. Gravel: Washed pea gravel (3/8" size) ensures good drainage. Alternatives: Pre-formed basin kits simplify digging. Hire an electrician for circuit/GFCI install if needed. Buy at home centers, plumbing supply stores, or online retailers.
Safety Considerations
ELECTRICAL: GFCI outlet is non-negotiable. No extension cords! Ensure circuit can handle pump load. Turn off power at breaker before any electrical work. LIFTING: Pumps and wet gravel are heavy. Lift with legs, not back. Get help. DIGGING: Call 811! Beware buried utilities. Wear eye/ear protection with jackhammer. CHEMICALS: Use PVC primer/cement in well-ventilated area, wear gloves/glasses. WATER: Wet surfaces are slippery. TESTING: Keep hands clear of basin interior during operation.
Troubleshooting Common Issues
Pump Not Running: Check power (GFCI tripped? Breaker off?), ensure float isn't stuck (jiggle gently), listen for hum (motor jammed? Try unplugging and clearing intake). Pump Runs But Doesn't Pump: Clogged intake or discharge (unplug, clear debris), stuck check valve (tap it gently, replace if faulty), airlock (ensure discharge pipe has a small vent hole just below check valve). Pump Runs Constantly: Float switch stuck 'on', leaky check valve allowing backflow, high water table exceeding pump capacity. Noisy Pump: Debris in impeller, loose parts, failing bearings (replace pump).
Maintenance and Prevention
Test Monthly: Pour water into pit, ensure pump activates and empties it. Clean Quarterly: Unplug, remove pump, clean intake screen and basin bottom of silt/debris. Inspect Annually: Check discharge line for obstructions, ensure outlet extends far away, verify check valve function, test battery backup if installed. Every 2-5 Years: Consider replacing the pump proactively (lifespan varies). Keep pit covered!
Cost Analysis: DIY vs Professional
DIY: Pump ($150-$300), Basin ($40-$80), Pipe/Fittings/Valve ($50-$100), Gravel/Sealant ($30-$50), Cover ($20-$50) = $300 - $600 total. Pro Install: $1000 - $3000+ (varies by region, pump quality, basin prep difficulty, electrical needs). Savings: DIY saves significantly. Invest savings in a quality pump and battery backup. Battery backup adds $200-$500+.
Related Plumbing Problems
Persistent leaks might indicate foundation cracks needing repair, improper exterior grading/downspouts (water draining towards house), clogged perimeter drains (weeping tile), high water table requiring a more robust system, or gutter issues dumping water next to the foundation.
Frequently Asked Questions
How often should I test my sump pump?
Test it at least once a month, especially before rainy seasons. Simply pour a bucket of water into the pit until the float rises and triggers the pump. It should turn on, pump out the water, and shut off automatically.
Is a battery backup really necessary?
Absolutely recommended! The most common time for basement flooding is during heavy storms, which often cause power outages. A battery backup pump kicks in automatically when the power fails, giving you critical protection when you need it most.
My pump is running constantly, what's wrong?
This could be a stuck float switch (try gently freeing it), a faulty check valve allowing water to flow back into the pit (listen for water flowing back after shutoff, replace valve), or an exceptionally high water table exceeding your pump's capacity. Check these first. If unsure, call a pro.
Can I install a sump pump if I already have water?
Yes, but it's messy! You'll need a wet/dry vac or a temporary 'trash pump' to remove standing water first so you can clearly see where to dig the pit at the lowest point. Ensure the area is safe and electrically isolated.
How long does a sump pump last?
Typically 5-10 years, but lifespan depends heavily on water quality, usage frequency, and quality of the pump. Regular cleaning and testing help extend its life. Budget for replacement proactively.