Easy Shower Head Replacement: Fix Leaks & Upgrade in 30 Minutes Flat
Struggling with a leaky or low-pressure shower head? Our DIY guide shows homeowners how to replace it safely with basic tools. Save money and enjoy better showers today!
You're staring at a shower head that's either: 1) spraying everywhere but where it should, 2) leaking like a sieve at the connection, 3) clogged with years of nasty mineral gunk, or 4) just plain ugly. It's frustrating when something so simple ruins your daily routine. But take a deep breath – this is 100% fixable without calling a plumber.
That pathetic dribble. The annoying drip-drip-drip. The lime-crusted eyesore ruining your shower zen. We've all been there! But guess what? Replacing a shower head is one of the EASIEST wins in home plumbing. I'll walk you through every step so you can fix leaks, boost pressure, and upgrade your shower in less time than it takes to watch a sitcom.
Tools Needed
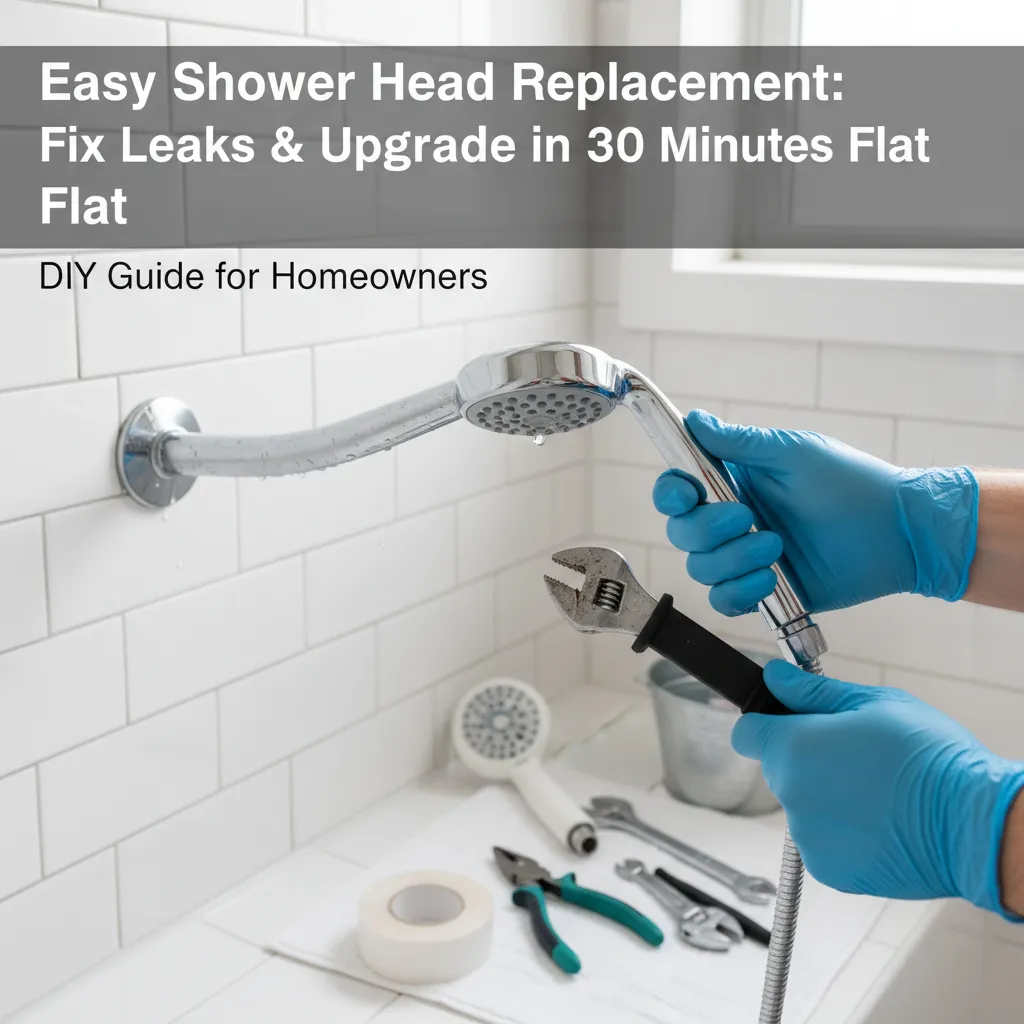
- Adjustable wrench (for gripping)
- Channel-lock pliers (with rubber jaws to prevent scratches)
- Old rag (protects shower finish)
- Vinegar-soaked paper towels (for mineral deposits)
Materials Needed
- New shower head (standard 1/2" NPT thread)
- PTFE thread seal tape ("plumber's tape", 0.003" thickness recommended)
- Replacement rubber washer (usually included with new shower head)
Solution (Beginner - 15-30 minutes)
Step 1: Prep Your Workspace & Remove the Old Head
Wrap your wrench jaws with the rag to protect the shower arm's finish. Grip the shower arm firmly with one hand while turning the shower head COUNTERCLOCKWISE with the wrench. If it's stuck, soak a paper towel in vinegar, wrap it around the joint, and wait 10 minutes to dissolve minerals.
⚠️ Warning: Never twist the shower arm itself – it can snap pipes inside the wall! If resistance feels extreme, stop and skip to troubleshooting.
Step 2: Clean Threads & Apply New Seal Tape
Scrub the exposed shower arm threads with an old toothbrush to remove old tape/gunk. Dry thoroughly. Wrap NEW plumber's tape CLOCKWISE around threads (following thread direction). Do 3-4 wraps – too much causes leaks! The tape should feel smooth, not lumpy.
⚠️ Warning: Never reuse old tape or skip this step – leaks are guaranteed!
Step 3: Install the New Shower Head
Insert the new rubber washer into the shower head (if not pre-installed). Hand-tighten the new head CLOCKWISE onto the arm until snug. Then, give it just 1/4-1/2 extra turn with your rag-covered wrench. Overtightening cracks fittings!
⚠️ Warning: Avoid using metal tools directly on chrome finishes – they WILL scratch.
Step 4: Test for Leaks & Celebrate!
Turn water on slowly. Check for drips at the connection. If leaking, tighten incrementally – never force it. No leaks? Enjoy your upgrade! If leaks persist, see troubleshooting below.
⚠️ Warning: Turn water on gently to avoid pressure surges that could damage new components.
Pro Tips
- Upgrade tip: Install a swivel ball adapter before the new head for adjustable angles.
- Water saver: Look for EPA WaterSense-labeled heads (saves 20% water with same pressure).
- Lime prevention: Soak your old shower head monthly in vinegar to extend its life.
- Grip hack: Use a silicone oven mitt for extra grip if the head is slippery.
When to Call a Professional
Call a plumber if: the shower arm spins freely, threads are stripped, you see water behind the wall, or if the arm breaks off. Also seek help if leaks persist after proper tape/washer installation – you might have deeper pipe issues.
Understanding the Problem in Detail
Mineral deposits from hard water gradually clog shower head nozzles, reducing pressure. Rubber washers dry out and crack over time, causing leaks. Overtightening during installation distorts threads. Most homes use standard 1/2" NPT threads, making replacements universal.
Tools and Materials Guide
Adjustable wrenches under 10" offer best control. Opt for pliers with padded jaws ($12-20). Choose PTFE tape over putty for cleaner seals. For water savings, select heads with flow rates ≤ 1.8 GPM. Buy supplies at any hardware store or online.
Safety Considerations
Always shut off water if dealing with stubborn connections to prevent flooding. Wear safety glasses when applying force. Never stand directly under the shower arm while working. Ensure step stools are stable if working on high showers.
Troubleshooting Common Issues
Stuck head? Apply penetrating oil (not WD-40) and wait overnight. Leaking after install? Disassemble and re-wrap tape clockwise. Low pressure? Soak new head in vinegar to remove manufacturing debris. Cross-threaded? Look for crooked alignment – start threads by hand only.
Maintenance and Prevention
Deep-clean shower heads every 3 months by soaking in vinegar. Check washers annually. Hand-tighten only during installs to preserve threads. Install a whole-house water filter if you have severe hard water.
Cost Analysis: DIY vs Professional
DIY cost: $15-50 (new head) + $2 (tape). Pro installation: $75-150. Water-saving heads pay for themselves in 6-12 months via reduced bills. Premium heads (massage/spray settings) run $30-80.
Related Plumbing Problems
Low pressure throughout bathroom? Might be clogged pipes. Leaks from shower valve? Requires cartridge replacement. Rusted shower arm? Needs extraction with specialized tools.
Frequently Asked Questions
Why is water spraying sideways after replacement?
Manufacturing debris often clogs new heads. Remove it and soak nozzles in vinegar for 20 minutes. Use a pin to clear blocked holes.
Can I replace a shower head without turning off water?
Yes, but I don't recommend it. If the shower arm breaks, you'll have an uncontrolled geyser. Briefly shutting off water is safer.
How tight is 'tight enough'?
Hand-tight plus 1/4-1/2 wrench turn. Leaks mean more tape is needed, not more force. Cracking sounds mean STOP immediately.
Do all shower heads fit my existing pipe?
99% of U.S. homes use standard 1/2" NPT threads. Check packaging for this specification. Adapters are available for non-standard setups.