Stop Toilet Leaks Fast: Your Stress-Free Guide to Replacing a Wax Ring
Stinky leaks under your toilet? Learn how to replace a wax ring yourself with this step-by-step guide. Save $200+ on plumber costs with beginner-friendly instructions.
We've all been there: You notice a faint sewage smell near the toilet or discover a suspicious damp spot on the floor. Maybe your toilet rocks slightly when you sit down. These are classic signs your wax seal has failed - letting sewer gases escape and water seep into your subfloor. It happens to every homeowner eventually due to toilet shifting, aging wax, or improper installation. The good news? It's simpler to fix than you think!
That foul odor or mysterious puddle around your toilet base isn't just annoying - it's a cry for help from a failed wax ring. Take a deep breath! I've helped hundreds of DIYers conquer this exact problem. By the time you finish this guide, you'll have the confidence to fix it yourself in about an hour, without the panic or plumber bills.
Tools Needed
- Adjustable wrench (for water supply line and bolts)
- Putty knife (to scrape old wax)
- Sponge & bucket (for water cleanup)
- Rag (to catch residual water)
- Screwdriver (for bolt caps)
- Rubber gloves (essential for hygiene)
Materials Needed
- Wax ring with plastic horn (standard size - fits 3-4 inch flanges)
- New toilet bolts (optional but recommended - $3)
- Paper towels (for cleanup)
- Rubbing alcohol (for flange cleaning)
- Plumber's putty (optional for bolt caps)
Solution (Beginner - 1-2 hours (including cleanup))
Step 1: Shut Off Water & Empty the Tank
Turn the valve behind the toilet clockwise until tight. Flush and hold the handle to drain the tank. Use your sponge to soak up remaining water in the tank and bowl. Place a rag in the bowl to catch drips.
⚠️ Warning: Water left in the bowl will spill when you lift the toilet - be thorough!
Step 2: Disconnect & Lift the Toilet
Unscrew the water supply line with your wrench. Pop off the bolt caps at the base, then loosen nuts on both closet bolts using your wrench. Rock the toilet gently side-to-side to break the old seal. Lift straight up - it's heavy! Set it sideways on old towels.
⚠️ Warning: Lift with your legs, not your back! Toilets weigh 60-100 lbs.
Step 3: Scrape & Prep the Flange
Remove old bolts and scrape ALL old wax from the flange using your putty knife. Wipe clean with paper towels and rubbing alcohol. Check the flange sits level with the floor. Insert new bolts into flange slots.
⚠️ Warning: Never use chemicals to clean wax - they can damage pipes.
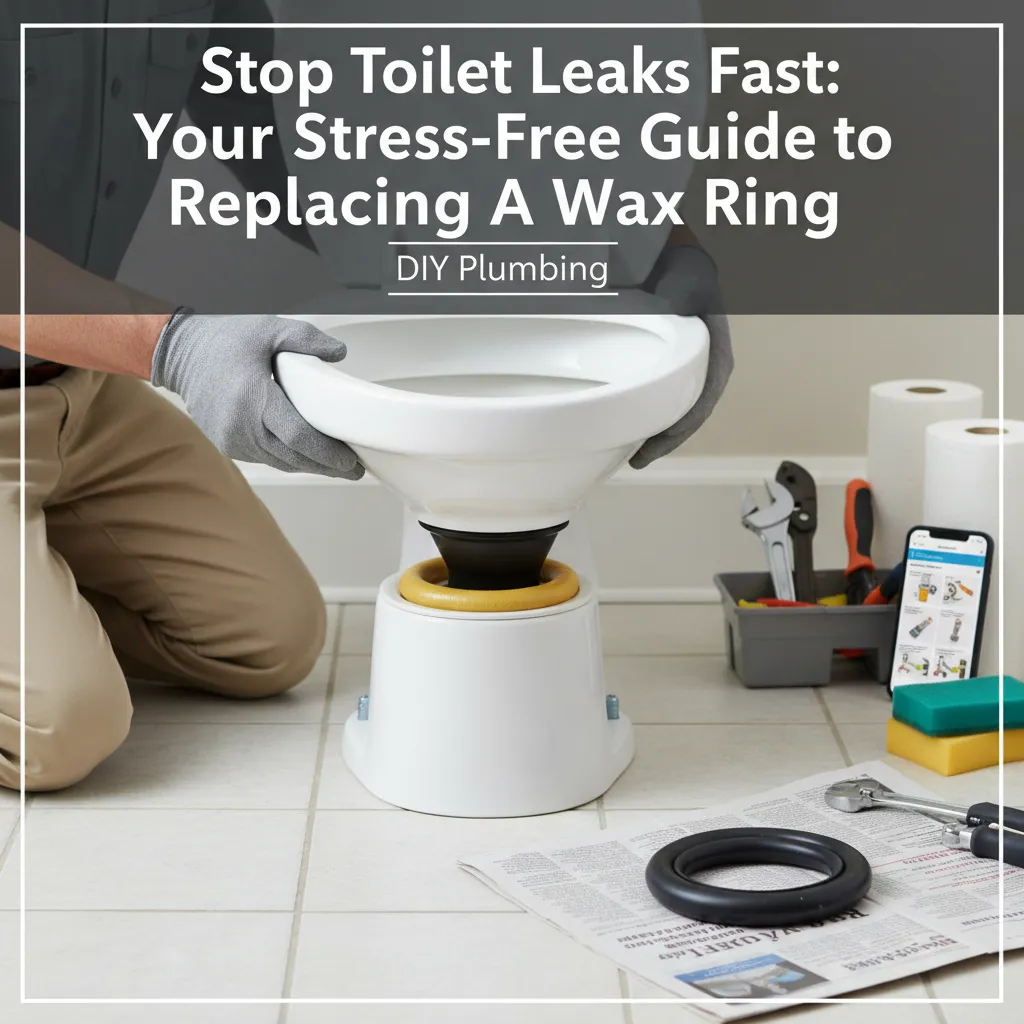
Step 4: Install New Wax Ring
Unwrap the new wax ring. Press it FIRMLY onto the toilet horn (the bottom outlet). The plastic horn should face down toward the drain. Pro tip: Let it sit for 10 minutes to soften slightly for better sealing.
⚠️ Warning: Don't stack two rings! This creates future leaks.
Step 5: Reset & Secure Toilet
Align the toilet over the bolts and lower STRAIGHT down without twisting. Sit on it to compress the wax evenly. Hand-tighten nuts onto bolts, alternating sides. Snug with wrench until the toilet stops rocking - but don't overtighten!
⚠️ Warning: Overtightening cracks porcelain - stop when resistance increases.
Step 6: Reconnect & Test for Leaks
Reattach the water supply line. Turn water on slowly. Flush 5-6 times while checking the base with a paper towel. Wipe away excess wax squeezed out. Snap on new bolt covers with plumber's putty for a clean finish.
⚠️ Warning: If leaks persist, shut off water immediately and recheck alignment.
Pro Tips
- Work on a warm day: Wax is more pliable above 70°F
- Use flange extenders if your flange sits below floor level ($8 at hardware stores)
- Place painter's tape on the floor to mark toilet position before lifting
- Keep a shop vac nearby for unexpected water in the drain pipe
When to Call a Professional
Call a plumber if: You find a cracked flange, broken toilet horn, or rotted subfloor; if leaks continue after two attempts; or if your toilet has unusual plumbing configurations. Most flange repairs require specialized tools.
Understanding the Problem in Detail
Wax rings create an airtight seal between your toilet and sewer pipe. They fail when toilets rock (loosening the seal), when wax dries out (typically after 10-20 years), or if the flange height is wrong. A failed seal lets sewer gases escape and water damage your floor.
Tools and Materials Guide
Choose wax rings with plastic horns for easier alignment. Standard 3-inch rings fit most homes; measure your drain pipe if unsure. Alternative materials: Wax-free rubber seals (like Fernco) work well in cold rooms. Find supplies at any hardware store - avoid bargain rings that use less wax.
Safety Considerations
Wear gloves - sewage exposure risks infection. Ventilate the room for sewer gases. Protect your back when lifting. Never place hands inside the drain pipe (sharp edges!). Turn off electricity if outlets are near floor.
Troubleshooting Common Issues
Toilet rocks after install? Loosen bolts, reposition, and retighten evenly,Persistent odor? Check for wax debris left in the drain or incomplete seal,Leaking at tank connection? This indicates a separate issue - likely tank bolts or gasket
Maintenance and Prevention
Avoid rocking the toilet when sitting. Tighten loose bolts immediately. Never use chemical drain openers - they degrade wax. Check floor caulking annually (leave back uncaulked to spot leaks early).
Cost Analysis: DIY vs Professional
DIY: $15 (wax ring) + $5 (bolts) = $20. Plumber: $200-$350. Save $180+! Invest savings in quality wax ring and new bolts.
Related Plumbing Problems
This repair often reveals: Broken flange bolts, cracked porcelain, damaged subfloor from leaks, or improper venting causing siphon breaks. Address these before reinstalling.
Frequently Asked Questions
Can I reuse the old bolts?
Not recommended. Old bolts often rust or strip threads. New brass bolts ($3) ensure a secure fit and prevent wobbling.
How long before I can use the toilet?
Immediately after testing! Wax seals instantly upon compression. Just avoid aggressive rocking for 24 hours.
Why is water seeping from under my toilet days after replacement?
Likely an incomplete seal. Shut off water, remove toilet, and check: 1) Wax ring fully compressed? 2) Flange clean? 3) Toilet perfectly level? 4) No wax debris blocking seal?