Fix Cold Showers Fast: Your Stress-Free Guide to Replacing a Water Heater Element
No hot water? Learn how to safely replace your water heater element with beginner-friendly steps. Save $300+ on a plumber with our clear DIY guide. Tools, tips, and troubleshooting included!
You're here because your morning shower went cold, or maybe your hot water runs out suspiciously fast. That familiar frustration when appliances break at the worst time? I get it. The good news: 80% of 'no hot water' issues in electric heaters come from burned-out elements – a fix well within reach for determined homeowners willing to follow safety protocols.
Waking up to ice-cold showers? That sinking feeling when your water heater stops working? Don't panic! Replacing a faulty heating element is probably simpler than you think. As a DIY plumber who's fixed hundreds of these, I'll guide you step-by-step through this common repair – no fancy skills needed, just basic tools and an afternoon.
Tools Needed
- Non-contact voltage tester (MUST-HAVE for safety)
- Element socket wrench (Special deep socket for elements - $10 at hardware stores)
- Adjustable wrench (For hose connections)
- Screwdriver set (To remove access panels)
- Garden hose (For draining tank)
- Work gloves (Protection from sharp edges)
- Safety glasses (Essential for eye protection)
Materials Needed
- Replacement heating element (Match VOLTAGE and WATTAGE of original - check label on tank)
- New gasket (Usually included with element - NEVER reuse old one)
- Teflon tape (High-density pink tape for plumbing)
- Bucket (For minor spills near element socket)
Solution (Intermediate - 1.5 - 3 hours (includes draining/refilling tank))
Step 1: Kill Power & Water - Safety First!
Turn OFF the water heater's breaker at your main electrical panel (double-check it's 240V!). Shut off cold water supply valve above the tank. Test wires with voltage tester – absolutely NO lights should glow. Insider tip: Tape breaker handle in OFF position so no one accidentally flips it.
⚠️ Warning: SKIPPING THIS RISKS ELECTROCUTION. Verify power is dead at the heater access panel before touching wires!
Step 2: Drain the Tank (Partial Drain is Okay)
Connect garden hose to drain valve at tank base. Run hose outside/down drain. Open ANY hot water faucet in your house (prevents vacuum lock). Open drain valve – expect rusty water! Drain just below element level (about 5-10 gallons). Tip: If valve is stuck, tap gently with wrench – DON'T force it or you'll cause leaks.
⚠️ Warning: Water will be HOT if heater was recently on. Wear gloves and direct hose away from anything damageable.
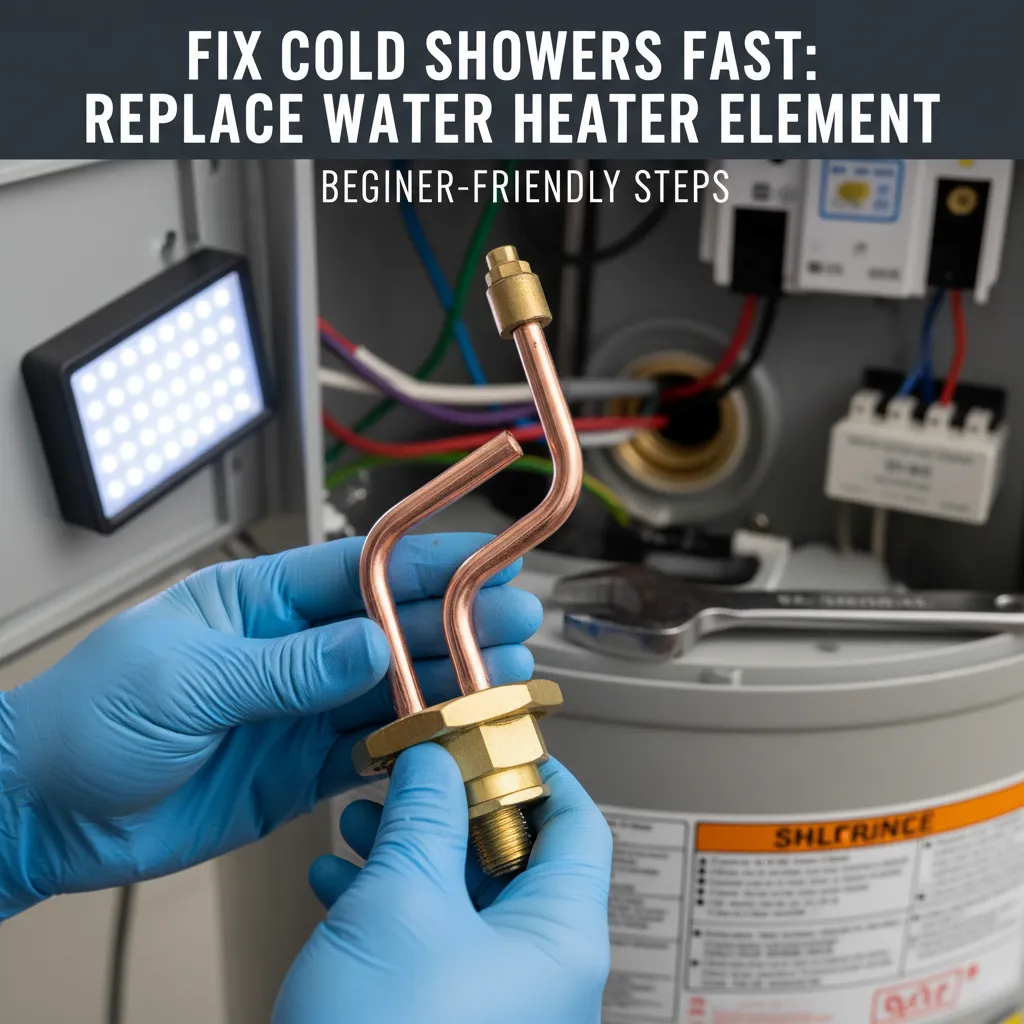
Step 3: Remove Old Element & Clean Socket
Remove access panel(s) on tank side. Photograph wire connections! Disconnect wires from element. Use element socket wrench to unscrew element counterclockwise – steady pressure works better than brute force. Once loose, catch residual water with bucket. Scrape mineral deposits from socket with old toothbrush. Pro tip: Place rags under work area – it gets messy!
⚠️ Warning: Don't rock wrench sideways – you could crack the tank. If stuck, apply penetrating oil and wait 15 minutes.
Step 4: Install New Element & Gasket
Wrap new element threads with 2 layers of Teflon tape (clockwise). Press NEW gasket into groove on element. Hand-thread element into tank until snug. Tighten with wrench – just 1/4 turn past hand-tight (over-tightening cracks the tank!). Reconnect wires EXACTLY as photographed earlier.
⚠️ Warning: Never reuse old gasket – it WILL leak. Cross-threading destroys the tank – start threads carefully!
Step 5: Refill Tank & Restore Power
Close drain valve, remove hose. Turn cold water supply BACK ON. Leave a hot faucet running somewhere until water flows steadily (no spitting). Check element area for leaks. Only when tank is full and leak-free, restore power at breaker. Insider trick: Wait 60 minutes before testing hot water – heaters refill/heal slowly.
⚠️ Warning: Turning power on with empty tank BURNS OUT ELEMENTS INSTANTLY. Verify water flow first!
Pro Tips
- Replace BOTH elements while tank is drained (top & bottom) – they often fail close together
- Buy OEM replacement elements – cheap generics overheat and fail faster
- Smell burning plastic? IMMEDIATELY kill power – wires are melting
- Pour white vinegar into tank before draining to dissolve sediment
- Label wires with tape during removal for foolproof reconnection
When to Call a Professional
Call a pro if: 1) You see tank body leaks (not fixable), 2) Breaker trips repeatedly after repair (wiring fault), 3) You're uncomfortable testing live circuits, or 4) Tank is over 10 years old (may need full replacement). Average service call: $200-$500.
Understanding the Problem in Detail
Heating elements fail due to mineral buildup (insulates them, causing overheating), old age, or sediment exposure when tank is low. Electric water heaters have two elements – upper heats recovery, lower maintains temp. When one burns out, you'll notice reduced hot water capacity or total failure.
Tools and Materials Guide
Element wrenches ($8-$20) prevent tank damage vs. makeshift tools. Buy elements at plumbing suppliers (not big-box stores) for better quality. Pink Teflon tape seals better than white. Can't find exact wattage? Match voltage exactly – wattage variance under 500W is usually acceptable.
Safety Considerations
ELECTRICAL: Always test wires with non-contact tester before touching. Assume everything is live until proven dead. PLUMBING: Drain water safely away from electrical areas. TANK INTEGRITY: Never use pipe wrenches on elements – the tank flange cracks easily. Over-tightening is the #1 DIY mistake.
Troubleshooting Common Issues
Leaking at new element? Tighten slightly more – if persists, replace gasket. No hot water after repair? Verify power at breaker and thermostat settings (often reset to 120°F). Water smells/tastes metallic? Flush tank completely – sediment disturbed during repair. Breaker trips? Double-check wire connections aren't touching the tank.
Maintenance and Prevention
Flush tank annually to remove sediment (attach hose, drain until water runs clear). Test elements every 2 years with a multimeter (should read 10-16 ohms). Lower thermostat to 120°F – reduces scaling and saves energy. Install a powered anode rod to extend tank life.
Cost Analysis: DIY vs Professional
DIY Cost: Element ($15-$40) + gasket ($2) + wrench ($15) = $32-$57. Pro Cost: $250-$500. Savings: $200-$450. Tip: Replace both elements simultaneously – second element adds only $15 to DIY cost but $100+ to pro bill.
Related Plumbing Problems
If replacing elements doesn't fix issues: 1) Faulty thermostats (test with multimeter), 2) Tripped high-limit switch (red button under panel), 3) Sediment-clogged tank (requires thorough flushing), 4) Failing pressure relief valve (leaks from overflow pipe).
Frequently Asked Questions
Can I replace just one element or should I do both?
Do both! Elements wear at similar rates. Since the tank is already drained, replacing both saves future headaches. The lower element works hardest and often fails first, but the upper isn't far behind.
How do I know if it's the element or thermostat?
Test elements with a multimeter (set to ohms). Disconnect wires first. Good elements show 10-16Ω; infinite resistance means it's dead. If elements test fine, suspect thermostats. No power to element? Likely a tripped thermostat reset button (red switch under panel).
Why is my new element not working after installation?
Three common culprits: 1) Power restored before tank fully refilled (burned new element instantly), 2) Thermostat wasn't reset (check for tripped high-limit switch), or 3) Air lock in pipes (run hot water from all faucets for 5 minutes). Always verify tank is full before powering on!